Thermocookery

menu icon
go to homepage
  • About Me
  • Recipes
  • Collaborate

subscribe
search icon
Homepage link
  • About Me
  • Recipes
  • Collaborate

×
Home » Page Layouts

Slow Cooker Baked Beans With Bacon Recipe

Slow cooker baked beans with bacon are an easy, hearty side dish made with simple ingredients. Great for lunch, dinner, or meal prep.

A white bowl filled with Baked Beans With Bacon and pieces of meat sits on a dark purple napkin, with two forks placed on the side of the bowl and a sprig of parsley in the background.

The search for perfect baked beans is finally over thanks to my slow cooker. I've been trying to work with canned versions for years and I never achieved that homemade taste I remembered from childhood. These slow cooker baked beans with bacon finally gave exactly what I'd been missing.

That first spoonful brought me right back to summer picnics and family get togethers when I was 9. Except now, I could create the same deep, complex flavor with just a handful of pantry staples and barely 15 minutes of hands-on time.

I made this recipe a few summers ago, when I was determined to look for shortcuts that didn't sacrifice quality. Letting the slow cooker create that long-simmered flavor is perfect if you have plenty of other things to do for the day. It's also great for summer, when you don't want to stand at the stovetop.

The kidney beans absorb the sweet-tangy sauce, the bacon gives the smoky essence, and the Worcestershire sauce and mustard add depth that makes people wonder and ask for your secret ingredient.

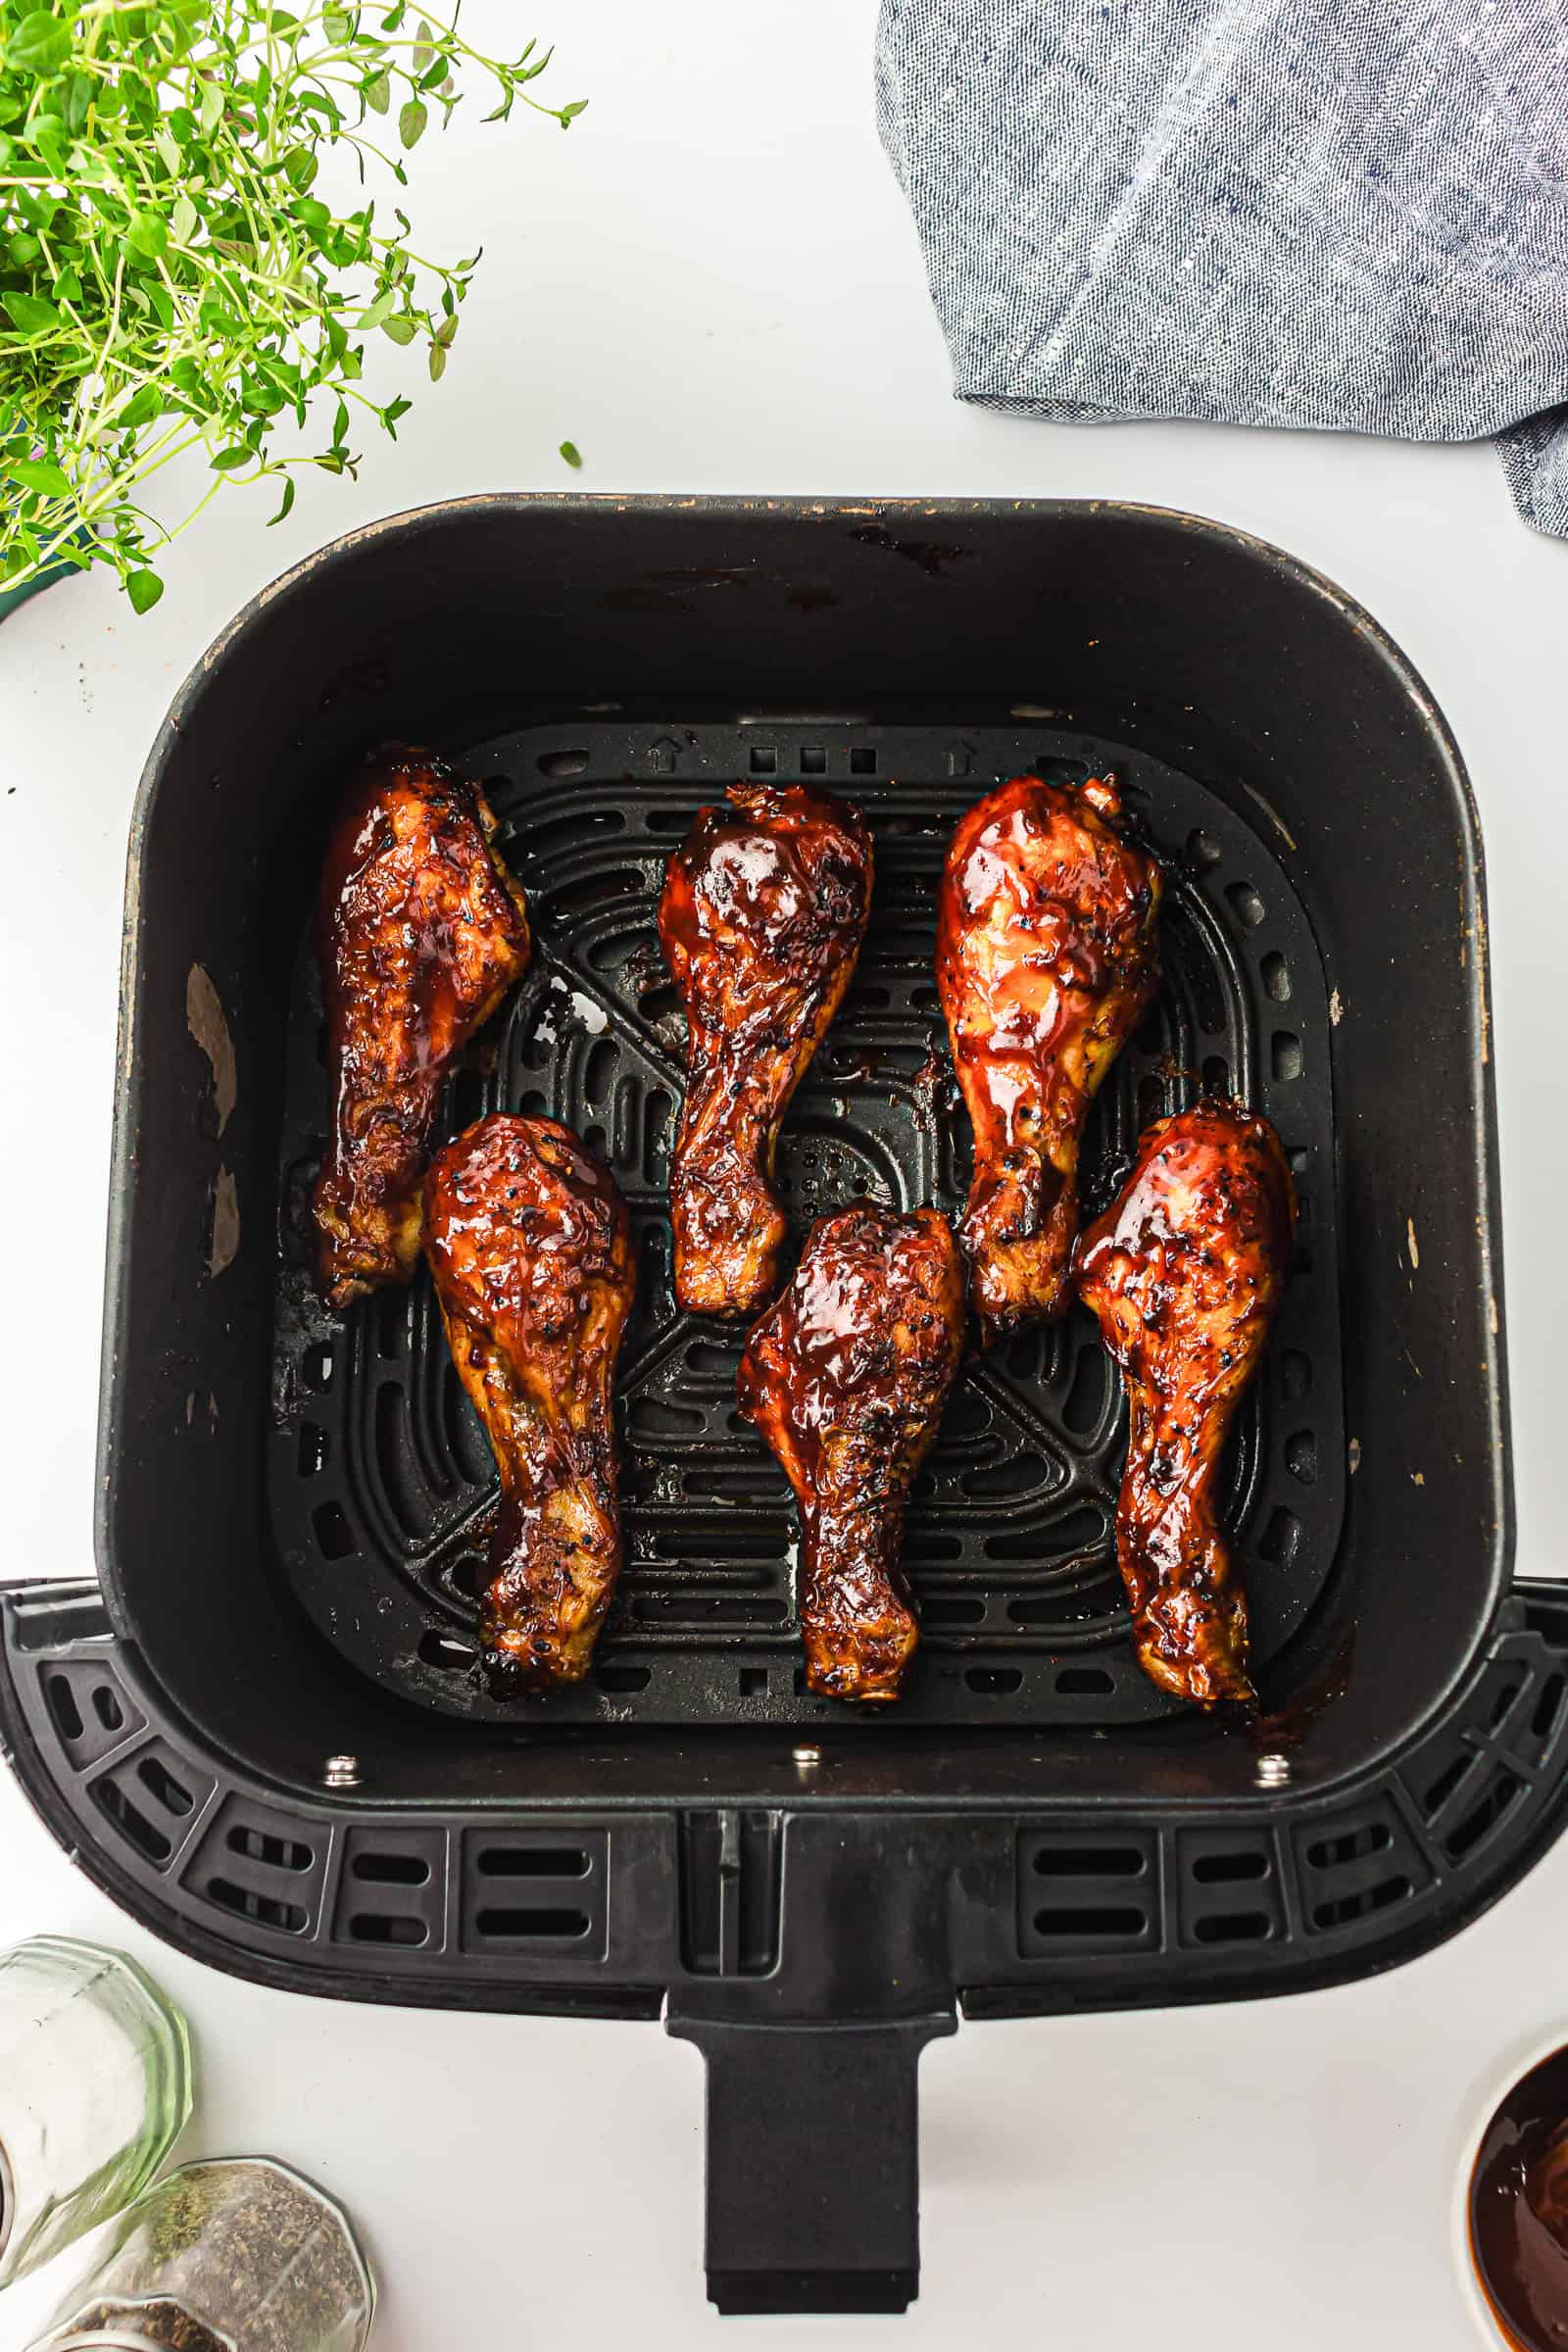
These beans have become my potluck signature dish, the one friends specifically request I bring to a BBQ night. They pair so well with crispy and juicy air fryer turkey thighs for an effortless dinner that feels intentional rather than thrown together. On our vegetarian nights, I serve them with crispy air fryer tofu for a meatless meal that still satisfies hearty appetites.

I've tried making it with different types of beans depending on what's available in my pantry, adjusted the sweetness based on who's coming to dinner, and even forgotten to add ingredients until halfway through cooking (it happened one time and yet it still turned out delicious!) The recipe is reliable but flexible enough to make your own, I sometimes double the recipe so I can have more for the whole week.

They fit seamlessly into both everyday meals and special occasions. My husband insists I make it for our Father's Day BBQ, and it goes well with chicken and steak. If you're looking for a reliable dish that's perfect for dinner or a special event, this is a great recipe to try and I'm confident it will probably have a permanent spot in your rotation.

Ingredients

An overhead view of small bowls with ingredients for Slow Cooker Baked Beans With Bacon—kidney beans, chopped bacon, onion, brown sugar, tomato sauce, spices, and more—arranged on a white surface for this delicious slow cooker recipe.
  • Bacon – Adds a rich, smoky flavor and crunch. I use about 8-10 strips of crispy bacon, crumbled, to enhance the dish with depth.
  • Red kidney beans – These give a hearty texture and absorb the flavors from the sauce well. I prefer using canned beans for convenience, though you can cook them from dried if you have time.
  • Onion – The sweetness of finely chopped onion helps balance the flavors in the sauce. I usually use yellow onions because they melt into the sauce better.
  • Tomato puree (passata) – This smooth and rich tomato base is key to the sauce’s consistency. I always go for passata because it has a smooth texture and no seeds.
  • Apple cider vinegar – Adds a subtle tang that balances the sweetness from the brown sugar. I've used white vinegar in a pinch, but the apple cider vinegar adds a deeper flavor.
  • Worcestershire sauce – Brings a savory umami flavor with a hint of tang, which rounds out the overall flavor profile. It’s an essential ingredient I never skip, as it adds depth to the dish.
  • Brown sugar (demerara) – The brown sugar enhances the dish with a subtle sweetness. I use demerara for a richer, molasses-like flavor, which gives the beans a slight caramelized edge.
  • Garlic paste – This adds a smooth, rich garlic flavor that blends seamlessly into the sauce. Fresh garlic paste makes a huge difference compared to powdered garlic.

See the recipe card for exact quantities.

Step-by-step Instructions

A close-up of a bowl filled with red kidney beans, chopped onions, and a thick tomato-based sauce, reminiscent of Slow Cooker Baked Beans or a hearty chili stew.

This slow cooker baked beans recipe is a simple yet flavorful dish, combining tender kidney beans, crispy bacon, and a tangy-sweet sauce. Perfect for meal prep or as a side dish to any main course, these beans cook low and slow to develop rich, savory flavors. 

Prepare the Ingredients

Chopped onions are being sautéed in a nonstick frying pan with a wooden handle on a light-colored surface, perfect as a base for a hearty baked beans recipe.

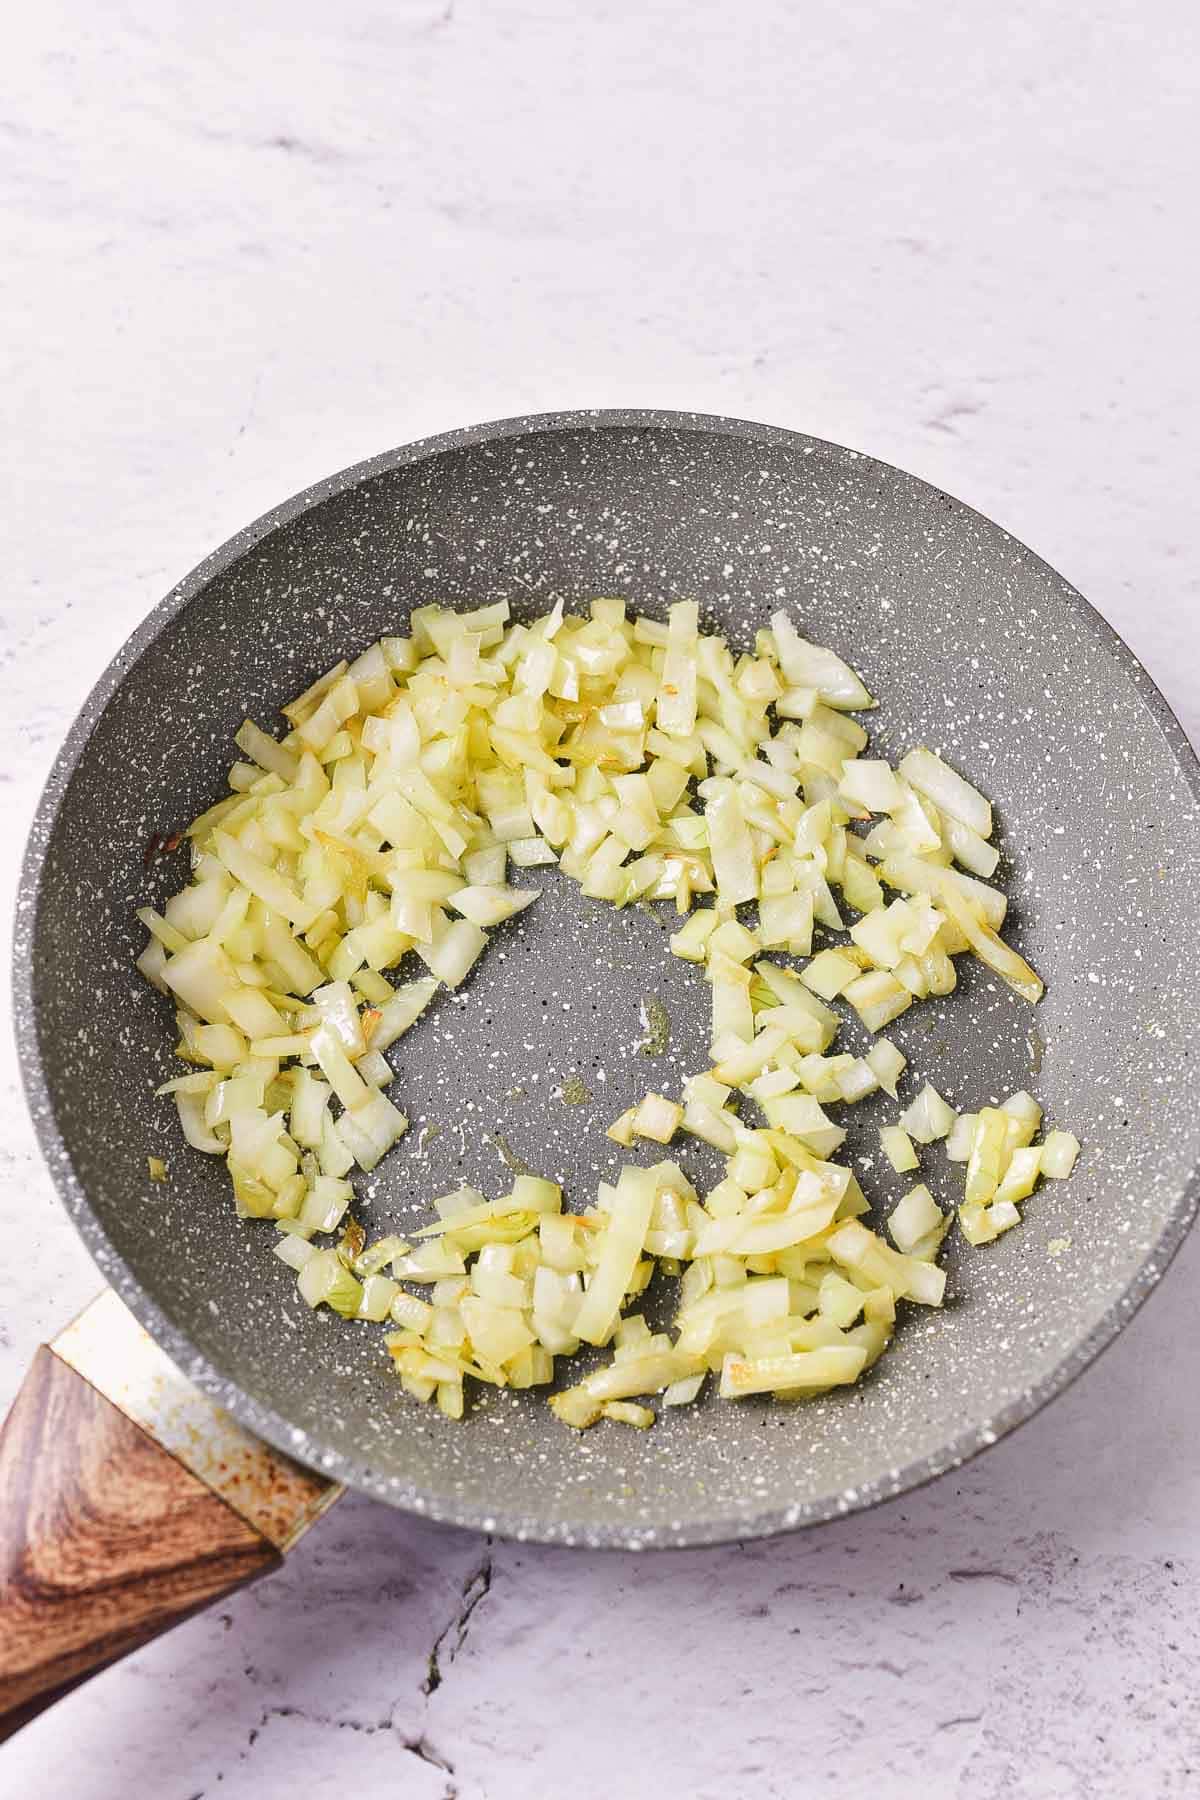
Start by heating olive oil in a frying pan over low heat. Add the finely chopped onion and cook for about 5 minutes, stirring occasionally. The goal here is to soften the onion and bring out its natural sweetness. Once translucent, remove from heat.

Cook the Bacon

Cook bacon until crispy. You can use your preferred method: in a pan without oil, in an air fryer at 360°F for about 8 minutes, or in the oven. Once cooked, allow the bacon to cool slightly before crumbling it into small pieces. This adds both texture and savory depth to the dish.

Combine the Beans and Seasonings

A glass bowl holds ingredients for Baked Beans With Bacon—kidney beans, chopped onions, tomato sauce, bacon pieces, mustard, and seasoning—with a metal spoon inside. Perfect for starting your favorite Slow Cooker Recipe. The ingredients are not yet mixed.
A glass bowl filled with a mixture of slow cooker baked beans, chopped onions, and sauce sits on a light-colored surface. A white spoon rests inside the bowl.

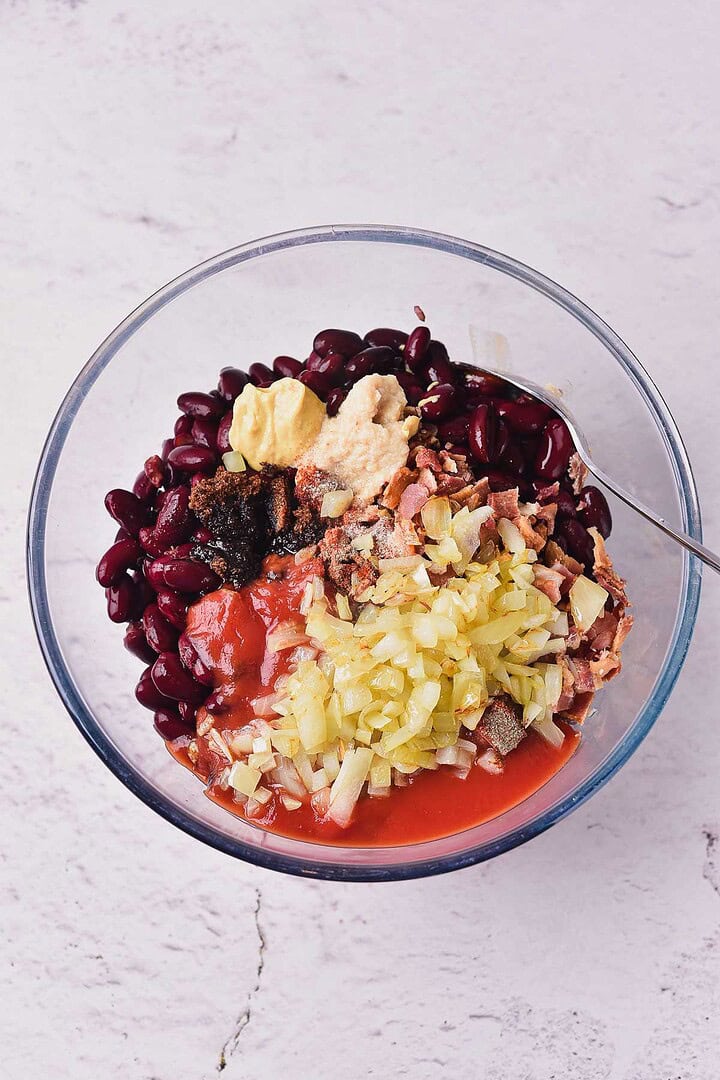
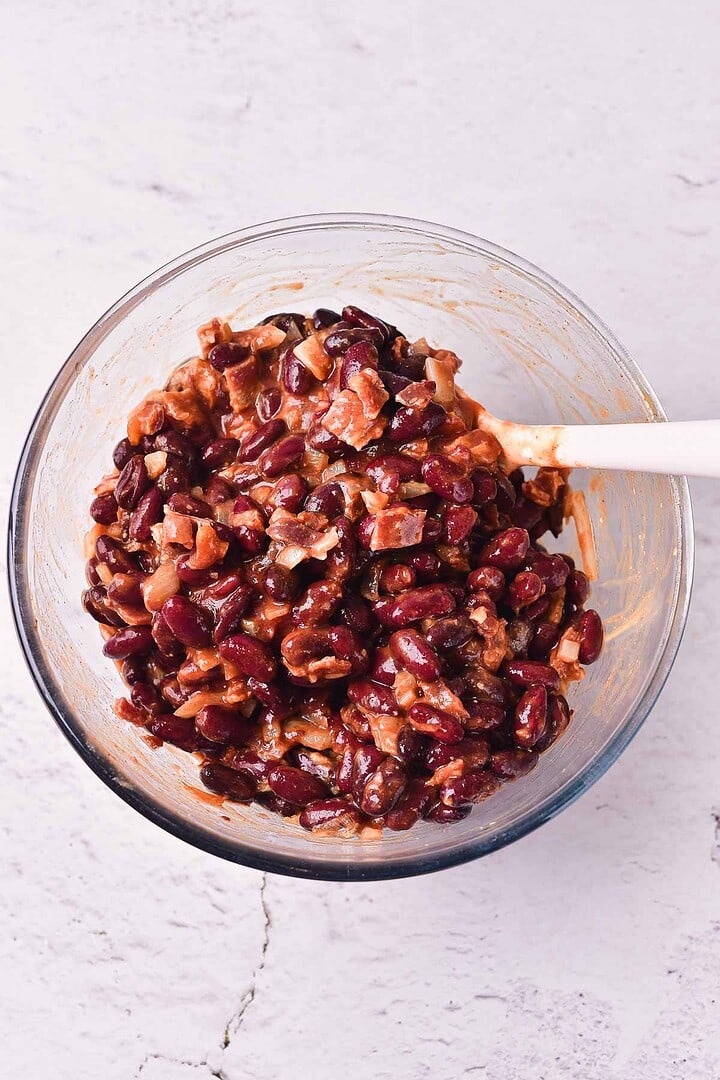
In a large mixing bowl, combine the drained kidney beans with the cooked onions and crumbled bacon. Add the tomato puree, brown sugar, garlic paste, apple cider vinegar, Dijon mustard, and Worcestershire sauce. Stir well to mix the ingredients thoroughly. Season with salt, paprika, and black pepper, adjusting to taste. This combination of ingredients forms the base of your baked beans and gives them their rich, savory flavor.

Cook the Beans

A slow cooker filled with a hearty stew of red kidney beans and savory meat in a rich reddish-brown sauce, perfect for a comforting Slow Cooker Baked Beans dish, set on a wooden surface.

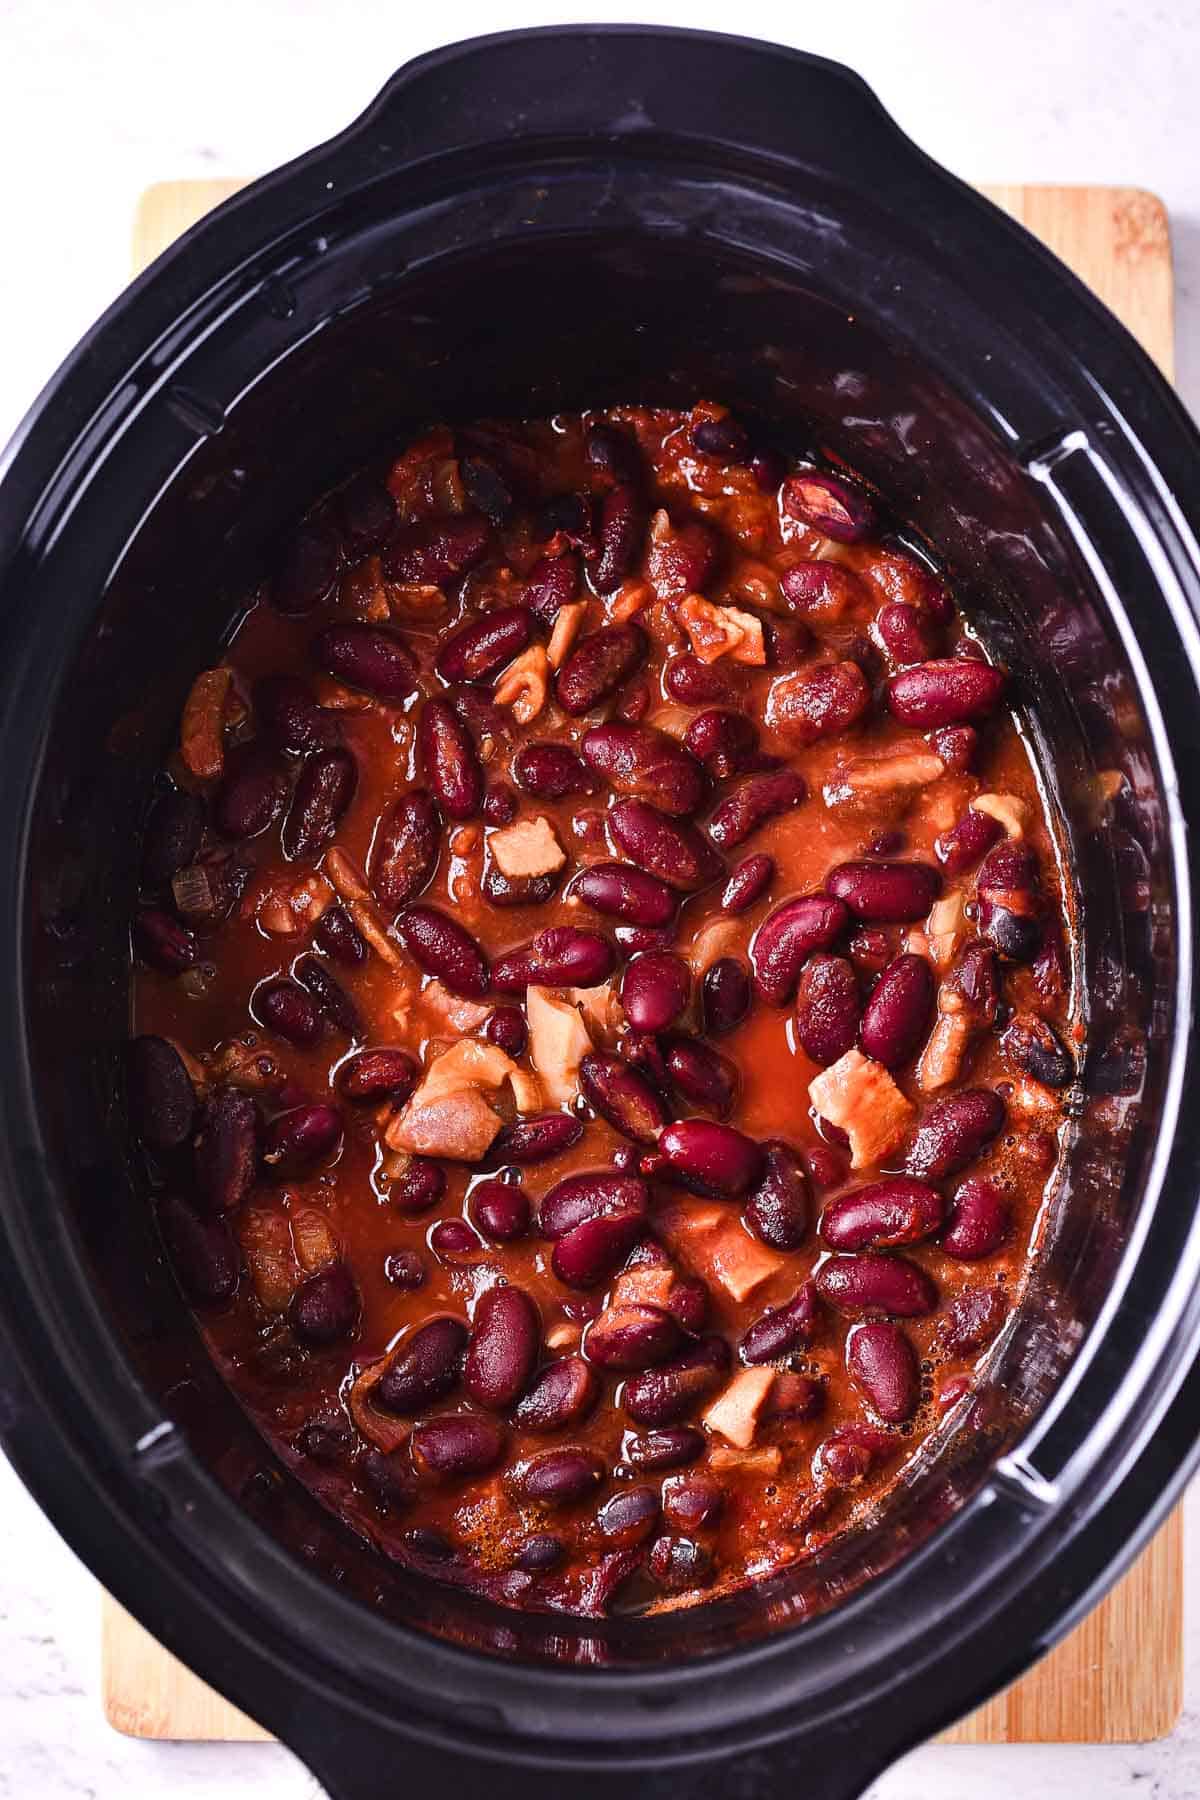
Transfer the bean mixture to your slow cooker. If the mixture looks too thick, add a little more tomato puree until you reach your desired consistency. This ensures the beans cook evenly and are coated with the flavorful sauce. Cover the slow cooker with its lid and set it to cook on High for 3 hours.

Serving

A white bowl filled with slow cooker baked beans in a tomato-based sauce sits on a dark textured cloth, with green herbs blurred in the background.

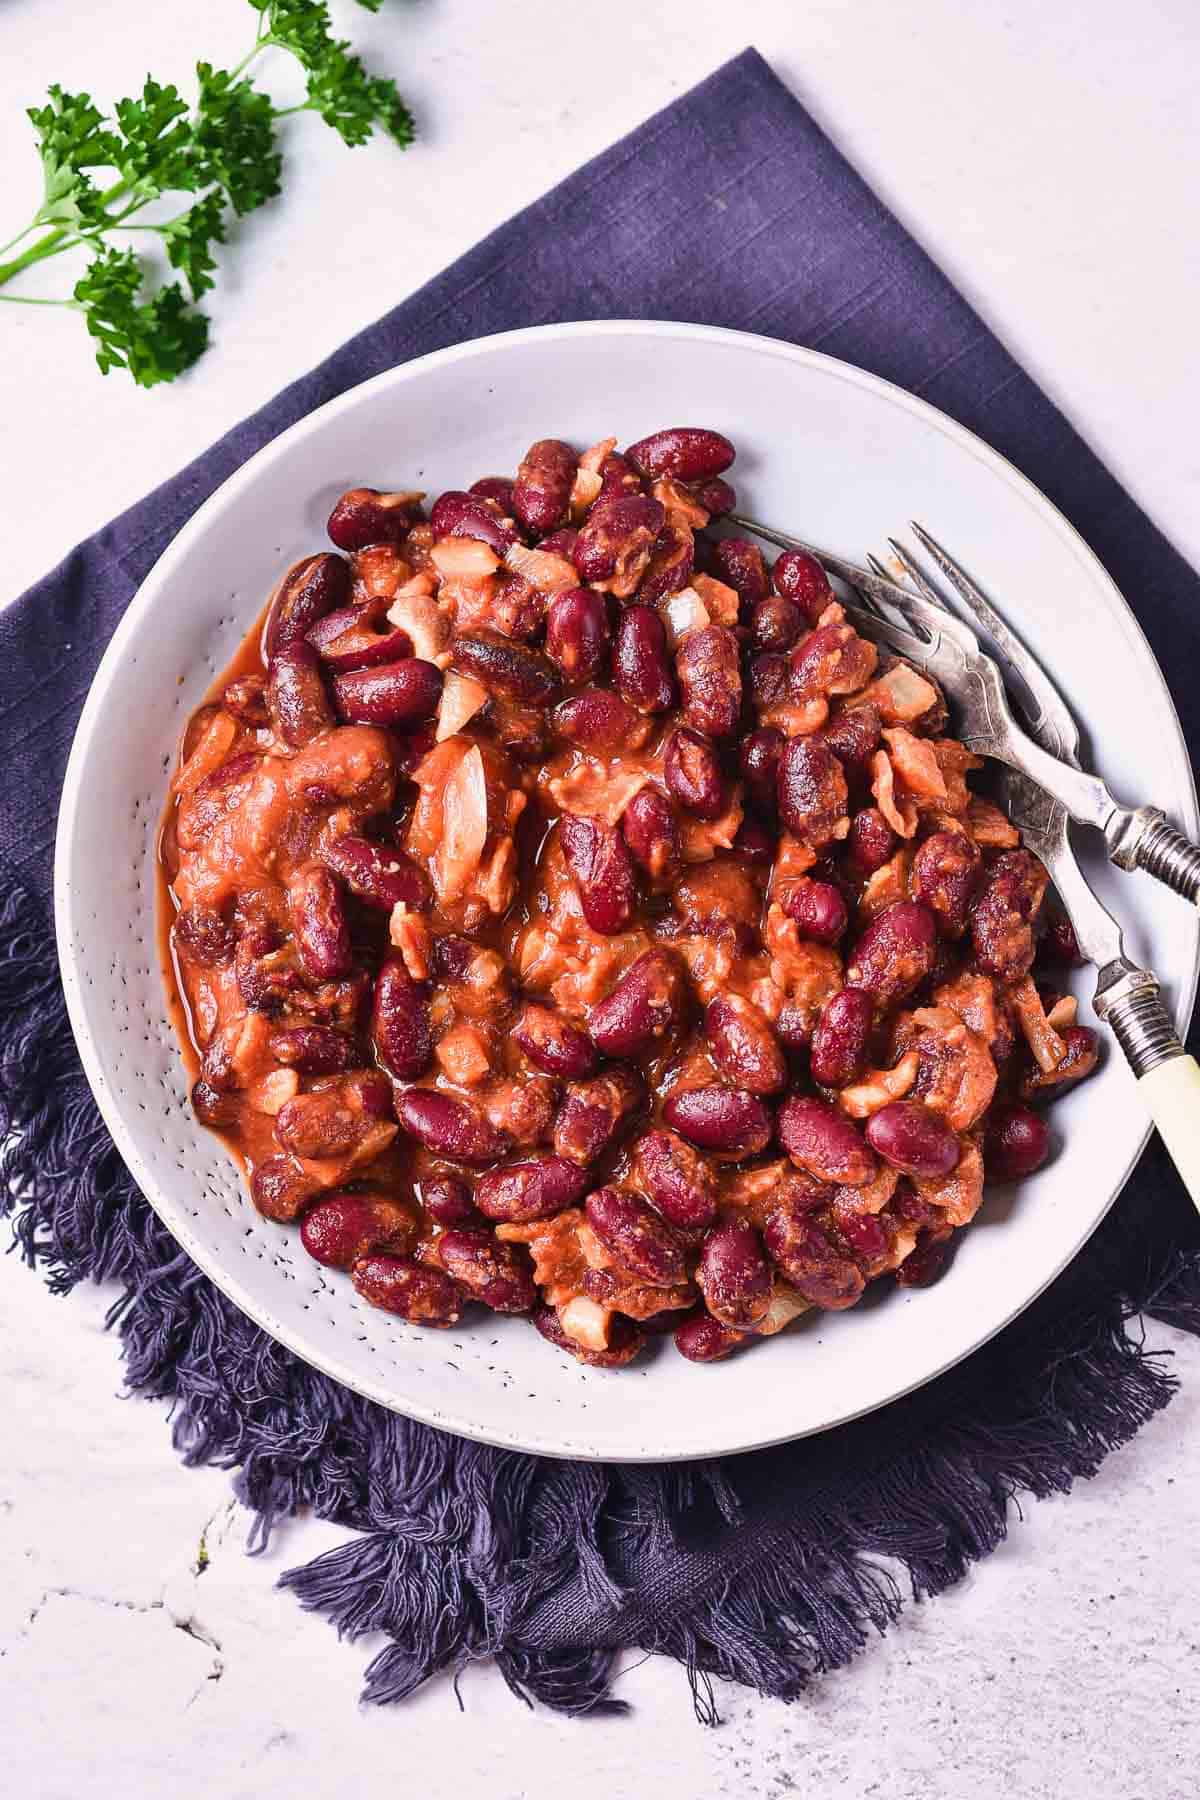
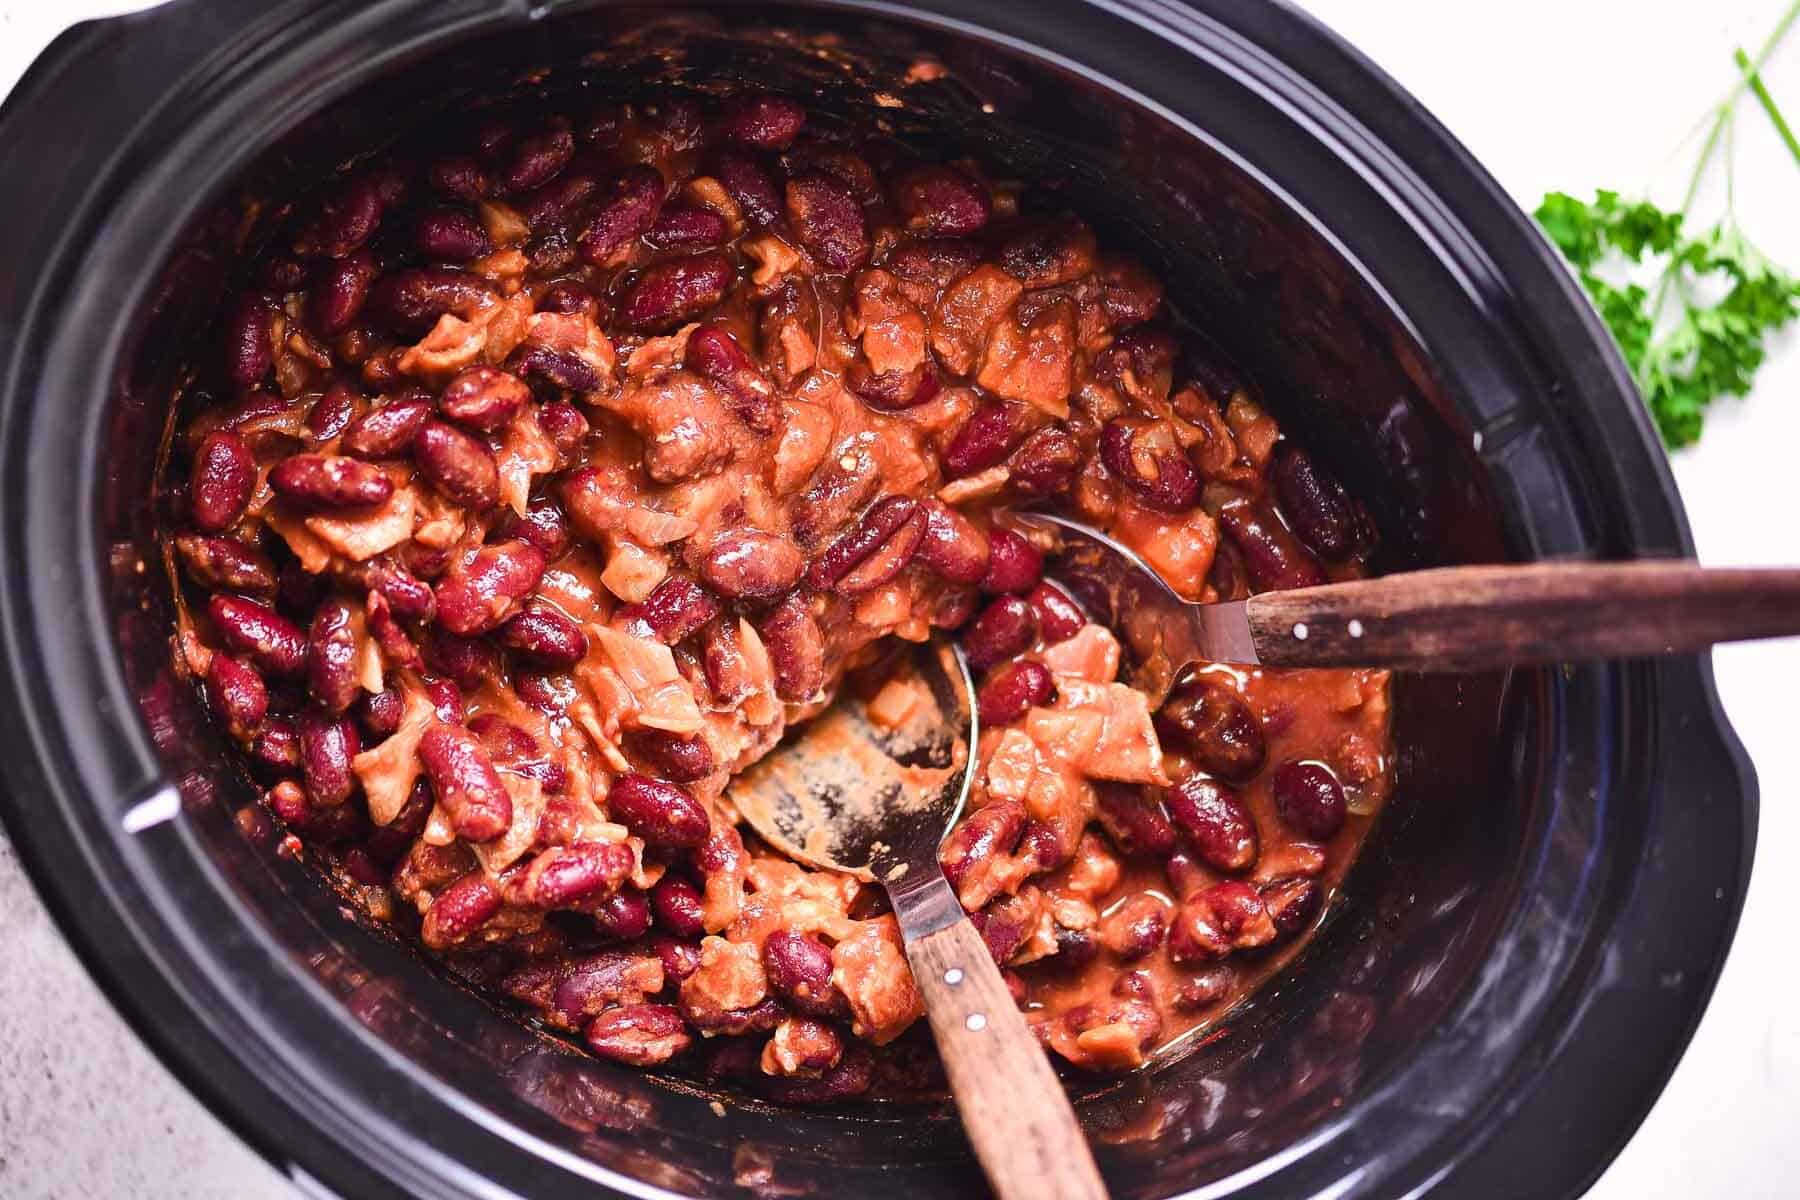
After 3 hours, your slow-cooked baked beans are ready to serve. These beans make a great standalone dish or can be served with toast for a simple meal. Garnish with fresh herbs for added flavor and color, if desired.

Storage

A slow cooker filled with chili containing red kidney beans, chunks of meat, and sauce brings cozy comfort. Two wooden-handled serving spoons rest inside, while a sprig of parsley sits on the white countertop—perfect inspiration for a hearty bacon recipe.

Allow the slow cooker baked beans to cool to room temperature before transferring them to an airtight container. Leftovers can be refrigerated for up to 4 days. For longer storage, you can freeze the beans for up to 3 months. To reheat, simply thaw in the refrigerator overnight and warm on the stove over low heat, adding a splash of water or broth if necessary to reach your desired consistency.

Top Tips

Drain the beans well: To avoid a soupy texture, make sure to drain the canned beans thoroughly before adding them to the slow cooker.

Use smoked paprika: For a deeper, smokier flavor, swap regular paprika with smoked paprika. It adds a great depth to the beans without the need for extra ingredients.

Make ahead: This dish can be prepared ahead of time and reheated. In fact, it often tastes even better the next day as the flavors continue to meld together.

Recipe

Tried and loved this recipe? Please leave a 5-star review below! Your reviews mean a lot to me, so if you've got any questions, please let me know in a comment.

A white bowl filled with Slow Cooker Baked Beans in a thick reddish-brown sauce, with visible pieces of onion and bacon, placed on a dark cloth napkin.
Print Recipe
5 from 1 vote

Slow Cooker Baked Beans With Bacon Recipe

Slow cooker baked beans with bacon—an easy, hearty side dish made with simple ingredients. Great for lunch, dinner, or meal prep.
Prep Time15 minutes mins
Cook Time3 minutes mins
Total Time18 minutes mins
Course: Main
Cuisine: American
Keyword: slow cooker baked beans with bacon
Servings: 5 servings
Calories: 294kcal
Author: Ksenia Prints

Equipment

  • Slow cooker (crockpot)
  • frying pan
  • Mixing Bowl
  • Measuring cups and spoons
  • Knife and cutting board

Ingredients

  • 1 cup bacon cooked and crumbled (about 8-10 strips)
  • 3 cans 15 oz each red kidney beans, drained
  • 1 medium onion finely chopped
  • 1 tablespoon olive oil
  • 2 cups tomato puree passata
  • 1 tablespoon brown sugar demerara
  • 1 tablespoon garlic paste
  • 1 tablespoon apple cider vinegar
  • 1½ teaspoons Dijon mustard
  • 2 teaspoons Worcestershire sauce
  • ⅓ teaspoon salt
  • ⅓ teaspoon paprika
  • ⅓ teaspoon black pepper

Instructions

  • Heat the olive oil in a frying pan over low heat. Add the finely chopped onion and cook for about 5 minutes, stirring occasionally until the onion is soft and translucent.
  • Cook the bacon until crispy using your preferred method: in a pan without oil, in an air fryer (8 minutes at 360°F), or in the oven. Once cooled, crumble the bacon into small pieces.
  • In a large mixing bowl, combine the drained kidney beans, cooked onions, and crumbled bacon.
  • Add the tomato puree, brown sugar, garlic paste, apple cider vinegar, Dijon mustard, and Worcestershire sauce to the bowl.
  • Season with salt, paprika, and black pepper, then stir everything together until well combined.
  • Transfer the bean mixture to your slow cooker. If the mixture seems too thick, add a little more tomato puree until you reach your desired consistency.
  • Cover the slow cooker with its lid and set it to cook on High for 3 hours.
  • After 3 hours, the baked beans are ready to serve. They can be enjoyed on their own, with toast, or garnished with fresh herbs.

Notes

Make sure to drain the canned beans well to avoid a soupy texture
For a smoky flavor, use smoked paprika instead of regular paprika
This dish can be prepared ahead and reheated - it often tastes even better the next day
If you don't have a slow cooker, you can simmer the mixture in a covered pot on the stove over low heat for about 1 hour, stirring occasionally
Leftovers can be refrigerated for up to 4 days or frozen for up to 3 months
Enjoy your homemade bacon baked beans!

Nutrition

Calories: 294kcal | Carbohydrates: 16g | Protein: 8g | Fat: 22g | Saturated Fat: 7g | Polyunsaturated Fat: 4g | Monounsaturated Fat: 11g | Trans Fat: 0.1g | Cholesterol: 31mg | Sodium: 548mg | Potassium: 630mg | Fiber: 3g | Sugar: 9g | Vitamin A: 557IU | Vitamin C: 14mg | Calcium: 39mg | Iron: 2mg

Cheesy Chicken and Potato Bake

This comforting chicken and potato bake with a creamy, cheesy finish makes for an easy, satisfying dinner all in one dish.

A close-up of a serving of cheesy potato casserole being lifted from a glass baking dish, showing visible layers of potatoes, creamy filling, and melted browned cheese on top.

I used to think that comfort food has to take long hours in the kitchen with complicated steps, but this cheesy chicken and potato bake thankfully proves that it doesn't have to be that way. Layers of thinly sliced potatoes and tender chicken are blanketed by cheddar cheese is a dish straight out of grandma's recipe book, an embodiment of true classic comfort food. It's incredibly moist with a buttery rich sauce that you'll want to spoon onto your plate before it runs out.

While this one-dish meal is already hearty and satisfying on its own, I often serve it with green side dishes like crispy air fryer kale chips or roast air fryer asparagus to bring some color and extra nutrition to the plate. The contrast between the creamy, cheesy casserole and the crisp vegetables creates a balanced meal that's really satisfying.

This casserole has earned its place in our regular dinner rotation with my other judge-approved kids' favorites like cheesy zucchini casserole and cheesy cabbage casserole with cracker topping. I've found that cheese is the winning piece when it comes to getting vegetables onto my children's plates... something about that golden, bubbly, and cheesy topping makes even the pickiest kids willing to give it a try. I might just add cheese on top of every vegetable if this is the hack that's going to solve everything!

I love how it only takes 15 minutes of prep, and the oven does all the work. I prep it the night before, and while my kids are telling me about their day and playing, it bakes in the oven. After the daily debrief with my kids, the dish is ready to serve.

The layering technique might seem intimidating and complicated at first glance, but it's actually really simple and makes sure that every bite has the perfect balance of potato, chicken, and cheese.If you're feeding a hungry family on a weeknight, bringing a comforting dish to a potluck, or just answering your kids' request for a chicken meal, this casserole checks out all those boxes.

And the best thing? The leftovers are perfect for next-day lunches or meal prep, and it's become a favorite in our home. With simple ingredients and hearty flavor, I’m always happy to make this chicken and potato bake again and again.

Ingredients

A raw chicken breast, a whole potato, shredded cheese, mayonnaise, olive oil, and three measuring spoons with spices are arranged on a white textured surface.
  • Russet potatoes – These potatoes are perfect for baking or mashing because of their starchy texture, which gives a fluffy interior when cooked. I’ve tried other potatoes, but russets hold up best in this recipe.
  • Boneless, skinless chicken breast – The lean protein here keeps the dish lighter. I’ve substituted with chicken thighs for added flavor, but the breast keeps it juicy without being greasy.
  • Mayonnaise – Adds a creamy base to the dish. I've used Greek yogurt as a substitute for a tangier, lighter version, but mayonnaise gives the best creamy texture.
  • Shredded cheddar cheese – This cheese adds a sharp, melty texture that binds the ingredients together. I’ve also used a mix of mozzarella and cheddar for a more melty outcome, but cheddar offers a robust flavor.

See the recipe card for exact quantities.

Step-by-step Instructions for this cheesy chicken and potato bake

A slice of cheesy potato casserole garnished with fresh herbs is served on a white plate with a fork. A cherry tomato and mixed greens are on the side, and a glass baking dish with more casserole is partially visible.

This cheesy chicken and potato bake is a comforting, easy-to-make meal that combines tender chicken, crispy potatoes, and melted cheese into a dish that's perfect for dinner.

Preheat the Oven

Start by preheating your oven to 375°F (190°C). The recipe has been adjusted for a standard US oven, but you can use a thermometer to make sure your oven is at the right temperature.

Prepare the Potatoes

Wash the potatoes thoroughly, then peel them completely. Slice them very thinly, about ⅛ inch thick. This helps them cook evenly and makes them easy to layer.

Coat the Baking Dish

Take a large baking dish and coat the bottom with olive oil. You can do this by spreading the oil evenly with your fingers or using a paper towel. This helps the potatoes and chicken not to stick to the dish.

Layer the Potatoes

A glass baking dish filled with thin, evenly sliced raw potatoes, layered and sprinkled with black pepper, on a light-colored countertop.

Arrange ⅓ of the potato slices in an even layer at the bottom of the baking dish. Make sure they slightly overlap. Season the first layer with about ½ teaspoon of salt and ¼ teaspoon of pepper. This gives the base layer a good amount of flavor.

Prepare the Chicken

To prepare the chicken, place the chicken breasts between two pieces of plastic wrap or parchment paper. Using a meat mallet or rolling pin, gently pound the chicken to about ½ inch thick. Slice the flattened chicken into strips about 2 inches wide.

Add the First Chicken Layer

A glass baking dish containing raw, thinly sliced chicken breast pieces arranged in a single layer and sprinkled with black pepper and dried herbs on a white surface.
Raw chicken breast fillets laid flat in a glass baking dish, seasoned with herbs and pepper, and drizzled with lines of mayonnaise on top. The dish is placed on a white surface.

Place half of the chicken strips in a single layer over the potatoes. Season the chicken with ½ teaspoon of salt, ¼ teaspoon of pepper, and ½ teaspoon of the dried herbs. Then spread about ⅓ cup of mayonnaise evenly over the chicken. This layer will keep the chicken moist as it cooks.

Layer More Potatoes

A glass baking dish filled with thinly sliced potatoes layered over raw ingredients, sprinkled with dried herbs, on a light-colored surface.

Add another ⅓ of the potato slices on top of the chicken, slightly overlapping. Sprinkle with ½ teaspoon salt and ¼ teaspoon pepper for seasoning.

Add the Final Chicken Layer

Place the remaining chicken strips over the second layer of potatoes. Sprinkle the last bit of salt, pepper, and herbs. Spread another ⅓ cup of mayonnaise evenly over the chicken.

Top with Remaining Potatoes and Mayonnaise

A glass baking dish filled with shredded cheese on top of an unbaked casserole, set on a light-colored surface.

Place the final layer of potato slices over the chicken. Spread the remaining mayonnaise over the top of the potatoes to add creaminess and flavor.

Cover and Bake

A rectangular glass baking dish filled with a casserole topped with a layer of melted, golden-brown cheese, viewed from above on a light-colored surface.

Cover the baking dish tightly with aluminum foil. Bake in the preheated oven for 45 minutes. This helps to steam the potatoes and chicken and start softening them.

Check and Adjust Baking Time

After 45 minutes, carefully remove the foil. Be cautious of hot steam. Pierce the potatoes with a fork to check if they're tender. If they’re still firm, cover them back with foil and bake for another 15-20 minutes. The potatoes should be tender when done.

Add Cheese and Bake Again

A glass baking dish filled with a baked casserole topped with browned, melted cheese sits on a light surface next to a folded gray cloth and a wooden utensil.

Once the potatoes are tender, remove the foil if you haven’t already. Sprinkle the shredded cheddar cheese evenly over the top. Return the dish to the oven, uncovered, and bake for another 15 minutes. This allows the cheese to melt and become bubbly and slightly browned.

Rest and Serve

A slice of chicken lasagna with a golden cheese topping is served on a white plate, garnished with a sprig of green herbs and a cherry tomato. A glass baking dish with more lasagna and a salad are in the background.

When the casserole is done, remove it from the oven and let it rest for 5-10 minutes before slicing and serving. This allows the dish to settle and makes it easier to cut into portions.

Storage

A rectangular glass baking dish filled with baked cheesy potato gratin, topped with melted and slightly browned cheese, sits on a white surface next to a wooden spoon and a folded grey cloth napkin.

Leftover cheesy chicken and potato bake can be stored in an airtight container in the fridge for up to 3 days. If you want to freeze it, let it cool completely and then wrap it tightly with plastic wrap and aluminum foil. Freeze for up to 3 months. To reheat, bake from frozen at 375°F for about 25-30 minutes or until hot throughout. You can also microwave individual portions for 2-3 minutes.

Top Tips

Check potato doneness: When testing the potatoes, make sure the fork easily pierces through without resistance to make sure they're properly cooked.

Flatten chicken without a mallet: If you don't have a meat mallet, use a heavy can or the bottom of a sturdy pan to flatten the chicken evenly.

Boost flavor with garlic: For extra flavor, add a minced garlic clove to the mayonnaise before spreading it on the chicken layers.

Recipe

Tried and loved this recipe? Please leave a 5-star review below! Your reviews mean a lot to me, so if you've got any questions, please let me know in a comment.

A slice of baked chicken lasagna with a golden, melted cheese topping is served on a white plate. A fork rests beside the lasagna, and a halved cherry tomato and herbs garnish the plate.
Print Recipe
No ratings yet

Cheesy Chicken and Potato Bake

A comforting chicken and potato casserole with a creamy, cheesy finish. An easy, satisfying dinner all in one dish.
Prep Time15 minutes mins
Cook Time1 hour hr 20 minutes mins
Course: Main
Cuisine: American
Keyword: cheesy chicken and potato bake
Servings: 6 servings
Calories: 572kcal
Author: Ksenia Prints

Equipment

  • Large baking dish (9x13 inch)
  • Vegetable peeler
  • Sharp knife
  • Meat mallet or heavy rolling pin
  • Aluminum foil

Ingredients

  • 2 pounds russet potatoes
  • 1 pound boneless skinless chicken breast
  • 1 cup mayonnaise
  • 1 tablespoon olive oil
  • 1 cup shredded cheddar cheese
  • 2 teaspoons salt
  • 1 teaspoon black pepper
  • 2 teaspoons dried herbs any combination of oregano, basil, and thyme

Instructions

  • Preheat your oven to 375°F (the recipe has been adjusted from 370°F for a standard US oven setting).
  • Wash the potatoes, then peel them completely. Using a sharp knife, slice the potatoes very thinly (about ⅛ inch thick).
  • Coat the bottom of a large baking dish with the olive oil, spreading it evenly with your fingers or a paper towel.
  • Arrange ⅓ of the potato slices in an even layer on the bottom of the dish, slightly overlapping them. Sprinkle with about ½ teaspoon salt and ¼ teaspoon pepper.
  • Place the chicken breasts between two pieces of plastic wrap or parchment paper. Using a meat mallet or heavy rolling pin, gently pound the chicken until it's about ½ inch thick. Slice the flattened chicken into strips about 2 inches wide.
  • Arrange half of the chicken strips in a single layer on top of the potatoes. Sprinkle with ½ teaspoon salt, ¼ teaspoon pepper, and ½ teaspoon of the dried herbs. Spread about ⅓ cup mayonnaise evenly over the chicken layer.
  • Add another ⅓ of the potato slices, sprinkle with ½ teaspoon salt and ¼ teaspoon pepper.
  • Place the remaining chicken strips on top, season with the remaining salt, pepper, and herbs. Spread another ⅓ cup mayonnaise over this chicken layer.
  • Arrange the remaining potato slices on top. Spread the remaining mayonnaise over the potatoes.
  • Cover the baking dish tightly with aluminum foil. Bake in the preheated oven for 45 minutes.
  • After 45 minutes, carefully remove the foil (watch out for hot steam). Pierce the potatoes with a fork to check if they're tender. If the potatoes are still firm, cover again with foil and bake for an additional 15-20 minutes.
  • Once the potatoes are tender, remove the foil if you haven't already, and sprinkle the shredded cheddar cheese evenly over the top.
  • Return the uncovered dish to the oven and bake for 15 more minutes, until the cheese is melted and starting to brown.
  • Remove from the oven and let rest for 5-10 minutes before cutting into portions and serving.

Notes

When testing if potatoes are done, the fork should easily pierce through without resistance
You can use pre-shredded cheese for convenience
If you don't have a meat mallet, you can also use a heavy can or the bottom of a sturdy pan to flatten the chicken
For extra flavor, add a minced garlic clove to the mayonnaise before spreading
Enjoy your homemade cheesy chicken and potato casserole!

Nutrition

Calories: 572kcal | Carbohydrates: 28g | Protein: 25g | Fat: 40g | Saturated Fat: 9g | Polyunsaturated Fat: 18g | Monounsaturated Fat: 11g | Trans Fat: 0.1g | Cholesterol: 82mg | Sodium: 1180mg | Potassium: 943mg | Fiber: 2g | Sugar: 1g | Vitamin A: 229IU | Vitamin C: 9mg | Calcium: 168mg | Iron: 2mg

Thai Red Curry Noodle Soup Recipe

Try this aromatic and easy Thai red curry noodle soup recipe! A flavorful curry noodle soup that's quick to make with authentic Thai flavors.

A bowl of Thai Red Curry noodle soup with tofu, bok choy, and carrots sits in front of a pot of soup. A cutting board with chopped greens and a knife is in the background, alongside a small brown bowl of herbs.

My relationship with Thai food started in my twenties with $9.99 pad thai takeout and slowly grew into a cooking habit that had me searching specialty markets for galangal and kaffir lime leaves. But even with all that enthusiasm, most Thai dishes stayed in the “weekend project” category—long ingredient lists and multi-step cooking processes made them hard to fit into everyday life.

Then I came across a Thai red curry noodle soup recipe that changed the game. It had all the bold, layered flavors I loved, but it came together fast—no more effort than a typical weeknight meal.

After watching hours of cooking videos, I found an old clip of a chef explaining how their favorite curry paste as a hack for the homemade curry professional Thai kitchens use as their foundation. Instead of building every dish from scratch, the soup relies on this concentrated flavor base. It starts with my favorite store-bought red curry paste, which stands in for a dozen ingredients and hours of prep, without sacrificing complexity.

Compared to past Thai recipes I’ve made—like thai tofu steaks that required marinating, pressing, and several steps—this soup is refreshingly simple. The process is clear, the flavors build naturally, and each bite has texture, brightness, and depth.

It also shifted the way I think about global cooking. Recipes like zucchini rolls showed me that keeping traditional flavors doesn’t mean you have to follow every traditional step. Once you understand the core ideas of a cuisine, it’s easier to find that balance between authenticity and practicality.

If you love Thai food but feel a little unsure about making it at home, this soup is a great starting point. It sticks to the essentials—sweet, sour, salty, spicy—but keeps things quick and approachable. After trying countless versions, this is the one I return to most. It’s easy, dependable, and always hits the spot.

Ingredients

Assorted ingredients on a white surface, perfect for a Thai Red Curry Noodle Soup recipe—including bok choy, tofu slices, noodles, carrots, onion, cilantro, soy sauce, tomato paste, ground ginger, two broths, and a bowl of oil.
  • Rice noodles (pad thai style) – The base for the soup, these noodles cook quickly and have a firm texture that holds up well in broth. I've tried thinner rice vermicelli before, but pad thai style noodles give a better bite and soak up the keep without becoming mushy.
  • Firm tofu – Cut into batons, tofu adds plant-based protein and a satisfying chew. Pressing it beforehand helps it hold shape during cooking. Occasionally, I swap tofu for tempeh for a nuttier flavor, but tofu remains my go-to for this soup’s texture.
  • Carrots – Thinly sliced for sweetness and slight crunch. They soften nicely in the simmering broth, balancing the spice of the curry paste. Sometimes I add bell peppers for extra color and sweetness.
  • Yellow onion – Wedged to release mild sweetness and aromatic depth. Using a smaller onion avoids overpowering the broth while still enhancing the overall flavor.
  • Baby bok choy – Adds fresh, leafy greens that cook quickly. Its mild bitterness contrasts the creamy coconut milk well. If bok choy isn't available, I use spinach or kale as alternatives.
  • Vegetable broth – The liquid base that carries all the flavors. I prefer homemade broth when possible for depth, but store-bought works fine. It keeps the soup light and savory.
  • Full-fat coconut milk – Key for creaminess and richness, it smooths the heat from the curry paste. I’ve tried light coconut milk, but it thins the soup too much.
  • Thai red curry paste – The main seasoning, bringing heat, depth, and authentic flavor. I’ve adjusted the amount based on spice preference, starting with less for mild heat.
  • Soy sauce or tamari – Adds saltiness and umami. Tamari is my choice when I want a gluten-free version without sacrificing flavor.
  • Rice vinegar – Balances the richness with a touch of acidity, brightening the broth. Sometimes I replace it with lime juice for a fresher note.

See the recipe card for exact quantities.

Step-by-step Instructions

A black cast iron pot filled with Thai Red Curry noodle soup, including sliced tofu, greens, and visible broth, sits on a black cloth with a wooden-handled utensil inside. A small plate with more tofu is partially visible nearby.

This thai red curry noodle soup combines creamy coconut milk, fragrant curry paste, and fresh vegetables for a comforting and flavorful meal. With tender tofu and perfectly cooked rice noodles, it’s a satisfying dish that comes together quickly and works well any time you want something nourishing and vibrant.

Prepare the Vegetables and Tofu

A brown cutting board with two piles of sliced vegetables: orange and yellow carrot rounds at the top, and sliced white onions at the bottom—perfect prep for a Thai Red Curry recipe. A small piece of onion is off to the side.
Halved baby bok choy, fresh with water droplets, arranged casually on a brown cutting board—perfect for adding to your next noodle soup or Thai red curry recipe.

Slice the carrots into half-inch rounds to make sure they cook evenly and soften without falling apart. Cut the onion into half-inch wedges to release a mild sweetness as it simmers. Clean the baby bok choy by trimming the ends and halving or quartering the leaves depending on their size so they cook through quickly. Cut the firm tofu into batons for a good bite-sized protein that holds its shape during cooking.

Toast the Curry Paste

A stainless steel pot with a small amount of Thai Red Curry paste in the center on a white surface. Partially visible in the corners are a glass bowl with residue and the edge of a dark container, suggesting the start of a flavorful recipe.
A stainless steel pot with remnants of cooked and slightly dried tomato paste stuck to the bottom and sides, as if just used for preparing a flavorful Thai Red Curry recipe, viewed from above on a white surface.

Heat the neutral oil in a large pot over medium heat. Add the Thai red curry paste and toast it for about a minute until it becomes fragrant. This step helps release the flavors in the paste. Stir constantly to prevent burning.

Add Broth and Vegetables

A stainless steel pot filled with red tomato sauce sits on a white surface. Black pepper is sprinkled in the center of the sauce, giving this recipe extra flavor. A glass jar and the end of a pasta bundle are visible nearby.
A metal pot containing a vibrant Thai Red Curry soup with visible slices of onion, carrot, tofu, and seasoning sits on a white surface. An empty glass bowl is placed nearby, ready for this flavorful recipe.

Pour in the vegetable broth to deglaze the pot, scraping the bottom to lift any stuck bits for added flavor. Add the sliced carrots, onion wedges, and tofu batons to the pot. Let everything simmer gently for about 10 minutes, allowing the flavors to develop and the vegetables to soften.

Cook the Rice Noodles

A stainless steel saucepan filled with water and uncooked white noodles sits on a white surface, viewed from above—perfect for your next noodle soup or Thai red curry recipe.

While the soup simmers, bring a separate pot of water to a boil and cook the rice noodles according to package instructions until they are al dente—soft but still with a little bite. Drain the noodles and rinse them with lukewarm water to stop the cooking process and prevent sticking.

Finish the Soup

A stainless steel pot filled with a vibrant Thai Red Curry noodle soup, featuring sliced tofu, vegetables, and fresh green herbs, sits on a white surface. Steam rises from the hot soup, hinting at its bold flavors.
A stainless steel pot filled with a reddish, creamy Thai Red Curry is placed on a white surface. Surrounding the pot are several empty and partially filled glass bowls and jars.

Add the coconut milk, soy sauce (or tamari), brown sugar (if using), and rice vinegar to the pot with the vegetables and tofu. Stir and simmer for about 2 minutes to combine the flavors.

Add Noodles and Greens

A silver pot filled with red noodle soup and white rice noodles sits on a white surface. Next to it, a clear bowl holds green leafy bok choy, perfect for adding freshness to this Thai Red Curry-inspired recipe.
A metal pot filled with delicious noodle soup containing bok choy and other visible vegetables sits on a white surface next to an empty glass bowl.

Stir in the cooked rice noodles and the prepared bok choy leaves. Cook for 3 to 4 minutes more until the greens are tender but not overcooked.

Serve

A black pot filled with Thai Red Curry noodle soup, tofu slices, bok choy, and greens sits on a white surface. Nearby are chopsticks, a patterned napkin, herbs on a cutting board, and bowls—perfect for your next recipe inspiration.

Ladle the soup into bowls and garnish with fresh cilantro leaves, a drizzle of sesame oil, and lime wedges for a bright, fresh finish. Serve immediately while hot.

Storage

A bowl of noodle soup with tofu, bok choy, and vegetables sits on a patterned plate. A spoon, chopsticks, a small cup of dark liquid, and part of a pan enhance this Thai Red Curry recipe scene on the white tabletop.

For meal prep, cook the noodles and slightly undercook the bok choy, then store them separately from the soup in airtight containers. This keeps the noodles from getting mushy and the greens fresh. When reheating, combine all components and warm gently on the stove until heated through. Leftovers can be refrigerated for up to 3 days.

Top Tips

Cook noodles al dente: Noodles will continue absorbing liquid over time, so cook them just until tender but still firm.

Adjust seasoning: Taste and adjust the seasoning before serving, especially after reheating, since flavors can mellow.

Add fresh garnishes: Use fresh cilantro, a drizzle of sesame oil, and a squeeze of lime just before serving to brighten the soup.

Recipe

Tried and loved this recipe? Please leave a 5-star review below! Your reviews mean a lot to me, so if you've got any questions, please let me know in a comment.

A black pot filled with Thai Red Curry noodle soup, tofu, bok choy, and vegetables sits on a patterned cloth with wooden-handled utensils inside. A cutting board with chopped herbs is nearby, completing the recipe scene.
Print Recipe
No ratings yet

Thai Red Curry Noodle Soup Recipe

Try this easy Thai red curry noodle soup recipe! A flavorful curry noodle soup that's quick to make with authentic Thai flavors. Aromatic and delicious!
Prep Time15 minutes mins
Cook Time20 minutes mins
Total Time35 minutes mins
Course: Main
Cuisine: American, Thai
Servings: 5 servings
Calories: 407kcal
Author: Ksenia Prints

Ingredients

For the Base:

  • 6 oz rice noodles 170g, pad thai style
  • 1 lb firm tofu 450g, cut into 2-inch batons
  • 2 small carrots 150g, sliced
  • ½ medium yellow onion 90g, wedged
  • 8 oz baby bok choy 225g
  • 3 cups vegetable broth 705ml
  • 1⅔ cups full-fat coconut milk 400ml

For the Seasoning:

  • 1 tablespoon neutral oil 15ml
  • 2 tablespoons Thai red curry paste 30g
  • 2 tablespoons soy sauce/tamari 30ml
  • 2 tablespoons rice vinegar 30ml
  • 1-2 teaspoons brown sugar 4-8g, optional

Finishing Touches:

  • Fresh cilantro
  • Sesame oil drizzle
  • Lime wedges

Instructions

  • Slice carrots into ½-inch rounds
  • Cut onion into ½-inch wedges
  • Clean bok choy, trim ends, halve or quarter depending on size
  • Prepare tofu batons
  • Heat oil in large pot over medium heat.
  • Toast curry paste until fragrant (about 1 minute)
  • Deglaze with broth, scraping bottom thoroughly
  • Add carrots, onions, and tofu; simmer 10 minutes
  • Meanwhile, cook rice noodles in separate pot until al dente
  • Drain and rinse with lukewarm water
  • Add coconut milk, soy sauce, sugar, and vinegar to soup
  • Simmer 2 minutes
  • Incorporate noodles and bok choy
  • Cook 3-4 minutes until the greens are tender
  • Serve immediately, garnished with cilantro, sesame oil, and lime wedges.

Notes

• For meal prep: Store noodles separately and slightly undercook bok choy. Combine when reheating.
• Noodles will continue absorbing liquid over time.
• Adjust seasoning to taste before serving.


Nutrition

Calories: 407kcal | Carbohydrates: 38g | Protein: 12g | Fat: 24g | Saturated Fat: 15g | Polyunsaturated Fat: 4g | Monounsaturated Fat: 4g | Trans Fat: 0.01g | Sodium: 1075mg | Potassium: 218mg | Fiber: 2g | Sugar: 4g | Vitamin A: 3816IU | Vitamin C: 23mg | Calcium: 198mg | Iron: 5mg

Air Fryer Chicken Shawarma Recipe

Make flavorful air fryer chicken shawarma with this recipe! Marinate chicken in shawarma spice, then air fry. 

Two grilled wraps, inspired by a Chicken Shawarma recipe, are placed on a green plate atop a yellow cloth. In the background, small bowls of sauce and shredded cheese sit with herbs scattered nearby.

There's something comforting when the kitchen smells like a Middle Eastern street food market. This air fryer chicken shawarma brings the nostalgia with all the flavors.

The combination warm spices like cumin, coriander, and paprika turns simple chicken tenders into something that can pass for restaurant shawarma, all without the need for a vertical rotisserie. The air fryer creates those crispy edges while keeping the chicken juicy inside, achieving what traditionally takes hours in 20 minutes.

The marinade does double duty here—the maple syrup helps the spices caramelize in the air fryer while the soy sauce adds an unexpected depth of flavor that makes everyone ask for the "secret ingredient."

I often prepare the chicken in the morning, letting it marinate while I'm at work, so dinner practically makes itself when evening rolls around. The mix of paprika, coriander, black pepper, and cumin creates that authentic shawarma flavor profile.

While the chicken cooks, I have plenty of time to prep for accompaniments and whip up the simple sauce. For a more authentic experience, I sometimes swap the mayo-based sauce for my homemade tahini—its nutty richness pairs perfectly with the spiced chicken.

When we're in a more fusion mood, I'll serve the shawarma with Mexican-style black bean hummus or Greek-inspired white bean hummus with feta on the side, creating a Mediterranean feast that makes everyone happy.

My family has turned shawarma night into an active dinner experience. I set out all the components—and let everyone build their own wraps. My kids love the assembly process, carefully layering their favorite ingredients and insisting to wrap them on their own. The pan-crisping step at the end is optional but worth it for that restaurant-style golden exterior.

If you're craving takeout flavors without the delivery fee or looking for a fun, interactive dinner that brings everyone to the table, this air fryer shawarma is a great option. The leftovers are perfect lunch wraps the next day, and whether you’re piling it into pitas, layering it over rice, or tossing the leftovers into a salad, this air fryer chicken shawarma fits right in.

Ingredients

Top-down view of Chicken Shawarma ingredients on a white surface, including raw chicken breast, shredded cheese, sliced tomatoes, cucumber sticks, mixed salad greens, tortillas, oil, sauces, mayonnaise, spices, and yogurt—perfect for an easy air fryer recipe.
  • Chicken tenders – These cook quickly and absorb the shawarma seasoning well, giving a juicy, tender bite. I find they are perfect for the air fryer because they stay moist and cook evenly. You can substitute with boneless chicken thighs for a richer, juicier flavor.
  • Paprika – An essential spice in shawarma blends, paprika adds a subtle smoky flavor. I prefer smoked paprika for the depth it brings, but regular paprika will work if that's what you have.
  • Maple syrup – This helps the spices caramelize, it works so much better than sugar.
  • Soy sauce – Adds saltiness and umami while also helping to tenderize the chicken. I use it to balance the spices in shawarma.
  • Sour cream – A creamy, tangy base for the sauce that cuts through the strong spices in the chicken. I've used Greek yogurt in place of sour cream for a thicker, tangier sauce, which works especially well if you like extra acidity.
  • Mayonnaise – Gives the shawarma sauce a rich, smooth texture. It helps coat the chicken and adds to the creaminess. For a lighter alternative, I’ve swapped it with avocado-based mayo, which blends in nicely.
  • Shredded cheddar – Though not traditional, cheddar adds a sharp contrast and melts nicely in the wrap. If you're looking for a more traditional taste, you can replace it with feta or skip the cheese entirely.
  • Tortillas – These are the base for wrapping up the chicken. I use soft flour tortillas, but whole wheat or gluten-free varieties are great alternatives for a healthier option.
  • Cucumber strips – Adds a fresh, crunchy element that balances the spices of the chicken. If you prefer, you can replace cucumber with shredded carrots or fresh lettuce for a refreshing crunch.
  • Salad mix – Gives the wrap a fresh, crunchy texture that contrasts the richness of the chicken and sauce. I like using a mix of spinach and arugula for a peppery bite, but romaine or iceberg lettuce will work just as well.

See the recipe card for exact quantities.

Step-by-step Instructions

Grilled wraps filled with sliced chicken shawarma, lettuce, tomato, cucumber, and onion are stacked on a green plate. A yellow cloth and small bowls of sauce are on the table—perfect for an easy air fryer recipe.

This air fryer chicken shawarma is a quick and easy way to enjoy all the classic flavors of shawarma with minimal effort. The juicy, tender chicken, paired with a rich, creamy sauce and wrapped in a soft tortilla, creates a satisfying meal. With a few simple steps, you can have a flavorful and hearty dish on the table in no time.

Make the Marinade

Raw chicken strips marinating in a brown sauce inside a clear glass bowl, with a white spatula resting in the mixture—perfect for a flavorful Chicken Shawarma recipe. The bowl sits on a light, textured surface.

In a medium-sized bowl, combine the maple syrup, paprika, coriander, pepper, garlic powder, cumin, salt, olive oil, soy sauce, garlic puree, and lemon juice. Stir everything together until it forms a smooth marinade. Add the chicken tenders to the marinade, making sure they are fully coated. You can either cook the chicken immediately or let it sit for 30 minutes to allow the flavors to develop more.

Cook the Chicken

Raw, marinated chicken tenders for a flavorful Chicken Shawarma recipe are arranged in a single layer inside an air fryer basket, ready to be cooked on a light-colored surface.

Preheat your air fryer to 360°F (180°C). Arrange the marinated chicken tenders in a single layer in the air fryer basket. Cook for 12 minutes, flipping the chicken halfway through the cooking time. After 12 minutes, check the chicken, and cook for an additional 8-10 minutes, or until fully cooked and golden brown.

Make the Sauce

A bowl filled with a creamy white mixture, likely a sauce or dressing for Chicken Shawarma, with a lavender-colored spatula resting inside. The bowl is placed on a light, textured surface.

While the chicken is cooking, prepare the sauce. In a small bowl, combine the sour cream, mayonnaise, and dried herbs. Stir well until the mixture is smooth and creamy. Set the sauce aside.

Prepare the Chicken

Cooked, golden-brown chicken tenders are arranged in a single layer inside an air fryer basket, set on a white surface. This easy air fryer recipe gives the chicken a seasoned, slightly crispy appearance reminiscent of Chicken Shawarma.
A white plate contains several slices of seasoned chicken breast, reminiscent of Chicken Shawarma, arranged in a casual pile on a light-colored surface—perfect for trying in your next Air Fryer recipe.

Once the chicken is cooked, remove it from the air fryer and let it cool for about 5 minutes. After it has cooled, slice the chicken into thin strips using a cutting board and a sharp knife.

Assemble the Wraps

A whole wheat tortilla on a light surface, topped with sliced lettuce, cucumbers, tomatoes, shredded cheese, and juicy Air Fryer Chicken Shawarma, drizzled with white sauce—this easy recipe is ready to be wrapped.

Lay a tortilla flat on a clean surface. Spread about 2 tablespoons of the sauce in the center of the tortilla. Top with some shredded cheese, sliced chicken, lettuce, cucumber, and tomato. Be careful not to overfill the tortilla to avoid difficulty when wrapping it. Add a small spoonful of sauce on top of the fillings.

Wrap It Up

Two folded burritos wrapped in light brown tortillas, placed side by side on a white textured surface—an easy Air Fryer recipe inspired by chicken shawarma flavors.

To fold the wrap, start by folding in the bottom of the tortilla, then fold in the sides. Roll the tortilla tightly, being gentle so it doesn’t tear.

Cook the Wraps

Two grilled burritos with visible grill marks, inspired by a chicken shawarma recipe, are placed side by side on a round, green-rimmed plate set on a light-colored, textured surface.

Heat a pan over medium heat. Place the wrapped shawarma in the pan and press down lightly with a spatula. Cook for 3-4 minutes until the bottom is golden and crispy. Flip the wrap and cook the other side for another 3-4 minutes. This will give the wrap a nice, golden finish.

Serve

A plate with three grilled chicken shawarma wraps filled with sliced chicken, cucumbers, tomatoes, and lettuce. The wraps are cut to reveal the fillings and served on a green plate with a yellow cloth underneath—an easy air fryer recipe!.

Serve the wraps warm, with extra sauce on the side if desired. They make a great meal for lunch or dinner and are perfect for meal prepping or family dinners.

Storage

Close-up of a grilled Chicken Shawarma wrap cut in half, showing sliced chicken, lettuce, cucumber, and other vegetables inside. The wrap has visible grill marks and is placed on a table with blurred food in the background.

You can make the chicken shawarma ahead of time by marinating and cooking the chicken tenders. Once cooked, let the chicken cool to room temperature and store it in an airtight container in the refrigerator for up to 3 days. Alternatively, the cooked chicken can be frozen for up to 3 months. To use later, thaw in the refrigerator overnight and reheat in the microwave or on the stovetop.

If you prefer, you can also assemble the wraps ahead of time. After preparing the chicken, spread the sauce and add the fillings to the tortillas, then wrap them up. Store the wrapped shawarmas in the fridge for up to 2 days, or freeze them for up to 3 months. To reheat, wrap the frozen wraps in foil and bake at 350°F (175°C) for about 15-20 minutes, or heat them in a pan over medium heat for a few minutes on each side.

Top Tips

Marinate longer for more flavor: While 30 minutes of marination works, letting the chicken sit for 2-3 hours (or overnight) in the fridge will enhance the flavors, making the chicken more aromatic and flavorful.

Don't overcrowd the air fryer basket: For even cooking and crispy chicken, make sure the chicken tenders are in a single layer in the air fryer basket. You may need to cook in batches if you have more chicken.

Customize the fillings: Feel free to add other veggies like bell peppers or onions, or swap the cheese for a lighter option like feta for added flavor. The wraps are versatile, so get creative with the fillings based on your preferences!

Recipe

Tried and loved this recipe? Please leave a 5-star review below! Your reviews mean a lot to me, so if you've got any questions, please let me know in a comment.

Grilled wraps filled with sliced chicken shawarma, lettuce, cucumber, and other vegetables are stacked on a green plate. A bowl of sauce and some herbs are visible in the background.
Print Recipe
No ratings yet

Air Fryer Chicken Shawarma

Make flavorful air fryer chicken shawarma with this recipe! Marinate chicken in shawarma spice, then air fry. 
Prep Time5 minutes mins
Cook Time50 minutes mins
Total Time55 minutes mins
Course: Main
Cuisine: American, Mediterranean
Keyword: air fryer chicken shawarma
Servings: 4 servings
Calories: 599kcal
Author: Ksenia Prints

Ingredients

  • 1 lb chicken tenders
  • 1 tablespoon maple syrup
  • ½ teaspoon each: paprika coriander, black pepper, garlic powder, cumin
  • ⅓ teaspoon salt
  • 2 tablespoon olive oil
  • 2 tablespoon soy sauce
  • 1 tablespoon garlic puree
  • 1 tablespoon lemon juice
  • ½ cup sour cream
  • ½ cup mayonnaise
  • ⅓ teaspoon dried herbs
  • 4 large tortillas
  • ⅓ cup cucumber strips
  • ⅓ cup tomato strips
  • ⅓ cup shredded cheddar
  • ⅓ cup salad mix

Instructions

  • Make the marinade: In a medium bowl, mix together maple syrup, paprika, coriander, pepper, garlic powder, cumin, salt, olive oil, soy sauce, garlic puree, and lemon juice.
  • Add the chicken tenders to the marinade and coat them well. You can cook right away or let them sit for 30 minutes for more flavor.
  • Cook the chicken: Preheat your air fryer to 360°F. Place the chicken in a single layer in the basket. Cook for 12 minutes, then flip the pieces over and cook for another 8-10 minutes until fully cooked.
  • Make the sauce: While the chicken cooks, mix the sour cream, mayonnaise, and dried herbs in a small bowl until smooth.
  • Prepare the chicken: Let the cooked chicken cool for about 5 minutes, then cut it into thin slices on a cutting board.
  • Assemble the wraps: Lay a tortilla flat. Spread about 2 tablespoons of sauce in the middle. Add some cheese, sliced chicken, lettuce, cucumber, and tomato. Don't overfill or it will be hard to wrap. Add another small spoonful of sauce on top.
  • Wrap it up: Fold in the bottom of the tortilla first, then fold in the sides, and roll it up tightly. Be gentle so you don't tear the tortilla.
  • Cook the wraps: Heat a pan over medium heat. Place the wrapped shawarma in the pan and press down lightly with a spatula. Cook for 3-4 minutes until golden, then flip and cook the other side for 3-4 minutes.
  • Serve warm with extra sauce on the side if you like.

Nutrition

Calories: 599kcal | Carbohydrates: 23g | Protein: 31g | Fat: 42g | Saturated Fat: 10g | Polyunsaturated Fat: 15g | Monounsaturated Fat: 13g | Trans Fat: 0.1g | Cholesterol: 111mg | Sodium: 1300mg | Potassium: 612mg | Fiber: 2g | Sugar: 6g | Vitamin A: 602IU | Vitamin C: 7mg | Calcium: 167mg | Iron: 2mg

Easy Chilli Con Carne Recipe

This easy chili con carne recipe is a classic and easy dish with spice! Perfect for a quick, delicious meal.

A green bowl filled with chili topped with shredded cheese, diced avocado, and a dollop of sour cream sits on a green napkin; a fork and small bowls of grated cheese and avocado are nearby.

As a mom of two rapidly growing kids, I love hearty recipes that are also nutritious. This chilli con carne is always a hit at home. It’s packed with tender ground beef, creamy kidney beans, and vegetables simmered in a perfectly spiced tomato base. A touch of brown sugar balances the heat, while slow simmering brings everything together into a rich, complex flavor

What I love about this recipe is how it makes use of pantry staples and a simple technique of sautéing aromatics before adding the beef. My secret? Cooking the tomato paste for two minutes before adding the liquid! it deepens the flavor in a way that makes everyone think you've been cooking all day.

I love having this chilli over a steaming plate of plain rice that soaks up all the flavorful sauce, or with my roasted potatoes with broccoli for a complete meal. Sometimes, I'll quickly air fry some kale or beet chips as alternatives to tortilla chips. They add a colorful, nutritious twist that somehow makes everyone feel better about going back for seconds.

My family has their own opinions about chilli toppings, and this recipe has become our perfect base for customization. My husband prefers his with extra cheese and jalapeños, while my children love when I add a dollop of sour cream to cool down the spice. 

If you're feeding a crowd, meal prepping for the week, or just craving something comforting on a cold evening, this chili is perfect especially with the hands-off time. The leftovers are just as amazing the next day, making it a go-to recipe for Sunday batch cooking. Also, thanks to this, I keep a pot of homemade chilli in the refrigerator, just in case. 

A green bowl filled with chili topped with shredded cheese, diced avocado, a dollop of sour cream, and chopped herbs. The chili contains ground meat, beans, and chopped vegetables.

Ingredients

A variety of chili ingredients in bowls on a white surface, including ground beef, kidney beans, chopped celery, diced tomatoes, tomato paste, diced yellow bell pepper, chopped garlic, broth, spices, oil, salt, pepper, and breadcrumbs.
  • Ground beef – The main protein, bringing a hearty, rich flavor. I prefer lean ground beef to avoid excess grease, but I sometimes mix in ground turkey for a lighter version.
  • Red kidney beans – These add heartiness and a creamy texture that pairs perfectly with the beef. I've swapped them with black beans when I was out of kidney beans, and the flavor still worked well.
  • Diced tomatoes – Forms the base of the sauce, adding a tangy and juicy element. I like using San Marzano tomatoes for a sweeter, richer flavor, but any good-quality diced tomatoes are just fine.
  • Bell pepper – Adds sweetness and crunch to balance the richness of the beef. I typically use red bell peppers for their sweeter taste, but green bell peppers give a sharper flavor if you prefer that.
  • Onion – Essential for depth and sweetness. I use yellow onions, as they caramelize well and add a rich, sweet undertone to the dish.
  • Tomato paste – Intensifies the tomato flavor and gives the sauce a velvety richness. I’ve tried sun-dried tomato paste for a tangy kick, and it worked really well.
  • Garlic – Adds a savory, aromatic punch. Fresh garlic is my go-to because it’s more potent than pre-chopped or powdered garlic, offering a stronger taste.
  • Beef broth – Adds moisture and richness to the sauce, making it comforting. I sometimes use chicken broth for a lighter version, but beef broth gives the fullest, savory flavor.
  • Paprika – Brings a smoky, earthy layer to the dish. I often swap in smoked paprika for extra depth, but regular paprika is perfect if you prefer a milder flavor.
  • Chili powder – Gives the dish warmth and depth. I tend to add more when I want a bolder flavor, but it’s easy to adjust depending on how spicy you like it.
  • Cumin – Adds a warm, earthy, slightly nutty flavor. I’ve used ground coriander as a substitute, which gives a slightly brighter flavor, but cumin is my favorite here for the depth it adds.

See the recipe card for full list and exact quantities.

Step-by-step Instructions

A bowl of chili topped with shredded cheese, diced avocado, and a dollop of sour cream sits on a green napkin. A black fork rests in the bowl, holding a bite of chili with toppings.

This chili con carne is a hearty and flavorful dish that's simple to make, with a rich combination of ground beef, beans, and spices. Perfect for a family dinner or a crowd, this recipe delivers a satisfying meal with minimal effort.

Cook the Onions

Chopped onions sautéing in oil in a large cream-colored pot with red handles on a light gray countertop.

Start by heating olive oil in a large pot or Dutch oven over medium-low heat. Once the oil is hot, add the diced onion. Cook the onion for 3-4 minutes, stirring occasionally with a spatula, until it becomes soft and translucent. This creates the base flavor for your chili.

Add Bell Peppers and Garlic

Chopped yellow bell pepper and onion are sautéing in a white pot with red handles, placed on a light gray marble countertop.

Next, add the diced bell pepper to the pot and cook for another 4 minutes, stirring occasionally. The bell pepper adds a mild sweetness to balance the heat from the spices. Then, add the minced garlic and cook for another 30 seconds, stirring constantly until fragrant.

Stir in Tomato Paste

A red and white pot on a gray countertop containing diced vegetables, including yellow squash and onions, sautéed and seasoned with spices.

Add the tomato paste to the vegetables in the pot. Stir constantly for about 2 minutes to allow the tomato paste to cook slightly and deepen in flavor. This step builds a rich, savory base for the chili.

Brown the Ground Beef

A red and white pot on a marble surface contains cooked ground beef mixed with chopped yellow bell peppers and onions.

Turn the heat up to medium and add the ground beef to the pot. Use a spoon to break the meat apart as it cooks. Cook for about 10 minutes, stirring occasionally, until the beef is browned and no longer pink. This step is crucial for developing the meaty flavor that gives the chili its depth.

Add Liquids and Stir

A red and white pot on a gray countertop contains ground meat, chopped vegetables, broth, and a mound of diced tomatoes in liquid.

Pour in the beef broth and canned diced tomatoes with their juice. Stir well to combine, making sure the beef and vegetables are evenly distributed. Bring the mixture to a gentle boil, which helps all the flavors meld together.

Season the Chili

A red and white pot filled with an uncooked mixture of ground beef, diced tomatoes, tomato paste, chopped yellow bell pepper, seasonings, and liquid on a light gray countertop.

Add the brown sugar, salt, black pepper, paprika, chili powder, and cumin. Stir well to make sure the spices are evenly distributed throughout the chili. The sugar balances the acidity of the tomatoes, while the spices bring the characteristic warmth and depth of flavor to the dish.

Simmer to Develop Flavors

Reduce the heat to low, then cover the pot partially with a lid. Let the chili simmer for 30 minutes, stirring occasionally. This allows the flavors to develop and the sauce to thicken. Keep an eye on it to prevent burning or sticking.

Add Beans

A red Dutch oven on a light countertop filled with cooked ground meat, tomato sauce, chopped vegetables, and a layer of red kidney beans on top.

Add the drained kidney beans to the chili and stir gently. Continue cooking for another 10 minutes, allowing the beans to heat through and absorb the flavors of the chili. If the chili looks too thick at any point, feel free to add more beef broth to achieve your preferred consistency.

Adjust Seasoning

Taste the chili and adjust the seasoning if needed. You can add more salt, pepper, or spices according to your personal taste.

Serve

A green bowl filled with chili con carne, topped with shredded cheese, avocado slices, and sour cream. A black fork is placed in the bowl. Some cilantro garnish is visible on top.

Ladle the chili into bowls and serve with optional toppings. A few choices include diced avocado, fresh parsley or cilantro, shredded cheddar cheese, or a dollop of sour cream. These toppings add extra flavor and texture to the dish.

Storage

A green bowl filled with chili topped with shredded cheese, diced avocado, a dollop of sour cream, and chopped herbs. The chili contains ground meat, beans, and chopped vegetables.

Allow the chili to cool to room temperature before storing. Leftovers can be refrigerated in an airtight container for up to 3 days. If you want to store it for a longer period, you can freeze the chili for up to 3 months. To reheat, thaw in the refrigerator overnight and heat it on the stove over medium heat until warmed through. Alternatively, you can microwave individual portions, stirring every minute for even heating.

Top Tips

Adjust the heat: For a spicier chili, increase the chili powder or add a pinch of red pepper flakes to suit your taste.

Make ahead: The chili actually tastes better the next day, as the flavors have had time to meld, making it a great make-ahead dish.

Time-saving prep: Save time by chopping the vegetables while the onions are cooking to streamline the cooking process.

Recipe

Tried and loved this recipe? Please leave a 5-star review below! Your reviews mean a lot to me, so if you've got any questions, please let me know in a comment.

A bowl of Chilli Con Carne topped with shredded cheese, avocado slices, and a dollop of sour cream, with a black fork resting in the bowl. This easy recipe features ground meat, beans, and tomato sauce for a hearty meal.
Print Recipe
5 from 2 votes

Easy Chilli Con Carne

This easy chili con carne recipe is a classic and easy dish with spice! Perfect for a quick, delicious meal.
Prep Time10 minutes mins
Cook Time1 hour hr
Total Time1 hour hr 10 minutes mins
Course: Main
Cuisine: American
Keyword: chilli con carne
Servings: 6 servings
Calories: 267kcal
Author: Ksenia Prints

Equipment

  • Large pot or Dutch oven
  • Wooden spoon or spatula
  • Knife and cutting board
  • Measuring spoons
  • Can opener

Ingredients

  • 1 pound ground beef
  • 1 can 15 oz red kidney beans, drained
  • 1 can 14.5 oz diced tomatoes
  • 1 bell pepper diced
  • 1 medium onion diced
  • 1 tablespoon tomato paste
  • 1 tablespoon brown sugar
  • 3 cloves garlic finely chopped
  • 2 cups beef broth
  • 2 tablespoons olive oil
  • ½ teaspoon salt
  • â…“ teaspoon black pepper
  • ½ teaspoon paprika
  • ½ teaspoon chili powder
  • ½ teaspoon cumin

Instructions

  • Heat the olive oil in a large pot or Dutch oven over medium-low heat. Add the diced onion and cook for 3-4 minutes, stirring occasionally with a spatula until the onion becomes translucent.
  • Add the diced bell pepper to the pot and cook for another 4 minutes, stirring occasionally. Then add the chopped garlic and cook for 30 seconds until fragrant.
  • Add the tomato paste to the vegetables and stir continuously for about 2 minutes. This helps develop a deeper flavor.
  • Increase the heat to medium and add the ground beef to the pot. Break it apart with your spoon as it cooks. Continue cooking for about 10 minutes, stirring occasionally, until the beef is browned and no longer pink.
  • Pour in the beef broth and canned diced tomatoes (with their juice). Stir to combine and bring the mixture to a gentle boil.
  • Add the brown sugar, salt, black pepper, paprika, chili powder, and cumin. Stir well to distribute the spices evenly.
  • Reduce the heat to low, cover partially with a lid, and simmer for 30 minutes, stirring occasionally. This allows the flavors to develop and the sauce to thicken.
  • Add the drained kidney beans and stir gently. Continue cooking for another 10 minutes. If the chili looks too thick, add a little more beef broth until you reach your desired consistency.
  • Taste and adjust seasoning if needed before serving.
  • Ladle the chili into bowls. Serve with optional toppings such as diced avocado, fresh parsley or cilantro, shredded cheddar cheese, or a dollop of sour cream.

Notes

For spicier chili, add more chili powder or a pinch of red pepper flakes
The chili tastes even better the next day after flavors have had time to meld
Leftovers can be refrigerated for up to 3 days or frozen for up to 3 months
To save time, you can chop the vegetables while the onions are cooking
For a healthier version, you can substitute ground turkey for the beef
Enjoy your homemade chili!

Nutrition

Calories: 267kcal | Carbohydrates: 6g | Protein: 15g | Fat: 20g | Saturated Fat: 7g | Polyunsaturated Fat: 1g | Monounsaturated Fat: 10g | Trans Fat: 1g | Cholesterol: 54mg | Sodium: 569mg | Potassium: 359mg | Fiber: 1g | Sugar: 4g | Vitamin A: 714IU | Vitamin C: 28mg | Calcium: 32mg | Iron: 2mg

Creamy Sun-Dried Tomato Chicken Casserole Recipe

A delicious chicken recipe featuring creamy sun-dried tomato sauce, basil, and sun-dried tomatoes! Like marry me chicken but better!

A close-up of a spatula lifting a serving of baked pasta with melted cheese and breadcrumbs from a rectangular baking dish. The pasta appears mixed with vegetables and sauce.

Restaurant-quality dishes don't have to mean hours in the kitchen or a sink full of dishes. This creamy sun-dried tomato chicken casserole gives that perfect balance of rich, tangy, and savory flavors in one convenient dish that comes together in about 30 minutes of active time. The combination of tender chicken pieces and al dente pasta in a velvety sauce with intensely flavored sun-dried tomatoes creates something that feels special enough for company but simple enough for weeknights. 

My husband couldn't stop talking about how the cream cheese melts into a nice sauce that clings to every piece of pasta and chicken. The sun-dried tomatoes add bursts of concentrated flavor and beautiful color, while the touch of red pepper flakes brings just enough warmth without overwhelming the dish. For a complete meal, I often serve this with a side of air fried Brussels sprouts to add some green to our plates—the slight caramelization of the sprouts complements the cream of the pasta really well.

While my family gets settled after a busy day, I can have this casserole prepped and in the oven in under 25 minutes. The hands-off baking time gives me minutes to quickly prepare a side like roast air fryer asparagus, which roasts to perfections in just about the same time as the casserole needs to bake. What makes this dish great is its make-ahead potential—I often assemble it during a less hectic time and bake it a few minutes before dinner.

I've found countless ways to adjust this dish to our needs. Adding spinach or other vegetables makes it more nutritious while maintaining the creamy texture everyone loves. On nights when we're craving something lighter, I might skip the casserole approach altogether and serve the chicken and sauce over zucchini noodles, inspired by my crustless zucchini quiche that taught me how versatile this vegetable can be. The panko topping creates the perfect contrast of crispy and creamy textures that makes this feel like something from a restaurant rather than a quick family meal.

If you're looking for a new addition to your dinner rotation or need something impressive yet not too complicated, this casserole is one to bookmark. The leftovers might be even better the next day, reheated well for lunch. For another easy baked dinner with bold flavor and minimal prep, try this TikTok viral dumpling bake made with frozen dumplings and coconut curry sauce.

Want a vegetarian variation of this Marry Me Chicken? Try this Marry Me Tofu - it's going to blow you away with the flavors, even if you can't stand tofu.

Ingredients

Chicken breasts on a plate, surrounded by bowls of dry pasta, spinach, shredded cheese, milk, broth, bread crumbs, cream cheese, butter, chopped onion, pepper, and a jar of sun-dried tomatoes, plus two garlic cloves.
  • Chicken breasts – The main protein in this dish, providing a tender, mild flavor that absorbs the richness of the sauce. I prefer cutting them into small, bite-sized pieces for even cooking and to give a good balance with the pasta.
  • Penne pasta – A hearty pasta shape that holds the creamy sauce well. Cooking it al dente gives it the perfect texture that complements the richness of the sauce without becoming mushy.
  • Sun-dried tomatoes – These add a tangy, slightly sweet depth to the dish. I’ve used both oil-packed and dry sun-dried tomatoes, and the oil-packed variety gives more moisture and flavor, so I always go with those.
  • Cream cheese – Adds a creamy, smooth texture to the sauce, making it rich and velvety. I’ve also used mascarpone for a slightly lighter version, but the cream cheese is what really makes this dish indulgent.
  • Heavy cream – Adds the desired richness to the sauce, turning it into a luxurious, velvety coating for the pasta. I’ve experimented with milk, but the heavy cream is necessary for the full flavor.
  • Mozzarella cheese – Gives the dish a melty, gooey texture. I always use whole milk mozzarella because it melts better and adds a creamy consistency to the sauce.
  • Parmesan cheese – A sharp, nutty addition that enhances the richness of the sauce and gives it an extra layer of flavor. I prefer freshly grated over pre-grated for the best texture and taste.
  • Panko breadcrumbs – Gives a crispy topping that contrasts nicely with the creamy sauce. I’ve used regular breadcrumbs before, but panko adds a lighter, crunchier texture that holds up better when baked.
  • Butter – Used to coat the breadcrumbs for baking, helping them turn golden and crispy. I've also tried olive oil for a lighter option, but butter adds the richest flavor.

See the recipe card for exact quantities.

Step-by-step Instructions

A close-up of a baked pasta casserole in a square pan, with a serving being lifted out. The dish is topped with golden breadcrumbs and melted cheese, with visible pasta and vegetables. Steam rises from the hot food.

This creamy sun-dried tomato chicken casserole is the ultimate comfort food, combining tender chicken, pasta, and a rich, flavorful creamy sauce. With a crunchy, cheesy topping, this dish is perfect for any occasion—from busy weeknights to a comforting weekend meal. It’s quick to prepare and guarantees a hearty, satisfying meal the whole family will enjoy.

Preheat the Oven

Start by preheating your oven to 375°F (190°C). This makes sure that your casserole will bake evenly and become perfectly golden brown by the time it’s done.

Cook the Pasta

Cook your pasta according to the package instructions. Once it’s done, drain and set aside. This is the base of the casserole, and cooking it ahead of time avoids overcooking them.

Brown the Chicken

Raw chicken pieces are being stirred in a black frying pan with a white spatula. The pan is on a light-colored countertop, and the chicken appears to be just starting to cook.

Heat 2 tablespoons of oil from the jar of sun-dried tomatoes in a large skillet over medium heat. Add the chicken pieces and brown them, stirring occasionally, until they are cooked through and lightly browned on the outside. This step will add depth of flavor to the dish, thanks to the oil.

Sauté the Onion and Garlic

A hand stirs chopped onions and garlic in a black frying pan using a spatula. The pan rests on a light-colored surface.

In the same skillet, add the chopped onion and minced garlic. Cook until the onion softens and becomes translucent, about 3-4 minutes. The garlic and onion will infuse the oil with savory flavor, adding to the richness of the casserole.

Add Sun-Dried Tomatoes and Creamy Base

A hand holds an open jar of sun-dried tomatoes over a skillet filled with a creamy recipe and chunks of sun-dried tomato. A white spatula with a wooden handle rests in the skillet, ready to stir the savory mixture.

Next, add the chopped sun-dried tomatoes to the skillet. Stir them into the onions and garlic, allowing them to heat through and release their flavor. Then, add the cream cheese, heavy cream, chicken broth, and seasonings (such as salt, pepper, and Italian seasoning). Stir everything together and let it simmer for 5-7 minutes until the sauce slightly thickens.

Combine the Sauce with Pasta and Chicken

A person is stirring penne pasta, cooked chicken pieces, and fresh spinach in a black pan with a wooden spoon and fork, preparing a creamy sun-dried tomato chicken casserole on a light-colored surface.

Once the sauce has thickened, add the cooked pasta and browned chicken to the skillet. If you’re using spinach, fold it in now. The spinach wilts quickly and blends beautifully into the creamy sauce. Stir everything together so the pasta and chicken are well coated with the creamy sauce.

Transfer to the Baking Dish

A hand holds a spatula stirring a creamy chicken casserole with penne pasta, spinach, and sun-dried tomato in a dark rectangular baking dish on a light textured surface.

Transfer the mixture into a greased 9x13-inch baking dish, spreading it out evenly. This is where the casserole will bake and get its delicious golden crust.

Top with Cheese and Panko

A hand is sprinkling shredded cheese over an unbaked chicken casserole in a rectangular baking pan. The pasta appears mixed with greens and pieces of meat. The scene is set on a light-colored surface.
A rectangular black baking dish filled with an unbaked chicken casserole topped with shredded cheese and a coarse yellow topping, possibly cornmeal or breadcrumbs, sits on a light-colored surface—a creamy recipe ready to bake.

Sprinkle the shredded mozzarella and grated parmesan cheese on top of the casserole. Then, in a small bowl, mix the panko breadcrumbs with melted butter and sprinkle this mixture over the cheese. The breadcrumbs will crisp up in the oven, giving the casserole a crunchy, golden top.

Bake the Casserole

A rectangular baking dish filled with baked pasta and a golden, crumbly crust, this creamy recipe features hints of sun-dried tomato. The dish sits on a light surface, with a white plate and metal serving utensils nearby.

Place the baking dish in the oven and bake for 20-25 minutes, or until the top is golden brown and the casserole is bubbly. Keep an eye on it toward the end to make sure it doesn’t over-brown.

Rest and Serve

A person holds a rectangular baking dish filled with baked pasta, inspired by a creamy chicken recipe, topped with a golden crumb crust. A serving sits on a white plate, garnished with chopped green herbs; extra herbs fill a small bowl nearby.

Once baked, remove the casserole from the oven and let it rest for about 5 minutes. This allows the sauce to set and makes it easier to slice. Serve warm and enjoy this creamy, savory dish!

Storage

A person uses a spatula to lift a serving of creamy chicken casserole topped with melted cheese and breadcrumbs, featuring sun-dried tomato, from a rectangular black baking dish.

Store any leftover creamy sun-dried tomato chicken casserole in an airtight container in the refrigerator for up to 3 days. To reheat, place it in the oven at 350°F (175°C) for about 15 minutes or until heated through. You can also microwave individual portions for 1-2 minutes, depending on the amount.

Top Tips

Make-ahead option: Prepare the casserole in advance and refrigerate it until you're ready to bake. When baking from the fridge, add an extra 10 minutes to the cooking time to make sure it heats through completely.

Use fresh spinach for extra flavor: Fresh spinach adds a nice pop of color and flavor to the casserole. If you prefer a milder taste, you can skip it or swap it out for another leafy green like kale or Swiss chard.

For crispier topping: If you like a crunchy topping, broil the casserole for 2-3 minutes at the end of baking to get the panko breadcrumbs golden and crispy. Keep an eye on it to avoid burning!

Recipe

Tried and loved this recipe? Please leave a 5-star review below! Your reviews mean a lot to me, so if you've got any questions, please let me know in a comment.

A close-up of a hand holding a spatula lifting a serving of baked casserole with melted cheese from a square baking pan. The casserole contains pasta, vegetables, and a golden topping.
Print Recipe
No ratings yet

Creamy Sun-Dried Tomato Chicken Casserole

A delicious chicken recipe featuring creamy sun-dried tomato sauce, basil, and sun-dried tomatoes! Like marry me chicken but better!
Prep Time15 minutes mins
Cook Time25 minutes mins
Total Time40 minutes mins
Course: Dinner, Lunch
Cuisine: Italian
Keyword: chicken casserole, Creamy Sun-Dried Tomato Chicken Casserole
Servings: 6 servings
Calories: 705kcal
Author: Ksenia Prints

Equipment

  • Oven
  • 9x13 Baking Dish

Ingredients

  • 4 chicken breasts cut into 1-inch pieces
  • 8 oz penne pasta cooked al dente
  • 1 jar 7 oz sun-dried tomatoes in oil, chopped
  • 2 garlic cloves minced
  • 1 small onion diced
  • 8 oz cream cheese softened
  • 1 cup heavy cream
  • 1 cup chicken broth
  • 1 cup mozzarella cheese shredded
  • ½ cup parmesan cheese grated
  • 1 teaspoon Italian seasoning
  • ½ teaspoons red pepper flakes
  • Salt and pepper to taste
  • 1 cup fresh spinach optional
  • ½ cup panko breadcrumbs
  • 2 tablespoons butter melted

Instructions

  • Preheat oven to 375°F (190°C).
  • Cook pasta according to package directions. Set aside.
  • In large skillet, brown chicken pieces with 2 tablespoons of oil from the sun-dried tomatoes.
  • In same skillet, cook onion and garlic until soft. Add sun-dried tomatoes.
  • Add cream cheese, cream, broth, and seasonings. Simmer until slightly thickened.
  • Mix sauce with pasta, chicken, and spinach if using.
  • Transfer to 9x13 baking dish. Top with mozzarella and parmesan.
  • Mix panko with melted butter, sprinkle over cheese.
  • Bake 20-25 minutes until bubbly and golden brown.
  • Let rest 5 minutes before serving.

Video

Notes

Can prepare ahead and bake when needed. Add 10 minutes to baking time if from refrigerated.

Nutrition

Calories: 705kcal | Carbohydrates: 39g | Protein: 49g | Fat: 39g | Saturated Fat: 22g | Polyunsaturated Fat: 2g | Monounsaturated Fat: 10g | Trans Fat: 0.02g | Cholesterol: 201mg | Sodium: 753mg | Potassium: 841mg | Fiber: 2g | Sugar: 5g | Vitamin A: 1862IU | Vitamin C: 5mg | Calcium: 306mg | Iron: 2mg

Garlic Butter Pepperoni Pizza Muffins Recipe

Quick and easy garlic butter pepperoni pizza muffins recipe! Cheesy, pull-apart pizza muffins are a quick snack made with garlic butter, pizza sauce, and mozzarella in dough!

Three savory muffins with pieces of pepperoni and melted cheese are stacked on a white plate. Perfect for any Pepperoni Pizza lover, this muffins recipe is served with dipping sauce, with more muffins in the background on a light surface.

These garlic butter pepperoni pizza muffins combine two family favorites—pizza and pull-apart bread—into one irresistible snack that disappears quicker as I can make them. Pillowy biscuit pieces loaded with pepperoni and mozzarella, then brushed with garlicky herb butter while still hot from the oven—they're like individual servings of the best parts of pizza without the fuss of making the dough from scratch.

If you love pizza in all forms, you should try my homemade pepperoni pizza rolls or cast iron deep dish pepperoni pizza when you have a bit more time on your hands. 

They are perfect for any occasion, making them a great snack or a fun addition to meals. I love pairing them with air fryer chicken wings, which makes it perfect for game days or summer play dates. For a more balanced meal, I often add a crisp little gem salad on the side for a fresh complement to the rich muffins.

I love how quick and easy these pizza muffins are to make with ingredients I almost always have on hand. Whether it’s during homework time or that post-school, pre-dinner rush, I can have them in the oven in under 10 minutes.

The refrigerated biscuits are a game-changer, as I no longer have to deal with yeast dough like I used to. The simple assembly process also means even my youngest can help put them together. When I'm really in a time crunch, I prep the muffins earlier in the day and just pop them in the oven when we're ready to eat.

I've tried sneaking in a few vegetables and they're the perfect disguise. Sometimes I add diced bell peppers, olives, or spinach. My daughter prefers them with a small dish of warm pizza sauce for dipping, while my son insists they're perfect just as they are. The leftovers (which would be a miracle if there are) make great quick breakfasts or lunchbox additions the next day—they're still delicious at room temperature.

If you're looking for an easy dinner sidekick, a party snack that will win anyone over, or just a way to satisfy pizza cravings without the delivery cost, these garlic butter pepperoni pizza muffins are perfect every time. They've become such a regular feature in our kitchen that my kids now recognize the smell of garlic butter as a signal that they'll be having their favorite—and what parent doesn't love hearing "Yes!" instead of "What's that?" at mealtime?

Ingredients

A can of Pillsbury Grands! biscuits, a stick of butter, a glass bowl of shredded cheese, a small bowl of pepperoni slices, and herbs—everything you need for easy Pepperoni Pizza Muffins Recipe or savory garlic butter bites.
  • Refrigerated biscuits – The base of this dish, it adds a soft, pillowy texture that crisps up beautifully when baked. I’ve used both flaky and buttery biscuits, but the buttery ones tend to have a richer flavor.
  • Pepperoni slices – Adds a savory, slightly spicy flavor to balance the richness of the cheese. If you want to go lighter, turkey pepperoni works as a substitute, though it’s less greasy.
  • Shredded mozzarella cheese – Gives a gooey, melty texture that makes the dish irresistibly cheesy. I always go for whole milk mozzarella over part-skim for better melt and flavor.
  • Unsalted butter – Gives a rich, golden finish to the biscuits when brushed on top. 
  • Garlic salt – Adds savory depth with a touch of garlic flavor. 

See the recipe card for exact quantities.

Step-by-step Instructions

A close-up of savory muffins inspired by a Pepperoni Pizza, topped with melted cheese and pieces of pepperoni, stacked on a white plate. This tempting muffins recipe features more treats in the background.

These garlic butter pizza muffins are the perfect combination of savory and cheesy, with a golden, crispy exterior and a soft, flavorful inside. Made with biscuit dough, pepperoni, and melted mozzarella, they’re an easy, crowd-favorite snack or side dish. 

Preheat the Oven and Prepare the Pan

Preheat your oven to 375°F (190°C). While the oven is heating up, thoroughly grease a jumbo muffin pan with non-stick cooking spray or butter to make sure the muffins don’t stick during baking.

Prepare the Biscuit Mixture

Unbaked biscuit dough cut into small triangular pieces, perfect for a garlic butter treat, is spread out on a white and green cutting board atop a white surface. A yellow cloth is partially visible in the bottom left corner.
A clear glass bowl containing shredded mozzarella cheese, cooked chicken pieces, and slices of pepperoni sits on a white surface—like the makings of a Pepperoni Pizza. A corner of a yellow cloth is visible in the lower left corner.
A hand holds a ball of dough mixed with shredded cheese and pieces of pepperoni, ready to become a Pepperoni Pizza muffins recipe, over a glass bowl with more of the same mixture, on a white surface.

Quarter each biscuit into 4 pieces and place them in a large mixing bowl. This helps the biscuit pieces bake more evenly and gives each muffin a light, airy texture.

Next, cut each pepperoni slice into quarters and add them to the bowl with the biscuit pieces. Sprinkle in the shredded mozzarella cheese. Toss everything together until the cheese and pepperoni are evenly mixed into the biscuit pieces.

Fill the Muffin Cups

A red muffin tin holds twelve unbaked pizza muffins, some topped with shredded cheese and slices of pepperoni, on a white surface with a yellow cloth partially visible in the lower left corner.

Spoon the biscuit, cheese, and pepperoni mixture into each muffin cup. Distribute it evenly, making sure each muffin cup is filled with approximately 6 pieces. The muffins will puff up during baking, so don’t overfill the cups.

Add the Butter

A red muffin tin holds twelve unbaked pepperoni pizza muffins, each topped with slices of cheese, herbs, and pepperoni, on a light-colored surface. A yellow cloth is partially visible in the lower left corner.

Cut half of the stick of butter (about 4 tablespoons) into 12 small pieces. Place one piece of butter on top of each muffin. This will melt into the muffins, helping them get that delicious, golden finish as they bake.

Bake the Muffins

A red muffin tin contains twelve golden-topped Pepperoni Pizza Muffins, infused with garlic butter and sprinkled herbs, resting on a white surface—an irresistible recipe for pizza lovers.

Place the muffin pan into the preheated oven and bake for 20-25 minutes. Keep an eye on them toward the end—you're looking for a golden-brown color and bubbly, melted cheese. The muffins should rise slightly and become crispy on the top.

Prepare the Garlic-Butter Mixture

While the muffins are baking, melt the remaining butter (about 4 tablespoons) in a small bowl. Add the garlic salt and dried parsley to the melted butter and stir until combined. This mixture will give the muffins their savory garlic flavor.

Finish and Serve

A stack of three savory pepperoni pizza muffins with melted cheese and pepperoni slices sits on a white plate, accompanied by more muffins and a small bowl of garlic butter dipping sauce in the background. Try this delicious recipe for your next snack!.

Once the muffins are out of the oven, immediately brush each one with the garlic-parsley butter mixture, making sure to coat them generously. Allow the muffins to cool for a few minutes before removing them from the pan. Serve them warm for the best texture and flavor.

Storage

A plate with three savory Pepperoni Pizza Muffins, topped with melted cheese and pepperoni, is in the foreground. A bowl of dipping sauce and more muffins on a plate are in the background, served with crisp lettuce—perfect for a new recipe to try!.

To store garlic butter pepperoni pizza muffins, allow them to cool to room temperature before transferring them to an airtight container. You can refrigerate the muffins for up to 3 days. To reheat, simply place them in the oven at 350°F (175°C) for about 10-12 minutes, or until warmed through. You can also use a microwave, heating in 30-second intervals.

Top Tips

Distribute evenly: When mixing the biscuit dough, cheese, and pepperoni, make sure everything is well combined so each muffin has a good balance of cheese and pepperoni.

Monitor the baking time: Keep an eye on the muffins in the final minutes of baking. They should be golden brown and bubbly, but be careful not to over-bake them.

Customize the flavor: Try using different cheeses like cheddar or provolone to switch things up. You can also add a pinch of red pepper flakes or Italian seasoning for extra flavor.

Recipe

Tried and loved this recipe? Please leave a 5-star review below! Your reviews mean a lot to me, so if you've got any questions, please let me know in a comment.

A close-up of three savory muffin-shaped bread bites with visible pieces of pepperoni and herbs, inspired by a Pepperoni Pizza Muffins Recipe, stacked on a white plate. A cup of red dipping sauce is blurred in the background.
Print Recipe
No ratings yet

Garlic Butter Pepperoni Pizza Muffins

Quick and easy garlic butter pepperoni pizza muffins recipe! Cheesy, pull-apart pizza muffins are a quick snack made with garlic butter, pizza sauce, and mozzarella in dough!
Prep Time20 minutes mins
Cook Time25 minutes mins
Total Time45 minutes mins
Course: Appetizer, Side Dish
Cuisine: American
Keyword: garlic butter pepperoni pizza muffins
Servings: 12 muffins
Calories: 77kcal
Author: Ksenia Prints

Equipment

  • Jumbo Muffin Pan
  • Cutting Board
  • Knife

Ingredients

  • 1 can refrigerated biscuits
  • 15 pepperoni slices
  • 2 cups shredded mozzarella cheese
  • 1 stick unsalted butter
  • Dried parsley
  • 1 teaspoon garlic salt

Instructions

  • Preheat your oven to 375°F (190°C) and thoroughly grease a jumbo muffin pan.
  • Quarter each biscuit and place all pieces in a large mixing bowl.
  • Cut each pepperoni slice into quarters. Add the pepperoni pieces and shredded mozzarella to the bowl with the biscuit pieces and mix well.
  • Place approximately 6 biscuit pieces with cheese and pepperoni into each muffin cup, distributing the mixture evenly among all cups.
  • Cut half the stick of butter into 12 small pieces. Place one piece on top of each muffin.
  • Bake for 20-25 minutes until the muffins are golden brown and bubbly.
  • While the muffins are baking, melt the remaining half stick of butter in a small bowl. Add the garlic salt and dried parsley to the melted butter and mix well.
  • When the muffins are done, immediately brush each one with the garlic-parsley butter mixture.
  • Allow the muffins to cool slightly before removing from the pan. Serve warm.

Nutrition

Calories: 77kcal | Carbohydrates: 2g | Protein: 5g | Fat: 6g | Saturated Fat: 3g | Polyunsaturated Fat: 0.4g | Monounsaturated Fat: 2g | Trans Fat: 0.04g | Cholesterol: 17mg | Sodium: 372mg | Potassium: 26mg | Fiber: 0.03g | Sugar: 0.3g | Vitamin A: 128IU | Calcium: 96mg | Iron: 0.2mg

2-Ingredient Air Fryer Plantain Chips Recipes

In just 10 minutes in the air fryer, you can have your own healthy, crunchy plantain chips snack! Make baked plantain chips with just two ingredients. 

A bowl filled with plantain chips surrounds a serving of red salsa, with some chips spilling out onto a light-colored marble surface.

These plantain chips have become my go-to for satiating snack cravings without having my belt buckle afterwards. Hailing from Latin American kitchens, these chips are traditionally made by frying thin slices of green plantains, but this air fryer version cuts back on our and time. If I had to describe them, I'd say they taste like a cross between a kettle chip and a savory banana—earthy, crisp, and slightly sweet if you let them ripen just a bit.

With just two ingredients and 10 minutes of your time, this recipe is a staple for anyone looking to snack smarter, whether you're gluten-free, vegan, or simply want something craveable without the preservatives and excess salt.  And if you're having a party, serve with my 7 layer dip or the iconic longhorn steakhouse parmesan spinach dip!

A plate filled with banana chips arranged in a circle around a serving of red salsa on a light surface, with additional banana chips scattered in the background.

Are Air Fryer Plantain Chips a Healthy Snack?

Absolutely—especially when compared to potato chips or packaged snack mixes. Plantains are naturally rich in fiber, potassium, and resistant starch, making them great for digestion and even blood sugar regulation. And with the summer coming up, if you are trying to fit into some old jeans (like me), it is lower in fat than traditional chips and offer real satiety thanks to fiber and slow-burning starch.

While deep frying can add unwanted calories and fats, air frying creates the same crispy texture with a fraction of the oil. Compared to baking, air frying also yields a superior crunch in less time.

A wooden board with thin banana slices, a whole peeled banana, and a green mandoline slicer on a white surface.

Curious how air frying measures up across the board? Check out this Essential Air Fryer Accessories Guide to upgrade your air fryer game, or try these Crispy Air Fryer Beet Chips for another healthy chip option.

How to Get Perfectly Crunchy Plantain Chips!

Check early and flip: Not all air fryers are created equal. Peek at the 6-minute mark, and flip halfway for even browning.

Use green plantains, not ripe ones. Yellow or spotted plantains will yield softer, sweeter chips.

Mandoline magic: For perfectly even, ultra-crispy slices, a mandoline slicer beats a knife every time. Uniformity = consistency.

Don't overcrowd: Don’t be tempted to cook them all at once. Batch cooking is better than soggy chips.  Give your chips space in the air fryer basket. Overlapping slices will steam, not crisp. 

A wooden cutting board with two unpeeled plantains and a kitchen knife is placed on a light marble surface.

Ingredient Highlight: What Exactly Are Plantains?

Plantains look like bananas but don’t be fooled—they’re starchier, firmer, and typically used in savory dishes. While bananas are best raw, plantains shine when cooked, especially in Latin American and Caribbean cuisine.

If you're looking to explore further, try these traditional Plátanos Maduros (Fried Sweet Plantains)or Baked Plantains with Guava and Cheese, that explore a baked version of the fruit. 

A person holds an open air fryer basket filled with homemade banana chips. The basket is black, and the person is wearing a blue shirt. The background is a light-colored surface.

Directions to Make Homemade Plantain Chips Recipe

  • Cut off both ends of the plantains.
  • Score the skin lengthwise and peel carefully—green plantains can be tricky!
  • Slice diagonally into thick chips. 
  • Spray your air fryer basket lightly with oil.
  • Arrange plantain slices in a single layer—no overlaps!
  • Air fry at 370°F for 6–8 minutes. Flip slices, then cook another 5 minutes. Total cook time is about 10–13 minutes.
  • Remove, season (sprinkle with sea salt, pepper, spices of your choice), and let cool completely before eating.

Storage

Let your plantain chips cool fully before storing. Moisture is the enemy of crunch! Place them in an airtight container at room temperature and enjoy within 3 days. If they soften, pop them back in the air fryer for 1–2 minutes to re-crisp.

A ceramic bowl filled with tomato sauce is surrounded by a ring of crispy plantain chips, arranged neatly around the edge of the bowl on a light-colored surface.

Recipe

Tried and loved this recipe? Please leave a 5-star review below! Your reviews mean a lot to me, so if you've got any questions, please let me know in a comment.

A bowl of red salsa partially surrounded by dried banana chips, with several chips scattered on a light gray marble surface.
Print Recipe
No ratings yet

How to Make Crispy Plantain Chips in the Air Fryer

In just 10 minutes in the air fryer, you can have your own healthy, crunchy plantain chips snack! Make baked plantain chips with just two ingredients. This recipe is a staple for anyone looking to snack smarter, whether you're gluten-free, vegan, or simply want something craveable without the preservatives and excess salt.  
Prep Time10 minutes mins
Total Time10 minutes mins
Course: Appetizer, dessert / snack
Cuisine: Colombian, Latin American, Mexican
Keyword: plantain chips
Servings: 4 people
Calories: 136kcal
Author: Ksenia Prints

Equipment

  • Air Fryer
  • Air Fryer Liners
  • Cutting Board
  • Mandoline or sharp knife
  • Mixing Bowl

Ingredients

  • 2 medium green plantains
  • Oil Spray
  • Salt and pepper optional
  • Spices chili flakes, cumin, coriander (optional)

Instructions

  • Cut off the ends of the plantain. To peel the plantain, score the skin lengthwise without damaging the flesh. Then peel the plantain.
  • Cut plantain into diagonal slices of about ¼-inch in thickness, using a knife or a mandoline.
  • Spray the air fryer basket with oil.
  • Lay the plantain chips in the basket in a single layer, without any overlap.
  • Bake the chips in the air fryer at 370 F degrees for 6-8 minutes. Turn the slices over to the other side and cook for an additional 5 minutes or until crispy. Chips usually need 10-13 minutes in the air fryer in total.
  • You can now sprinkle plátano chips with your choice of spices (I like cumin, coriander and chili flakes), or salt and pepper.
  • Let them cool before eating. Store leftovers in an airtight container in room temperature for up to 3 days.

Nutrition

Calories: 136kcal | Carbohydrates: 33g | Protein: 1g | Fat: 0.1g | Saturated Fat: 0.1g | Polyunsaturated Fat: 0.03g | Monounsaturated Fat: 0.02g | Sodium: 2mg | Potassium: 386mg | Fiber: 2g | Sugar: 2g | Vitamin C: 18mg | Calcium: 2mg | Iron: 1mg

Rich Turkey Bolognese Recipe

Hearty turkey Bolognese with ground turkey, vegetables, and San Marzano tomatoes. Perfect even for cold busy nights, served over pasta with Parmesan.

A white bowl filled with penne pasta topped with meat sauce, garnished with fresh basil and grated cheese. A pan of sauce, a bowl of grated cheese, and a fork are visible in the background on a marble surface.

For a while, this turkey Bolognese has become our family's Sunday tradition. It's a meal worth waiting for while it simmers away on the stove, filling the house with rich, irresistible aroma. While traditional beef Bolognese has its merits, I've discovered that using ground turkey creates a lighter sauce that maintains all the depth of the classic version. This sauce changed our pasta nights completely, taking them from basic to restaurant-quality without much effort. 

I came up with this recipe during a period when I was trying to work more air fryer zucchini fritters and vegetable-heavy dishes like my ground beef zucchini and rice casserole into our rotation. The turkey Bolognese became the perfect middle ground—lighter than beef but still hearty enough to satisfy everyone at the table. We often serve it with a slice of rosemary sourdough bread for sopping up every last bit of sauce.

The real secret to this sauce isn't some fancy ingredient or complicated technique—it's patience. Time turns the simple combination of turkey, vegetables, and tomatoes into something as good as this. The milk might seem unusual, but it's actually a traditional Italian technique that mellows the acidity of the tomatoes while adding richness. And that final pat of butter stirred in the end? The key to creating a silky texture that clings perfectly to the pasta. The pasta also adds to the final taste, I found that cooking it in chicken broth makes the flavors deeper. 

Ingredient Highlight: Ground Turkey

Top-down view of raw ingredients for a recipe arranged on a marble surface, including ground meat, rice, chopped carrots, onions, butter, rosemary, bay leaf, garlic, tomato sauce, scallions, black pepper, milk, and oil.

Lean, flavorful, and versatile, ground turkey is a fantastic alternative to traditional beef or pork. It brings a lighter touch to this hearty sauce while still delivering that rich, comforting depth.

One of the great things about turkey is how easily it takes on flavor. Whether you’re building layers in a sauce like this one or giving it a bold spice rub — like in our Cajun-style baked turkey breast with vegetables — turkey has a way of transforming with each recipe. It's a true blank canvas.

When we’re working with other cuts, we love mixing things up with recipes like our crispy and juicy air fryer turkey thighs for something a little more indulgent, or these oven-baked turkey tenders that my kids ask for on repeat.

And if you’re ever left with extra cooked turkey, don’t toss it! You can always reinvent using my Texas French toast casserole made with leftover turkey.

Step-by-step Instructions for Turkey Bolognese

A white bowl of penne pasta topped with rich Turkey Bolognese, grated cheese, and a basil leaf sits on a marble surface. Nearby are a bowl of grated cheese and a pot of Turkey Bolognese. A fork rests in the bowl.

This ground turkey Bolognese recipe is a comforting, flavorful dish made with ground turkey, vegetables, and aromatic herbs. Slow-cooked to bring out the rich flavors, this Bolognese is perfect for serving over pasta and topped with freshly grated Parmigiano-Reggiano. It's a great way to make a filling and satisfying meal with minimal effort.

Prepare the Vegetables

Start by finely chopping the onions, carrots, and celery. Mince the garlic cloves. These vegetables make up the base of the sauce, adding sweetness and depth to the flavor.

Cook the Vegetables

A person adds chopped ingredients from a small glass bowl into a stainless steel skillet for a hearty Turkey Bolognese recipe, with diced carrots, celery, onions, and garlic. A wooden spoon rests in the pan on a marble countertop.

Heat 50ml of extra virgin olive oil in a large pan over medium heat. Add the onions, carrots, celery, and garlic to the pan. Cook, stirring occasionally, until the vegetables have softened, about 8-10 minutes. This will create a flavorful base for the Bolognese sauce.

Brown the Ground Turkey

A pot on a marble surface contains chopped onions, carrots, celery, and raw ground meat being stirred with a wooden spoon—perfect for starting your favorite Turkey Bolognese recipe.

Add 1kg of ground turkey to the pan. Break it up with a spoon and cook until the turkey is browned all over. Make sure to stir occasionally to make sure it cooks evenly. This step helps develop the flavor of the meat and adds richness to the sauce.

Deglaze with White Wine

A hand pours liquid from a small white bowl into a large metal pan filled with cooked ground meat, carrots, celery, and onions for a delicious Rich Turkey Bolognese. A wooden spoon rests in the pan on a light marble surface.

Once the turkey is browned, pour in 200ml of dry white wine. Stir the mixture, scraping any browned bits from the bottom of the pan. Let the wine simmer for about 2 minutes to reduce by half, which intensifies the flavor.

Add Tomatoes, Milk, and Herbs

A hand stirs a saucepan filled with crushed tomatoes, cream, and sprigs of rosemary using a wooden spoon—a perfect base for a rich Turkey Bolognese. The pot sits on a marble countertop.

Add 800g of crushed San Marzano tomatoes to the pan, followed by 250ml of whole milk. Stir to combine. Add the bay leaves and sprig of fresh rosemary. The milk will help mellow the acidity of the tomatoes, while the herbs will infuse the sauce with flavor.

Simmer the Sauce

A hand holds a small white bowl with a dark spice next to a skillet of rich Turkey Bolognese sauce. A wooden spoon rests in the skillet, which sits on a light gray marble countertop.

Lower the heat and let the sauce simmer uncovered for 2 hours, stirring occasionally. This slow cooking time helps the flavors develop and allows the sauce to thicken. If the sauce becomes too thick, you can add a little water or broth to reach your desired consistency.

Final Touches

A person adds pieces of butter from a small white ramekin into a pan of rich Turkey Bolognese sauce on a marble countertop. A wooden spoon rests in the savory sauce, while an empty ramekin sits nearby.

Once the sauce has thickened and the flavors have melded together, remove the bay leaves and rosemary sprig. Stir in 50g of unsalted butter for extra richness. Season with salt and pepper to taste.

Serve

A pot of Turkey Bolognese sauce with a wooden spoon rests on a towel. Below, penne pasta topped with the savory Bolognese recipe and basil sits next to grated cheese, a pepper shaker, and a bottle of olive oil.

Serve the turkey Bolognese over your favorite pasta. Top with freshly grated Parmigiano-Reggiano for added flavor. Enjoy this hearty and comforting meal!

Storage

A bowl of penne pasta topped with a rich Turkey Bolognese sauce, garnished with shaved parmesan cheese and fresh basil leaves. A fork rests inside the bowl.

If you ever have leftovers, let the turkey Bolognese cool to room temperature. Transfer it to an airtight container and store it in the refrigerator for up to 4 days. If you want to store it longer, freeze the Bolognese in a freezer-safe container for up to 3 months. To reheat, thaw it in the refrigerator overnight and heat it on the stove over medium heat until warmed through. You can also reheat it in the microwave, stirring every minute for even heating. If the sauce thickens too much, simply add a splash of broth or water to reach your desired consistency.

Top Tips

Use fresh herbs: Fresh rosemary and bay leaves infuse the sauce with a fragrant aroma. While dried herbs can be used, fresh herbs bring a more vibrant, natural flavor to the Bolognese.

Save some pasta water: When cooking your pasta, reserve a cup of pasta water before draining. Adding a bit of this starchy water to your Bolognese sauce helps thicken it and makes sure the sauce adheres better to the pasta, creating a smoother, more cohesive dish.

Spice it up: For a bit of heat, sprinkle in some red pepper flakes to your bolognese. This adds a subtle kick without overpowering the rich, savory flavors, giving the sauce a deeper layer of complexity. Start with a pinch and adjust to taste based on how spicy you prefer it.

Recipe

Tried and loved this recipe? Please leave a 5-star review below! Your reviews mean a lot to me, so if you've got any questions, please let me know in a comment.

A white bowl filled with penne pasta, topped with a chunky tomato meat sauce, grated cheese, and a fresh basil leaf. A spoon rests in the bowl, and a towel and cheese dish are nearby on a marble surface.
Print Recipe
No ratings yet

Rich Turkey Bolognese

Hearty turkey Bolognese with ground turkey, vegetables, and San Marzano tomatoes. Perfect even for cold busy nights, served over pasta with Parmesan.
Prep Time15 minutes mins
Cook Time2 hours hrs
Total Time2 hours hrs 15 minutes mins
Course: Main, Pasta
Cuisine: American
Servings: 6 servings
Calories: 410kcal
Author: Ksenia Prints

Ingredients

  • 1 kg ground turkey
  • 2 onions finely chopped
  • 2 carrots finely diced
  • 2 celery stalks finely diced
  • 4 garlic cloves minced
  • 200 ml dry white wine
  • 800 g San Marzano tomatoes crushed
  • 250 ml whole milk
  • 2 bay leaves
  • 1 sprig fresh rosemary
  • 50 g unsalted butter
  • 50 ml extra virgin olive oil
  • Salt and freshly ground black pepper
  • Freshly grated Parmigiano-Reggiano

Instructions

  • Sautee onions, carrots, celery, and garlic until in oil over medium heat softened.
  • Add turkey, cook until browned.
  • Deglaze with wine, reduce by half.
  • Add tomatoes, milk, bay leaves, and rosemary. Simmer for 2 hours.
  • Remove herbs, stir in butter.
  • Season to taste.
  • Serve with pasta of choice and fresh Parmigiano-Reggiano.

Video

Nutrition

Calories: 410kcal | Carbohydrates: 12g | Protein: 43g | Fat: 19g | Saturated Fat: 7g | Polyunsaturated Fat: 2g | Monounsaturated Fat: 9g | Trans Fat: 0.3g | Cholesterol: 115mg | Sodium: 114mg | Potassium: 965mg | Fiber: 2g | Sugar: 7g | Vitamin A: 1461IU | Vitamin C: 22mg | Calcium: 90mg | Iron: 2mg

Homemade Corn Casserole Recipe

This homemade corn casserole is quick to prep, made with real ingredients, and bakes up golden, tender, and perfect as a side dish or snack.

Two rectangular slices of golden-brown homemade corn casserole are served on a white plate with a fork. The casserole appears moist inside, and a glass baking dish with more pieces is in the background.

Golden brown on top with a creamy, cornbread-like texture throughout, this homemade corn casserole is not only a side dish but our family's comfort food. Its subtle sweetness and tender kernels make every bite irresistible—I just know it'll get as many compliments as the main dish.

The combination of cornmeal and flour creates a satisfying texture—neither too dense nor too light—while sour cream adds richness without overshadowing the corn’s natural flavor. And those little bites of corn kernels? The cherry on top.

I love this casserole for how simple it is to make, and how reliable. Unlike others that require extensive prep or precise timing, this recipe comes together in just one bowl with ingredients you likely already have in your pantry. Fresh, frozen, or canned corn all work well, making it perfect for pairing with everything from air fryer turkey thighs to BBQ chicken drumsticks—or even tofu.

The baking process gives the top a beautiful golden crust while the interior stays creamy and tender. My family has strong opinions about their preferred texture—some love the crispy edges, while others go straight for the soft center. I often serve this with air fryer asparagus for a complete meal, though it works just as well with lighter sides like air fryer asparagus.

This casserole has become my go-to side dish. The sweet corn flavor brightens up heavier meals while giving enough substance to satisfy hearty appetites. Plus, leftovers reheat nicely (if there are any)—I've been known to sneak a piece for breakfast with shredded cheddar and a fried egg on top. My daughter often catches me in the act and asks to share, though she usually ends up eating most of it, piled high with extra cheese.

If you're feeding a crowd or meal prepping for a busy week ahead, this corn casserole brings consistent results with minimal effort. It's proof that sometimes the best recipes are the ones that simply, reliably, make everyone happy—no fancy ingredients or techniques required.

Ingredients

Seven small bowls and a plate on a light gray surface hold ingredients for homemade corn casserole: two eggs, sour cream, flour, cornmeal, sugar, canned corn, a stick of butter, and baking powder. Perfect for any corn casserole recipe.
  • Sour cream – Adds a creamy, tangy richness. I’ve tried using Greek yogurt as a substitute when I ran out of sour cream, and while it works, it’s slightly less rich.
  • Cornmeal – Gives texture and enhances the corn flavor. I experimented with using a finer cornmeal once, but it made the casserole too dense, so I stick with regular.
  • Corn kernels – Bring sweetness and moisture. I prefer fresh or frozen corn because they retain their texture better than canned corn, which can sometimes be too soft.
  • Butter – Gives a smooth, rich finish. I’ve swapped it for olive oil in the past for a lighter option, but the butter creates a better flavor base for the casserole.
  • Eggs – Bind everything together and create a smooth consistency. I’ve tried using flax eggs for a vegan version, but the texture wasn’t as fluffy, so I stick with regular eggs for this dish.

See the recipe card for exact quantities.

Step-by-step Instructions

Two pieces of cornbread on a decorative cream-colored plate with a fork beside them; a pink napkin and green herb garnish add charm—perfect alongside your favorite homemade corn casserole.

This homemade corn casserole is a simple and comforting dish, perfect for family dinners or get togethers. With a soft, slightly sweet texture and a golden, crispy top, it pairs well with just about anything. The recipe combines pantry staples like cornmeal, flour, and sour cream to create a dish that's both easy to make and full of flavor. Follow these steps to bring a little warmth and comfort to your table.

Preheat the Oven

Begin by preheating your oven to 350°F (175°C). Lightly grease an 8x8-inch baking dish with butter or cooking spray to prevent the casserole from sticking.

Prepare the Dry Ingredients

A white ceramic bowl filled with a mixture of dry cornmeal, ready for a delicious homemade corn casserole, sits on a light gray textured surface.

In a medium bowl, combine the dry ingredients: 6 tablespoons of all-purpose flour, 3 tablespoons of cornmeal, 3 tablespoons of sugar, 1 teaspoon of baking powder, and ¼ teaspoon of salt. Whisk these ingredients together to make sure they are well mixed and evenly distributed.

Combine the Wet Ingredients

In a separate bowl, whisk together the wet ingredients: ½ cup of sour cream, 3 tablespoons of melted butter, and 2 large eggs. Beat them until smooth and well incorporated.

Mix the Wet and Dry Ingredients

Add the wet ingredients to the dry ingredients. Stir gently with a spoon or spatula just until combined. Be careful not to overmix, as this can make the casserole dense.

Add the Corn Kernels

A white mixing bowl filled with a lumpy, yellowish corn casserole batter, complete with visible corn kernels, sits on a light gray countertop.

Fold in 1 ½ cups of corn kernels (fresh, frozen, or canned and drained). Make sure that the corn is evenly distributed throughout the batter for a consistent texture.

Transfer to Baking Dish

A square glass baking dish filled with an uncooked, yellow corn casserole mixture sits on a light gray surface. This homemade recipe is evenly spread and features visible corn kernels.

Pour the batter into your prepared 8x8-inch baking dish. Use a spatula to spread the mixture evenly in the dish, making sure the surface is smooth.

Bake the Casserole

A square glass baking dish filled with a golden-brown homemade corn casserole sits on a round wooden board against a light gray background.

Place the baking dish in the preheated oven and bake for 40-45 minutes. The casserole is done when the top is golden brown and firm to the touch. It's normal for the center to remain slightly moist. If you insert a toothpick into the center, it should come out with just a few crumbs.

Let it Set

A square, golden-brown homemade corn casserole with a slightly uneven surface sits in a clear glass baking dish on a cooling rack. A pink cloth is partially visible in the corner.

Once the casserole is baked, remove it from the oven and let it sit for 5 minutes before serving. This allows the casserole to set and makes it easier to cut.

Serve and Enjoy

A square glass baking dish with a golden-brown homemade corn casserole, missing one piece. The casserole contains visible chunks, likely nuts. Plates, a wooden spatula, and a pink cloth are in the background.

Serve the corn casserole warm or at room temperature. For extra richness, top with a dollop of sour cream and sprinkle with fresh herbs like chives or parsley for added color and flavor.

Storage

A plate with two rectangular pieces of golden brown homemade corn casserole next to a fork. A glass baking dish with more corn casserole and a partially eaten piece is nearby, with pink and white cloths and green herb leaves in the background.

To store homemade corn casserole, allow it to cool to room temperature before transferring it to an airtight container. Refrigerate for up to 4 days. To reheat, place it in the oven at 350°F (175°C) for 10-15 minutes, or until heated through. You can also microwave individual portions, but be sure to cover the casserole to retain moisture. 

Top Tips

Frozen corn tip: No need to thaw frozen corn before using—it can go straight into the batter.

Canned corn tip: Be sure to drain canned corn well to prevent excess moisture in the casserole.

Doneness check: Test the casserole’s doneness by inserting a toothpick in the center. It should come out mostly clean with a few moist crumbs.

Recipe

Tried and loved this recipe? Please leave a 5-star review below! Your reviews mean a lot to me, so if you've got any questions, please let me know in a comment.

Two rectangular pieces of golden-brown, dense homemade cake are placed on a decorative white plate, with a fork and another plate of cake visible in the blurred background, evoking comfort much like a classic Corn Casserole recipe.
Print Recipe
5 from 1 vote

Homemade Corn Casserole

This homemade corn casserole is quick to prep, made with real ingredients, and bakes up golden, tender, and perfect as a side dish or snack.
Prep Time5 minutes mins
Cook Time45 minutes mins
Total Time50 minutes mins
Course: Side Dish
Cuisine: American
Keyword: homemade corn casserole
Servings: 4 servings
Calories: 241kcal
Author: Ksenia Prints

Equipment

  • 8×8 inch baking dish
  • Two mixing bowls
  • Measuring cups and spoons
  • Mixing spoon or spatula
  • Oven

Ingredients

  • ½ cup sour cream
  • 6 tablespoons all-purpose flour
  • 3 tablespoons cornmeal corn flour
  • 3 tablespoons sugar
  • 1 ½ cups corn kernels fresh, frozen, or canned - drained
  • 1 teaspoon baking powder
  • ¼ teaspoon salt
  • 3 tablespoons butter melted
  • 2 large eggs

Instructions

  • Preheat your oven to 350°F. Lightly grease an 8×8 inch baking dish with butter or cooking spray.
  • In a medium bowl, whisk together the dry ingredients: all-purpose flour, cornmeal, sugar, baking powder, and salt.
  • In a separate bowl, combine the wet ingredients: sour cream, melted butter, and eggs. Beat until well mixed.
  • Pour the wet ingredients into the bowl with the dry ingredients. Stir just until combined - don't overmix.
  • Fold in the corn kernels, distributing them evenly throughout the batter.
  • Pour the mixture into your prepared baking dish, spreading it evenly with a spatula.
  • Bake in the preheated oven for 40-45 minutes. The casserole is done when the top is golden brown and feels firm to the touch. The center may still be slightly moist, which is normal.
  • Remove from the oven and let stand for 5 minutes before serving.
  • Serve warm or at room temperature. If desired, top with a dollop of sour cream and sprinkle with fresh herbs like chives or parsley.

Notes

If using frozen corn, you don't need to thaw it first
If using canned corn, make sure to drain it well
Check for doneness by inserting a toothpick in the center - it should come out mostly clean with a few moist crumbs
This casserole pairs well with grilled meats, barbecue, or as a side dish for holiday meals
Leftovers can be refrigerated for up to 3 days and reheated in the microwave
Enjoy your delicious homemade corn casserole!

Nutrition

Calories: 241kcal | Carbohydrates: 34g | Protein: 7g | Fat: 9g | Saturated Fat: 4g | Polyunsaturated Fat: 1g | Monounsaturated Fat: 3g | Trans Fat: 0.01g | Cholesterol: 100mg | Sodium: 430mg | Potassium: 199mg | Fiber: 2g | Sugar: 13g | Vitamin A: 344IU | Vitamin C: 1mg | Calcium: 117mg | Iron: 1mg

Green Bean Casserole Recipe

A comforting green bean casserole with crispy fries, mushrooms, and a creamy sauce, baked to perfection for a hearty side dish.

A serving dish filled with green bean casserole, featuring crisp green beans, sliced mushrooms, and golden French fries, with a metal spoon resting inside.

One playdate, I watched my son go back for thirds of green beans. He had always hated them, and we were both surprised by how much he enjoyed them this time. I knew I had to try making my own version at home. But what's this health-obsessed mom to do to get her kid to eat green beans? Combine them with fries, of course.

Now, alongside the infamous air fryer zucchini fritters, the combination of crispy shoestring fries, tender green beans, and savory mushroom sauce has become our go-to answer for "What should we bring?"—whether it's a summer potluck party or a winter holiday gathering.

I never imagined my picky eater asking for green beans or air fryer asparagus for dinner, yet here we are.. He'd instantly assume we're having this when he smells the sweet aroma of caramelized onions - the same way I prepare them for my lentil and rice with caramelized onion recipe..

It also pairs well with plenty of options. Sometimes I serve it with air fryer BBQ chicken drumsticks or juicy air fryer turkey thighs. If we want something else, I go with lemon air fryer salmon or air fryer tofu.

This single dish changed our family's relationship with vegetables. My son loves green beans even more now, and my daughter finishes her plate—as long as the shoestring fries outnumber the vegetables. Some days, they compete to see who can finish more servings.

From the beginning, I made sure this recipe could adapt to different seasons and occasions. During summer BBQs, it holds up well on buffet tables with grilled meats. In the winter holidays, it adds a fresh, vibrant touch to heavier dishes. I love that something as simple as green beans can be enjoyed and appreciated by everyone at the table—even those who are usually skeptical of veggies.

A close-up view of a green bean casserole featuring tender green beans, sliced mushrooms, and crispy French fries, partially mixed together with a spoon in a white casserole dish.

Ingredients

Ingredients on a marble surface for a classic Green Bean Casserole Recipe: fresh green beans, white mushrooms, sliced onions, minced garlic, flour, cracked pepper, vegetable broth, milk, soy sauce, and cooking spray.
  • Fresh Green Beans – The star of the dish, bringing a fresh crunch. I’ve tried using canned green beans, but fresh ones deliver better texture and flavor. The key is trimming and cutting them into 1-inch pieces for even cooking.
  • Mushrooms – These add earthy umami flavor that enhances the dish. I prefer cremini mushrooms for their deeper taste. I’ve used white button mushrooms, but the cremini have a richer flavor.
  • Onion – Adds natural sweetness to the mix. I caramelize them for about 10 minutes to bring out the richness.
  • Garlic – Brings a fragrant, savory note to the dish. I’ve experimented with garlic powder, but freshly minced garlic has a stronger, more aromatic flavor that spreads evenly throughout.
  • Olive Oil or Butter – These are the fats used for sautéing the vegetables. I often choose olive oil for a lighter touch, but butter creates a richer flavor. 
  • All-Purpose Flour – Essential to help thicken the sauce and bind the ingredients together.
  • Vegetable or Chicken Broth – Serves as the base for the sauce. I often use vegetable broth for a lighter flavor, but chicken broth adds more depth. I prefer chicken broth for a richer, heartier sauce, but both options work well.
  • Milk (or Non-Dairy Milk) – Adds creaminess to the sauce. I typically use whole milk for a richer, smoother texture, but almond milk works when I need a dairy-free option. 
  • Frozen Shoestring Fries – Create a crispy topping for the casserole. These fries crisp up quickly and give the dish a golden, crunchy finish without the extra effort. Shoestring fries are the perfect size and texture, adding crunch with minimal hassle.

See the recipe card for exact quantities.

Step-by-step Instructions

A close-up of a green bean casserole featuring green beans, mushrooms, and crispy French fries, with a serving spoon lifting a portion from the bowl. The freshly cooked ingredients are mixed together for a comforting dish.

This green bean casserole is a comforting dish with a creamy mushroom sauce and crispy shoestring fries on top. It’s a perfect side dish for any meal, combining savory flavors with a satisfying crunch. Easy to prepare and made with simple ingredients, it’s a guaranteed hit at the dinner table. 

Prepare the Fries

A rectangular baking sheet with an even layer of uncooked, thin frozen French fries spread out on a light-colored surface—perfect for topping your favorite Green Bean Casserole Recipe.

Arrange the shoestring fries in a single layer on a baking sheet. Bake them in the preheated oven for about 15 minutes or until they are golden and crispy. Set aside once they’re done.

Sauté the Vegetables

Sliced onions are cooking in a stainless steel skillet on a marble countertop, with a wooden spoon resting on top—perfect for starting your favorite Green Bean Casserole Recipe.

In a large skillet, heat either olive oil or butter over medium heat. Add the sliced onion and cook it until caramelized, which will take about 10 minutes. Stir occasionally to make sure the onions cook evenly and don't burn.

Add Mushrooms and Garlic

A stainless steel pan filled with sliced mushrooms and onions, perfect for a Green Bean Casserole recipe, is being cooked with a wooden spoon resting inside the pan on a light-colored marble surface.

Next, add the sliced mushrooms and minced garlic to the skillet with the caramelized onions. Cook them together for 5-7 minutes, or until the mushrooms have softened and released their moisture. Once the liquid has evaporated, the mushrooms will be tender and ready for the next step.

Add Soy Sauce and Flour

A stainless steel pan containing sautéed mushrooms and onions, some browned, with a wooden spoon resting inside—perfect for starting a classic Green Bean Casserole Recipe. The pan is on a light marble surface.

Pour the soy sauce over the mushrooms and onions, stirring to combine. The soy sauce adds depth of flavor to the dish. Then, sprinkle the flour over the mushroom mixture and stir it in well. Let it cook for 1-2 minutes to remove the raw flour taste.

Add Broth and Milk

A stainless steel pan filled with creamy mushroom sauce, perfect for a Green Bean Casserole Recipe, sits on a marble surface. A wooden spoon rests in the thick sauce, which contains visible mushroom slices and a rich beige consistency.

Gradually pour in the vegetable or chicken broth while stirring constantly. This helps the mixture thicken. Once the sauce thickens, add the milk, and stir to combine. Taste the sauce and adjust the seasoning with salt and pepper. Stir everything until smooth.

Add Green Beans

A metal pan on a marble surface contains green beans coated in a thick brown sauce, resembling a savory Green Bean Casserole. A wooden spoon rests inside the pan, partially covered by the sauced green beans.

Add the green beans to the skillet with the mushroom sauce. Mix everything together so the green beans are fully coated in the sauce.

Assemble the Casserole

An oval white casserole dish with black handles holds a classic Green Bean Casserole Recipe, featuring green beans, mushrooms, and creamy sauce, all arranged invitingly on a light marble surface.

Grease a 9x13-inch baking dish and pour the green bean and mushroom mixture into the dish. Spread it out evenly and place it in the oven preheated to 350°F (175°C). Bake for 20 minutes to heat through.

Top with Fries

An oval baking dish with two handles is filled with thin, golden-brown French fries on a white marble surface, perfect for pairing with your favorite Green Bean Casserole Recipe.

Remove the casserole from the oven and top it with the crispy shoestring fries. Return the dish to the oven and bake for an additional 10-15 minutes, or until the fries are golden and crispy and the casserole is fully heated through.

Serve and Enjoy!

A white plate with green bean casserole topped with crispy fried onions sits next to a larger dish of green bean casserole. A glass of red wine and a gray napkin rest on the marble surface.

Serve this green bean casserole hot, straight from the oven, with the fries golden and crisp on top.

Storage

A spoon lifts a serving of green bean casserole, layered with thin, crispy fried onions, from a white, round casserole dish. The dish is partially filled with creamy green beans and golden fried onions.

To store the green bean casserole, let it cool to room temperature before transferring it to an airtight container. Refrigerate for up to 3-4 days. If you want to freeze it, portion the casserole into freezer-safe containers and remove as much air as possible to prevent freezer burn. To reheat, thaw the casserole overnight in the refrigerator, then bake it at 350°F (175°C) for about 20-25 minutes, until heated through. You can also microwave individual servings in 1-minute intervals, stirring between each, until warm.

Top Tips

Blanch green beans for better texture: If using fresh green beans, blanch them in boiling water for 3–4 minutes, then drain and pat dry before mixing into the sauce. This helps them cook evenly and stay tender without becoming mushy.

Use fresh mushrooms for a better texture: Fresh mushrooms give a better texture than canned, and they release their liquid into the sauce, giving the casserole a richer flavor.

Make it ahead: This casserole, similar to my rutabaga casserole, can be prepared in advance and stored in the fridge for up to 1 day before baking. This helps the flavors meld together and makes for an easier, stress-free meal on the day you serve it.

A close-up of a green bean casserole dish filled with cooked green beans, thinly sliced beef, and crispy French fries, with a serving spoon partially visible in the savory mixture.

Recipe

Tried and loved this recipe? Please leave a 5-star review below! Your reviews mean a lot to me, so if you've got any questions, please let me know in a comment.

A close-up of French fries mixed with green beans and mushrooms coated in a brown sauce, with one forkful being lifted from this unique twist on a Green Bean Casserole Recipe.
Print Recipe
No ratings yet

Green Bean Casserole

A comforting green bean casserole with crispy fries, mushrooms, and a creamy sauce, baked to perfection for a hearty side dish.
Prep Time20 minutes mins
Cook Time40 minutes mins
Total Time1 hour hr
Course: Side Dish
Cuisine: American
Keyword: green bean casserole
Servings: 8 servings
Calories: 80kcal
Author: Ksenia Prints

Equipment

  • Oven
  • 9x13 Baking Dish

Ingredients

  • 1 lb 450 g fresh green beans, trimmed and cut into 1-inch pieces (or 2 cans of green beans, drained)
  • 8 oz 225 g fresh mushrooms, sliced
  • 1 medium onion thinly sliced
  • 2 cloves garlic minced
  • 2 tablespoons olive oil or butter
  • 2 tablespoons all-purpose flour
  • 1 cup vegetable or chicken broth
  • ½ cup milk or non-dairy milk
  • 1 teaspoon soy sauce
  • Salt and pepper to taste
  • Frozen shoestring fries

Instructions

  • Preheat the oven to 450F.
  • Arrange shoestring fries in a single layer, and bake for 15 minutes.
  • In a large skillet, heat olive oil or butter over medium heat.
  • Add the sliced onion and cook until caramelized, about 10 minutes, stirring occasionally.
  • Add the sliced mushrooms and minced garlic to the skillet with the onions.
  • Cook until the mushrooms are tender and any liquid has evaporated, about 5-7 minutes.
  • Pour the soy sauce over the mushrooms and stir to combine.
  • Sprinkle the flour over the mushroom mixture and stir to combine. Cook for 1-2 minutes.
  • Gradually add the vegetable or chicken broth, stirring constantly until the mixture thickens.
  • Add the milk, taste, and season with salt and pepper. Stir to combine.
  • Add the green beans to the pan with the mushroom sauce. Mix well.
  • Preheat the oven to 350°F (175°C).
  • Pour the mixture into a greased 9 x 13-inch baking dish.
  • Bake for 20 minutes.
  • Remove from the oven and top with the shoestring fries.
  • Return to the oven and bake for an additional 10-15 minutes, until the fries are golden and crispy and the casserole is heated through.

Video

Nutrition

Calories: 80kcal | Carbohydrates: 9g | Protein: 3g | Fat: 4g | Saturated Fat: 1g | Polyunsaturated Fat: 1g | Monounsaturated Fat: 3g | Cholesterol: 2mg | Sodium: 162mg | Potassium: 265mg | Fiber: 2g | Sugar: 4g | Vitamin A: 417IU | Vitamin C: 9mg | Calcium: 47mg | Iron: 1mg

Crustless Zucchini Quiche Recipe

This simple, crustless zucchini quiche recipe made with Parmesan, eggs, and zucchini for a light, savory dish that is perfect for a quick, healthy meal.

A square slice of crustless zucchini quiche, topped with shredded cheese and chopped herbs, is served on a white plate with pink floral designs. The plate rests on a white marble surface.

Aside from the weather, one thing I love about spring and summer is the price of zucchini. It's honestly one of the most versatile vegetables; they can be made for breakfast, lunch, or dinner. My favorite snack are my air fryer zucchini fritters, crispy and full of little salty bites of feta.

But I digress. Because the point of this post is to tell you about the latest thing I made with zucchinis, this crustless zucchini quiche. It's a revelation, my friends. This quiche is an easy recipe that made it to top of my casseroles list, much like my cheesy zucchini and ground beef zucchini and rice casserole. What makes it particularly special is how it avoids the fussy crust-making process entirely—I can have a main dish for Mother's Day brunch, or a side for dinner that's ready in about an hour with minimal cleanup.

My love for this quiche began after discovering how good zucchini is for this dish when properly prepared. I pair it with little gem salad for a light lunch, or with air fryer asparagus for a complete meal. When my slow cooker carrot soup is simmering, this quiche makes the perfect companion—both vegetable dishes that complement each other nicely.

As I've mentioned, zucchinis are incredibly versatile. While I'm making dinner, this quiche can be prepped and baked for tomorrow's brunch at the same time. It's so adaptable that I've even served it as an appetizer for brunch parties, where it surprisingly went well with goat cheese salad and gravlax salmon with dill.

I've discovered countless ways to have this quiche throughout the week. It's easy to reheat and actually tastes even better the next day as flavors develop. I have it with chicken, and my kids love it with beef pot roast. My children would have it warm from the oven, while my husband prefers his cold straight from the fridge with a dollop of sour cream.

For a recipe that turns zucchini into something the entire family requests repeatedly, this crustless quiche is a staple spring or summer recipe. It's simple but has satisfying and filling results. If you're looking for an easy recipe to keep in your rotation this summer, this is perfect for you.

Ingredients

A top-down view of ingredients for a crustless zucchini quiche on marble: grated zucchini in a bowl, eggs, flour, chopped onions, herbs, cheese, ground pepper, and a bottle of oil. Perfect setup for an easy zucchini quiche recipe.
  • Grated zucchini – This is the main ingredient, giving moisture and natural sweetness. I always make sure to squeeze out excess water before adding it to the mix to prevent a watery quiche.
  • All-purpose flour – This helps bind the ingredients and adds structure to the quiche. I’ve tried using whole wheat flour for a more earthy flavor, but it can make the quiche denser, so I stick to all-purpose flour for a lighter texture. Gluten-free flour can work as well, but I find it a bit heavier.
  • Baking powder – This makes sure the quiche rises slightly, giving it a light and fluffy texture. I’ve used it in combination with self-rising flour in other recipes, but here, it’s the perfect way to get the fluffiness without altering the flavor or texture too much.
  • Eggs – The eggs are crucial for holding the quiche together and giving a creamy, smooth texture. 
  • Grated Parmesan cheese – This brings a sharp, nutty flavor that makes the quiche better. I’ve substituted it with cheddar or mozzarella when I wanted a milder taste, but the Parmesan adds the right depth. I also love how it browns nicely on top for added flavor.

See the recipe card for exact quantities.

Step-by-step Instructions

A rectangular baking dish filled with a golden-brown crustless zucchini quiche, some pieces cut and a metal spatula lifting one slice. The casserole top is crisp, with visible zucchini shreds—a delicious zucchini quiche recipe.

This crustless zucchini quiche is a simple and healthy dish, perfect for breakfast or a light lunch. It’s made with fresh zucchini and savory Parmesan. Without the crust, it’s lighter but still packed with flavor and texture. Here’s how to make it in just a few easy steps.

Preheat the Oven

Start by preheating your oven to 350°F (175°C). This makes sure the quiche bakes evenly and thoroughly.

Prepare the Ingredients

A person is mixing sliced vegetables, preparing a crustless zucchini quiche batter in a large metal bowl with a spatula. An oil dispenser sits on the marble countertop nearby, ready for this easy zucchini quiche recipe.

In a medium-sized mixing bowl, combine all the ingredients: grated zucchini, flour, baking powder, minced onion, beaten eggs, olive oil, grated Parmesan, salt, black pepper, and parsley. Mix them well until all ingredients are fully incorporated. The zucchini should be squeezed to remove excess moisture, making sure the quiche doesn’t turn out watery.

Prepare the Baking Dish

A hand spreads a yellow zucchini mixture for a crustless zucchini quiche in a rectangular baking pan on a marble countertop. Nearby are a metal mixing bowl with remnants of the mixture and a metallic oil dispenser.

Lightly spray a 9 x 13-inch baking dish with cooking spray or grease it with a little oil to prevent sticking. Once prepared, pour the zucchini mixture into the dish, spreading it out evenly to bake consistently.

Bake the Quiche

A hand uses a spatula to lift a slice of crustless zucchini quiche from a rectangular metal baking dish. A beige cloth and fresh parsley are on the marble countertop beside the dish.

Place the dish in the preheated oven and bake for 45 to 50 minutes. The quiche is done when it turns golden brown and a toothpick or knife inserted into the center comes out clean. If the quiche isn't quite set after 45 minutes, allow it to bake for an additional 5-10 minutes.

Cool and Serve

A baking dish with a rectangular crustless zucchini quiche, partially sliced, sits on a marble surface. Two small plates each hold a serving, with forks beside them. Fresh parsley is scattered around for this easy zucchini quiche recipe.

Once the quiche is fully baked, remove it from the oven and let it cool slightly. Cut the quiche into 12 equal pieces. It’s now ready to serve. Enjoy it warm or at room temperature for breakfast, lunch, or dinner!

Storage

A slice of herb frittata, reminiscent of a crustless quiche, is topped with grated cheese and parsley on a floral-patterned plate. A second plate with more frittata and a fork can be seen in the background.

To store crustless zucchini quiche, allow it to cool to room temperature before transferring it to an airtight container. Refrigerate for up to 3-4 days for the best freshness. If you’d like to freeze it, cut the quiche into individual servings and wrap each piece tightly in plastic wrap or place them in freezer-safe bags. Be sure to remove as much air as possible to prevent freezer burn. To reheat, place the quiche in the oven at 350°F (175°C) for about 15-20 minutes, or until heated through. You can also use a microwave, heating in 1-minute intervals until warm.

Top Tips

Squeeze out excess water from zucchini: To avoid a watery quiche, make sure to squeeze out as much moisture as possible from the grated zucchini before mixing it with the other ingredients. This will help the quiche set properly and have a better texture.

Use fresh grated Parmesan: For a sharper, richer flavor, always use freshly grated Parmesan cheese. Pre-grated Parmesan may lack the depth and creamy texture you want for the quiche.

Customize with your favorite add-ins: Feel free to add vegetables like spinach, bell peppers, or even mushrooms to the quiche for extra flavor and nutrition. Just make sure to sauté them first to remove excess moisture.

Recipe

Tried and loved this recipe? Please leave a 5-star review below! Your reviews mean a lot to me, so if you've got any questions, please let me know in a comment.

A close-up of a slice of herb and cheese frittata on a white floral plate, resembling a crustless zucchini quiche, garnished with grated cheese and parsley, with a fork holding a bite-sized piece.
Print Recipe
No ratings yet

Crustless Zucchini Quiche

A simple, crustless zucchini quiche recipe made with Parmesan, eggs, and zucchini for a light, savory dish. Perfect for a quick, healthy meal.
Prep Time15 minutes mins
Cook Time45 minutes mins
Total Time1 hour hr
Course: Main
Cuisine: American
Keyword: crustless zucchini quiche
Servings: 12 servings
Calories: 97kcal
Author: Ksenia Prints

Equipment

  • Oven
  • 9x13 Baking Dish

Ingredients

  • 4 cups grated zucchini squeezed dry
  • 1 ¼ cups all-purpose flour
  • 1 ½ teaspoons baking powder
  • ⅓ cup minced onion
  • 4 large eggs beaten
  • 1 tablespoon olive oil
  • ¼ cup grated Parmesan cheese
  • 1 teaspoon kosher salt
  • Fresh black pepper to taste
  • 1 teaspoon parsley

Instructions

  • Preheat the oven to 350°F.
  • In a bowl, mix all ingredients together.
  • Spray a 9 x 13-inch baking dish with cooking spray and pour in the mixture.
  • Bake for 45 to 50 minutes, until golden brown and a toothpick inserted in the center comes out clean.
  • Cut into 12 equal pieces.

Video

Nutrition

Calories: 97kcal | Carbohydrates: 12g | Protein: 4g | Fat: 3g | Saturated Fat: 1g | Polyunsaturated Fat: 1g | Monounsaturated Fat: 2g | Trans Fat: 0.01g | Cholesterol: 56mg | Sodium: 308mg | Potassium: 155mg | Fiber: 1g | Sugar: 1g | Vitamin A: 180IU | Vitamin C: 8mg | Calcium: 66mg | Iron: 1mg

Crispy Air Fryer Kale Chips Recipe

Crispy air fryer kale chips in just 10 minutes! A quick, healthy snack with herbs and olive oil—perfect for anytime cravings.

A white speckled bowl filled with crispy air fryer kale chips sits on a wooden surface, with a blurred cup in the background—perfect for your next healthy snack recipe.

Sometimes, I forget how my air fryer can turn vegetables into healthier alternatives for potato chips. In just 10 minutes, those leafy greens turn into paper-thin crisps that sound like stepping on autumn leaves when you bite into them. What makes these even better is pairing them with creamy dips like white bean hummus and feta or creamy canned chickpea hummus—the contrast between crispy kale and smooth hummus will make you reach in for more.

My first attempt on these kale chips was so soggy because I rushed through the drying process. That mistake taught me that I needed patience in this recipe and drying is crucial—even a few drops of water can ruin the crisp texture. Now I make sure each leaf is thoroughly dry before adding the olive oil and massage the seasoning blend of herbs into every piece. This extra minute of prep work makes all the difference (you have to trust me on this.)

What makes these kale chips amazing is how they satisfy the need for something crunchy and slightly salty without sacrificing your healthy eating goals. While my kids are doing homework or watching TV, I can make a batch in less time than it takes to drive to the store. Once I discovered how to make vegetable chips with the air fryer, I couldn't stop experimenting—my crispy air fryer beet chips use the same basic techniques.

I've found that having the right air fryer accessories makes a huge difference for recipes like this. A proper parchment liner prevents sticking while still allowing air circulation, essential for achieving that perfect crisp. My husband loves it when I add garlic powder and smoked paprika, while I prefer the classic herbs mix. Even my children, who used to wrinkle their noses at the idea of kale as a snack, now ask for "green crunchies" during movie nights.

I often make a double batch because they disappear quicker than potato chips, without the grease or heavy feeling afterward. They're my go-to afternoon pick-me-up when that 3 pm hunger hits. If you're looking for a lighter snack option or just want to make the most out of your air fryer, these kale chips will impress you.

Ingredients

A bowl of fresh kale leaves, a glass cup of olive oil, and three measuring spoons with herbs, pepper, and salt are arranged on white marble—perfect for trying an easy Kale Chips Recipe or making Crispy Kale Chips.
  • Fresh kale leaves – The key ingredient for this recipe, kale crisps up beautifully in the air fryer. I’ve tried both curly and flat-leaf kale, and while both work, I find curly kale gives the chips a better crunch.
  • Olive oil – This helps to achieve the right texture for crispy chips. I’ve used avocado oil as a substitute, but olive oil tends to give the chips a slightly richer taste.
  • Dried herbs – These bring flavor depth. I often use a blend of oregano, basil, and thyme, but feel free to experiment with different combinations based on what you have in your pantry.

See the recipe card for exact quantities.

Step-by-step Instructions

A white ceramic bowl filled with crispy kale chips sits on a wooden board, showcasing a delicious air fryer kale chips recipe, with blurred kitchen items and greenery in the background.

Air fryer kale chips are a simple and healthy snack that's crispy, flavorful, and easy to make. With just a few ingredients, they come together quickly in the air fryer and can be customized with your favorite seasonings. Perfect for when you're craving something crunchy without the guilt!

Preparing Kale for Air Frying

A white bowl filled with fresh, chopped kale leaves sits on a light marble surface—perfect for your next batch of crispy Air Fryer Kale Chips.

Start by preheating your air fryer to 350°F (175°C). Meanwhile, wash the kale leaves thoroughly and dry them completely using a salad spinner or paper towels. Excess moisture will prevent the kale from crisping up, so make sure they are completely dry. Once dried, remove the tough stems from each kale leaf. Hold the stem with one hand and pull the leafy part off with your other hand, or use kitchen scissors to snip them out. Tear or cut the kale leaves into bite-sized pieces, around 2 inches in size. Keep in mind that the kale will shrink as it cooks, so avoid cutting them too small.

Seasoning the Kale

A white bowl filled with fresh kale leaves, lightly sprinkled with seasoning, sits on a white marble surface—perfect for making crispy Air Fryer Kale Chips.

Place the kale pieces in a large bowl and drizzle with olive oil. Sprinkle with salt, dried herbs (like oregano, thyme, or basil), and black pepper. Using your hands, massage the oil and seasonings into the kale leaves for about 30 seconds, making sure each piece is evenly coated. This step is key for achieving even flavor and a crisp texture.

Air Frying the Kale

Fresh kale leaves are arranged in a single layer inside the basket of an air fryer, ready to become crispy Air Fryer Kale Chips. The appliance sits on a white surface, perfect for trying your favorite Kale Chips Recipe.

Place the seasoned kale in the air fryer basket in a single layer. It's important not to overcrowd the basket, as this can prevent the kale from crisping evenly. If necessary, air fry the kale in batches. Set the air fryer to 4 minutes. After 3 minutes, open the air fryer to check the kale. Give the basket a quick shake to redistribute the leaves. If the kale chips are not crispy yet, continue air frying for another 1-2 minutes, checking them frequently to avoid burning.

Finishing Touches

Crispy kale chips in an air fryer basket. The dark green kale, with some browned edges, sits on the black grate inside the appliance on a white countertop—an easy air fryer kale chips recipe for a healthy snack.

Once the kale chips are crispy, remove them from the air fryer and let them cool for about 1 minute. This helps the chips crisp up even more. Serve immediately as a light snack on their own, or pair with your favorite dipping sauce.

Storage

A white bowl filled with crispy air fryer kale chips sits on a wooden board. A small dish of red dipping sauce and a green leafy herb are nearby, along with a brass measuring spoon containing seasoning.

To store air fryer kale chips, let them cool completely to room temperature. Once cooled, transfer them to an airtight container or a resealable bag. Store in a dry place for up to 3 days. For longer storage, you can freeze the chips, though they may lose some crispiness upon reheating. To refresh the chips, reheat them in the air fryer for a couple of minutes.

Top Tips

Dry kale thoroughly: Before tossing the kale with oil and seasonings, make sure it's completely dry. Excess moisture will prevent the leaves from crisping up in the air fryer.

Residual Crisping: Keep in mind that kale chips will continue to crisp up slightly after removing them from the air fryer. Let them sit for a minute or two before serving to achieve the perfect crunch.

Flavor Variations: Experiment with seasonings like garlic powder, smoked paprika, or a pinch of cayenne pepper for different flavor profiles. This simple addition can take your kale chips to the next level!

Recipe

Tried and loved this recipe? Please leave a 5-star review below! Your reviews mean a lot to me, so if you've got any questions, please let me know in a comment.

A white speckled bowl filled with crispy kale chips sits on a wooden serving board, featuring a tasty air fryer kale chips recipe, with blurred kitchen items visible in the background.
Print Recipe
No ratings yet

Crispy Air Fryer Kale Chips

Crispy air fryer kale chips in just 10 minutes! A quick, healthy snack with herbs and olive oil—perfect for anytime cravings.
Prep Time2 minutes mins
Cook Time10 minutes mins
Total Time12 minutes mins
Course: Appetizer, Snacks
Cuisine: American
Keyword: crispy air fryer kale chips
Servings: 5 servings
Calories: 79kcal
Author: Ksenia Prints

Equipment

  • Air Fryer
  • Large mixing bowl
  • Kitchen scissors or knife
  • Measuring spoons

Ingredients

  • 3 cups fresh kale leaves
  • 3 tablespoons olive oil
  • ½ teaspoon dried herbs any combination of oregano, basil, and thyme
  • â…“ teaspoon black pepper
  • â…“ teaspoon salt

Instructions

  • Wash the kale leaves and thoroughly dry them using a salad spinner or paper towels. Water left on the leaves will prevent them from getting crispy.
  • Remove the tough center stems from each kale leaf by holding the stem with one hand and pulling the leafy parts off with your other hand, or cut them out with kitchen scissors.
  • Tear or cut the leaves into bite-sized pieces, about 2 inches in size. They will shrink when cooked.
  • Place the kale pieces in a large bowl. Drizzle with olive oil and sprinkle with salt, dried herbs, and pepper.
  • Using your hands, massage the oil and seasonings into the kale leaves for about 30 seconds to ensure even coating.
  • Place the seasoned kale leaves in the air fryer basket in a single layer. Don't overcrowd the basket - work in batches if necessary.
  • Air fry for 4 minutes.
  • Open the air fryer after 3 minutes to check progress. Give the basket a shake to redistribute the leaves.
  • If the kale chips aren't crispy yet, continue air frying for another 1-2 minutes, checking frequently to prevent burning.
  • Remove the crispy kale chips and let them cool for 1 minute.
  • Serve immediately as a snack on their own or with your favorite dipping sauce.

Notes

Make sure your kale is completely dry before adding oil and seasonings
The kale chips will continue to crisp up slightly after removing from the air fryer
Store any leftovers in an airtight container, but know they may lose some crispness
For different flavors, try adding garlic powder, smoked paprika, or a pinch of cayenne pepper
If you don't have an air fryer, you can bake these in the oven at 300°F for 10-15 minutes

Nutrition

Calories: 79kcal | Carbohydrates: 1g | Protein: 0.4g | Fat: 9g | Saturated Fat: 1g | Polyunsaturated Fat: 1g | Monounsaturated Fat: 6g | Sodium: 162mg | Potassium: 47mg | Fiber: 1g | Sugar: 0.1g | Vitamin A: 1263IU | Vitamin C: 12mg | Calcium: 35mg | Iron: 0.4mg

Slow Cooker Carrot Soup Recipe

Cozy slow cooker carrot soup made easy with broth, spices, and carrots. Creamy option included for a healthy, comforting meal.

A black bowl filled with vibrant carrot soup, garnished with cream, herbs, cracked pepper, and a drizzle of oil. A gold spoon rests in the bowl—a cozy recipe perfect for the slow cooker. A ceramic cup is visible in the background.

A good bowl of velvety smooth and naturally sweet soup. This slow cooker carrot soup recipe turns simple and minimal ingredients into pure comfort with minimal effort.

While I've made countless soups including instant pot creamy mushroom soup and creamy kabocha squash soup in the slow cooker, this carrot version remains my favorite for its hands-off simplicity and deep, developed flavors. The slow cooking process brings out the carrots' natural sweetness without any risk of scorching—a problem I constantly faced with stovetop versions.

It all started when I had to use up a 5-pound bag of carrots before they spoiled. After three failed stovetop attempts that left me with slightly burnt bottoms and uneven textures, I switched to the slow cooker. That simple changed made everything better and I don't know why I didn't think of it sooner.

The low, steady heat not only extracted more flavor but also required no monitoring. I could prep everything in 10 minutes and return hours later to perfectly tender vegetables.

Through countless attempts, I also found two game-changing additions: cumin adds an unexpected warmth, and fresh ginger brightens the entire soup. My family helped me perfect the recipe—my husband suggesting the cumin after tasting something similar at a Middle Eastern restaurant and my children needing more ginger during cold and flu season.

If you told me two years ago that carrot soup would be our home's go-to comfort food, I would probably stare at you blankly. I love pairing it with a side of rosemary sourdough bread for dipping or with eggplant grilled cheese for a complete meal. 

If you're looking for an easy weeknight dinner recipe that'll give your kids a boost on their veggie intake, this carrot soup will give you restaurant-quality results with minimal effort. The slow cooker does all the work and makes it taste like you spent hours on the stove.

Ingredients

A marble surface displays ingredients for slow cooker carrot soup: a bunch of carrots, fresh parsley, a small onion, two garlic cloves, ginger, cream, broth, oil, and spices—all ready to create a comforting dish.

Carrots – The main ingredient, adding natural sweetness and earthy flavor. I’ve found that medium-sized carrots blend into a smoother texture than large ones, and they’re easier to work with.

Onion – Adds a subtle sweetness and depth. I typically use yellow onions, as they’re milder and melt into the soup better.

Garlic – A key ingredient in the savory base of the soup. I always use freshly minced garlic because it gives a stronger flavor compared to pre-chopped or powdered. 

Vegetable or chicken broth – The base liquid of the soup. I tend to use vegetable broth for a lighter, cleaner taste, but when I used chicken broth once, it gave the soup a richer, more satisfying depth. I recommend experimenting with both to see what suits your needs and taste.

Ground ginger – Adds warmth with a hint of spice. I’ve used fresh ginger and ground ginger in this recipe, and fresh ginger tends to add a more vibrant, sharper kick.

Cumin – Gives a warm, earthy flavor that complements the carrots.

Olive oil or butter – For sautéing the vegetables. I usually stick with olive oil for a lighter taste, but when I want the soup to feel richer, I use butter.

Heavy cream or coconut milk – Both are optional but add creaminess, you may refer to the section below to determine which one's better for you.

See the recipe card for exact quantities.

Step-by-step Instructions

A black bowl filled with vibrant carrot soup, garnished with chopped herbs and black pepper, sits on a white marble surface. A gold spoon rests inside the bowl. A small beige pitcher and tan cloth are nearby—perfect for your next slow cooker recipe.

This slow cooker carrot soup is a simple, comforting dish that's perfect for any time of year. The carrots cook until tender, then blend into a smooth, velvety soup with warm spices like cumin and ginger. It’s an easy, hands-off recipe that can be customized with a creamy finish using either heavy cream or coconut milk.

Prepare the Ingredients

Start by placing the chopped carrots, onion, garlic, broth, ground ginger, cumin, salt, and pepper into the slow cooker. Make sure the vegetables are evenly spread out, and the broth covers them. This will help even out the cooking and meld the flavors together.

Add Olive Oil or Butter

A Slow Cooker on a marble countertop holds milk, rice, carrot sticks, and seasonings as a hand pours olive oil in, creating the perfect base for a comforting carrot soup recipe.

Drizzle olive oil or add butter on top of the ingredients. Any of the two will help sauté the vegetables as they cook, adding a bit of richness to the soup. If you want a dairy-free version, olive oil is the best choice, but butter can create a slightly creamier finish if you're okay with dairy.

Cook the Soup

Cover the slow cooker and cook the soup on low for 6-8 hours or on high for 3-4 hours. The goal is to cook the carrots until they are tender enough to blend easily. I usually go for the low setting to allow the flavors to develop more slowly, but both settings work well.

Puree the Soup

A hand holding an immersion blender blends a creamy carrot soup inside a black slow cooker on a white marble surface, perfect for trying a new recipe.
A hand holding an immersion blender blends carrot soup in a black slow cooker on a white marble countertop, perfect for your next cozy recipe.

Once the carrots are soft, use an immersion blender to puree the soup directly in the slow cooker. If you don't have an immersion blender, you can carefully transfer the soup in batches to a regular blender. Blend until the soup is smooth and velvety.

Add Creaminess (Optional)

A bowl of vibrant carrot soup sits on a white marble surface, garnished with cream and herbs. A spoon rests inside, surrounded by a slow cooker of soup, a small bowl of cream, chopped herbs, and a beige cloth—perfect for your next cozy recipe.

For extra creaminess, you can stir in heavy cream or coconut milk. I prefer coconut milk for a dairy-free version, which adds a subtle sweetness, but heavy cream makes the soup richer and more luxurious. You can adjust the amount to your liking depending on how creamy you want the soup to be.

Garnish and Serve

A hand holding a spoon hovers over a bowl of creamy orange carrot soup, garnished with herbs and a swirl of cream. Fresh herbs sit nearby on a white marble surface—an inviting scene for your next slow cooker recipe.

Serve the soup hot, garnished with fresh parsley or cilantro. This adds a pop of color and a fresh, herbaceous note that complements the flavors in the soup. Enjoy!

Storage

A black bowl filled with creamy orange carrot soup, garnished with herbs, black pepper, and a drizzle of cream. A gold spoon rests in the bowl. A ceramic cup and a tan textured cloth are nearby on a white surface—perfect for your next slow cooker recipe.

If you have leftovers, make sure the soup has cooled down to room temperature and then transfer it to an airtight container and store it in the refrigerator for up to 4 days. If you’d like to store it for longer, you can freeze the soup in freezer-safe containers for up to 3 months. To reheat, simply warm it on the stovetop over medium heat or microwave in 1-minute intervals, stirring occasionally. If the soup thickens after storing, add a little extra broth or water to reach your desired consistency.

Heavy Cream vs. Coconut Milk for Carrot Soup

A black bowl filled with creamy orange carrot soup garnished with herbs, black pepper, and a drizzle of oil, with a spoon resting inside. A beige cloth and part of a ceramic cup complete this inviting slow cooker recipe scene.

If you'll be adding heavy cream to the carrot soup, you'll have a rich, smooth texture that adds a nice, velvety finish. It complements the natural sweetness of the carrots, making the soup feel more indulgent and comforting. I gravitate more to this option for a more traditional, creamy carrot soup, it doesn't overpower the taste of the dish at all.

Coconut milk, on the other hand, is a great dairy-free alternative for anyone who doesn't like or can't have dairy. It adds a very subtle, tropical flavor. It adds creaminess but keep in mind that it's lighter than heavy cream, making the soup feel fresher and less rich. I prefer using coconut milk when I'm looking for a lighter, dairy-free version of the soup. Both options work well, and boils on your preference for richness or a lighter, more vibrant soup.

Top Tips

Use fresh spices: Freshly ground cumin and ginger add a much richer flavor compared to pre-ground versions. It makes a noticeable difference in the depth of the soup.

Adjust the texture: If the soup is too thick after blending, simply add more broth or water to thin it out. You can adjust it to your preferred consistency by adding small amounts at a time.

Make it ahead: This soup is a great make-ahead meal. The flavors deepen after sitting overnight, so you can prepare it in advance and reheat it for an even better taste the next day.

Recipe

Tried and loved this recipe? Please leave a 5-star review below! Your reviews mean a lot to me, so if you've got any questions, please let me know in a comment.

A black bowl filled with creamy orange carrot soup, garnished with herbs, ground pepper, and a drizzle of cream. A gold spoon rests inside the bowl, on a light marble surface next to a tan cloth—an inviting slow cooker recipe.
Print Recipe
5 from 1 vote

Slow Cooker Carrot Soup

Cozy slow cooker carrot soup made easy with broth, spices, and carrots. Creamy option included for a healthy, comforting meal.
Prep Time10 minutes mins
Cook Time6 hours hrs
Total Time6 hours hrs 10 minutes mins
Course: Soups
Cuisine: American
Keyword: slow cooker carrot soup
Servings: 6 servings
Calories: 1024kcal
Author: Ksenia Prints

Equipment

  • Slow Cooker

Ingredients

  • 2 lbs about 900 g carrots, peeled and chopped
  • 1 medium onion chopped
  • 2 cloves garlic minced
  • 4 cups vegetable or chicken broth
  • 1 teaspoon ground ginger or 1 tablespoon fresh ginger, grated
  • 1 teaspoon ground cumin
  • 1 teaspoon salt
  • Fresh black pepper to taste
  • 1 tablespoon olive oil or butter
  • ½ cup heavy cream or coconut milk optional, for creaminess
  • Fresh parsley or cilantro for garnish

Instructions

  • Place the chopped carrots, onion, garlic, broth, ginger, cumin, salt, and pepper into the slow cooker.
  • Drizzle olive oil or add butter on top.
  • Cover and cook on low for 6-8 hours or on high for 3-4 hours, until the carrots are tender.
  • Use an immersion blender to puree the soup until smooth. Alternatively, carefully transfer the soup in batches to a blender and blend until smooth.
  • If desired, stir in heavy cream or coconut milk for added creaminess.
  • Serve hot, garnished with fresh parsley or cilantro. Enjoy!

Video

Nutrition

Calories: 1024kcal | Carbohydrates: 109g | Protein: 20g | Fat: 62g | Saturated Fat: 30g | Polyunsaturated Fat: 4g | Monounsaturated Fat: 22g | Cholesterol: 153mg | Sodium: 6481mg | Potassium: 3433mg | Fiber: 28g | Sugar: 55g | Vitamin A: 153351IU | Vitamin C: 64mg | Calcium: 474mg | Iron: 6mg

Creamy Garlic Mussels Pasta Bake

Creamy mussels pasta bake with garlic, white wine, and Parmesan. A quick, savory dish perfect for seafood lovers. Ready in under 30 minutes!

A bowl of Mussels Pasta mixed with penne, topped with grated cheese and chopped parsley, sits on a wooden trivet with fresh parsley beside it.

When I was in college, seafood pasta always seemed like something reserved for restaurant dining — until I tried making this creamy garlic mussels pasta bake.

Where I live, mussels can be cheap in certain times of the year — spring when the water starts warming up slightly, and even fall. You can buy a big package for $6, and it's enough to feed a crowd. Adding pasta just makes it stretch that much further, feeling luxurious and decadent for under $10.

This one-pan wonder combines tender pasta and plump mussels in a rich, garlicky cream sauce. White wine adds extra depth, and Parmesan cheese adds a salty punch. In just 30 minutes, I can have this fancy, complicated-looking, and restaurant-quality dish that is weeknight-friendly.

I first started making this recipe when I finally decided to buy shellfish, after weeks of just passing by them with lingering stares at the market. I found that mussels are actually one of the easiest types of seafood to cook — they have their own built-in timer and let you know they’re done by opening their shells!

The creamy garlic sauce didn’t originally include white wine, and I was surprised by how much depth it added once I tried it. It’s that kind of little upgrade that makes everyone think you’ve been cooking for hours.

What makes this dish easy is that the oven does all the hard work. Pasta bakes in my home are meant to be that way—I can’t imagine cooking while also keeping up with my kids. While my family is off doing their own thing, with the occasional tug at the hem of my shirt, the pasta bake just bubbles away in the oven.

My family has helped me refine this recipe. My husband suggested using penne instead of linguine to get more of the creamy sauce. Even my children, who were initially skeptical of the "weird shells," now love the mussels, using empty shells as tiny spoons to scoop up more sauce.

If you're looking for a new recipe to serve that feels special without hours of work, this pasta bake will give you restaurant-quality results in weeknight time. The empty shells and clean plates say it all.

Ingredients

Uncooked penne pasta, fresh garlic mussels, bunches of parsley, a block of cheese on a wooden board, white wine, butter, cream for a creamy pasta bake, black pepper, and garlic cloves on a marble countertop.
  • Mussels – The main ingredient, giving a briny and rich flavor. I’ve tried both fresh and frozen mussels, and I find that fresh mussels open up more evenly and have a cleaner taste. If fresh isn’t available, frozen works well, but I recommend thawing them properly to maintain their flavor.
  • Penne pasta – This pasta holds the sauce well and provides a hearty bite that contrasts the creamy mussels. I’ve tested it with other shapes like spaghetti, but penne's sturdy texture holds up better in this dish, especially with the thick sauce.
  • Butter – Adds richness to the sauce and helps create a smooth, velvety base. I’ve used olive oil in a pinch, but butter gives the best depth and flavor when making a creamy seafood pasta.
  • Garlic – Gives an aromatic foundation for the dish. Fresh garlic is key—pre-minced or powdered garlic doesn’t give the same depth. I’ve experimented with roasted garlic, but the fresh, minced variety creates a more immediate flavor.
  • Heavy cream – Makes the sauce creamy and smooth. I’ve substituted with half-and-half for a lighter sauce, but the richness of heavy cream is what truly makes this dish indulgent.
  • White wine – Adds acidity to balance the richness of the cream and mussels. I prefer a dry white wine like Sauvignon Blanc or Pinot Grigio. I’ve tried using a bit of lemon juice, but white wine adds a more complex and balanced flavor.
  • Parmesan cheese – Adds saltiness and depth. Freshly grated Parmesan works best, as pre-grated tends to be drier and less flavorful. I’ve used Pecorino Romano in place of Parmesan, but the latter’s milder taste works better in this dish.

See the recipe card for exact quantities.

Step-by-Step Instructions

A white bowl filled with Mussels Pasta—penne and mussels in a creamy garlic sauce—garnished with parsley and cheese, sits on a white surface. Two forks rest in the bowl, and a blue pot with more Creamy Garlic Mussels is nearby.

This creamy garlic mussels pasta bake combines tender mussels, creamy garlic sauce, and hearty penne pasta for a flavorful and satisfying dish. It's a perfect meal for seafood lovers and a great option for a cozy dinner. Follow these simple steps to create this rich and savory pasta bake.

Preheat the Oven

Start by preheating your oven to 400°F (200°C). This makes sure that the oven is at the right temperature when it’s time to bake the mussels and pasta.

Cook the Pasta

Cook the penne according to the package instructions. Once done, drain the pasta and set it aside. You’ll be adding it to the sauce later, so make sure it’s ready to go.

Sauté Garlic in Butter

A piece of butter is melting in the center of a large cream-colored pot, ready to become the base for a creamy garlic mussels pasta. Bubbles form around it as the pot, with its blue rim, sits on a white surface.
A blue Dutch oven on a white surface contains sautéed minced garlic and oil, being stirred with a light green silicone spatula with a wooden handle—the perfect start for a creamy pasta bake or flavorful garlic mussels pasta.

In an oven-safe skillet, melt the butter over medium heat. Once the butter is melted and starting to bubble, add the minced garlic. Cook the garlic for about 1 minute until it becomes fragrant but be careful not to burn it.

Add Cream and Wine

A light yellow creamy liquid in a blue Dutch oven with a wooden-handled spatula inside, resting on a white marble surface. Some small specks are visible in the liquid, hinting at the beginnings of a delicious garlic mussels pasta bake.

Pour in the heavy cream and white wine, stirring to combine. Let the mixture simmer for 5 minutes, allowing the flavors to meld together and the sauce to thicken slightly. Keep an eye on it, and make sure it doesn’t boil over.

Stir in Parmesan Cheese

Once the cream and wine mixture has simmered, stir in the Parmesan cheese. Keep stirring until the cheese melts completely into the sauce, creating a smooth, creamy base.

Add the Mussels

A blue-handled pot filled with creamy garlic mussels in a light broth, placed on a white marble surface.

Add the cleaned mussels to the skillet. Stir them gently into the sauce to make sure they’re evenly distributed. The mussels will cook in the oven, releasing their briny juices into the sauce.

Bake the Mussels

Transfer the skillet to the preheated oven and bake for 10-12 minutes. The mussels will begin to open as they cook, releasing their flavor into the sauce. Check after 10 minutes to make sure the mussels are fully open. Discard any mussels that remain closed.

Combine with Pasta

A blue-handled skillet on a marble surface holds cooked penne pasta mixed with creamy garlic mussels in their shells.

Once the mussels are cooked, add the drained penne to the skillet. Toss the pasta in the sauce to coat it well, making sure every piece is covered with the creamy, flavorful mixture.

Final Touches

A pan filled with creamy garlic mussels and penne pasta, garnished with chopped parsley, sits on a marble surface, surrounded by fresh sprigs of parsley.

Sprinkle the dish with freshly chopped parsley, and season with salt and pepper to taste. This will add freshness and a touch of brightness to balance the richness of the dish.

Serve Immediately

A white bowl filled with Mussels Pasta—cooked penne and steamed mussels, garnished with chopped parsley and grated cheese. A fork and spoon rest on the edge of the bowl.

Once everything is mixed and the pasta is coated with the sauce, serve the creamy garlic mussels pasta bake immediately. It’s best enjoyed fresh and hot from the oven.

Storage

A pan filled with cooked penne Pasta Bake, black mussels, and chopped fresh parsley, topped with grated cheese. The Mussels Pasta dish sits on a light surface with parsley leaves scattered nearby.

If you ever need to store creamy garlic mussels pasta bake, allow the dish to cool to room temperature before transferring it to an airtight container. For the best freshness, refrigerate the pasta bake for up to 2 days. Freezing is not recommended, as the texture of the mussels may change when reheated. To reheat, place the pasta bake in the oven at 350°F (175°C) for about 20 minutes, or until heated through. You can also use the microwave, heating in 1-minute intervals, stirring occasionally until warmed.

Top Tips

Use fresh mussels: Fresh mussels give the best flavor and texture. If you’re using frozen mussels, be sure to thaw them completely and check for any unopened ones before adding them to the dish.

Don’t overcook the mussels: Mussels cook quickly. Baking for 10-12 minutes is usually enough. Overcooking can result in rubbery mussels, so be sure to remove any unopened ones after baking.

Adjust the creaminess: If you prefer a richer sauce, you can add more cream or a bit of cream cheese for extra smoothness. For a lighter version, use half-and-half instead of heavy cream.

What to Serve With Creamy Garlic Mussels Pasta Bake

A white bowl filled with Garlic Mussels Pasta and penne, garnished with chopped parsley, with a fork and spoon resting inside. Parsley leaves and a blue pot are visible nearby on a white surface.

When serving creamy garlic mussels pasta bake, rey pairing it with a refreshing side like a little gem salad to balance the rich, creamy flavors of the dish. The crisp lettuce and light dressing provide a nice contrast to the heartiness of the pasta. For a bit of crunch, serve it alongside rosemary sourdough bread to soak up any extra sauce.

If you're looking for something more substantial, try roasted vegetables like roasted carrots with hazelnuts, which add a sweet and nutty element. Alternatively, a side of roast air fryer asparagus offers a light, savory contrast to the richness of the pasta bake. For more baked pasta options, explore other recipes like creamy leek and mushroom pasta bake or baked feta pasta for a different twist on a comforting, creamy dish.

Recipe

Tried and loved this recipe? Please leave a 5-star review below! Your reviews mean a lot to me, so if you've got any questions, please let me know in a comment.

A white bowl filled with creamy penne pasta and garlic mussels, garnished with chopped parsley, sits on a marble surface. Two utensils rest in the bowl. A blue pot with more mussels is partially visible in the background.
Print Recipe
No ratings yet

Creamy Garlic Mussels Pasta Bake

Creamy mussels pasta bake with garlic, white wine, and Parmesan. A quick, savory dish perfect for seafood lovers. Ready in under 30 minutes!
Prep Time10 minutes mins
Cook Time20 minutes mins
Total Time30 minutes mins
Course: Pasta
Cuisine: American
Keyword: creamy garlic mussels pasta bake
Servings: 4 servings
Calories: 525kcal
Author: Ksenia Prints

Equipment

  • Skillet
  • Oven

Ingredients

  • 1 pound mussels cleaned
  • 8 oz penne pasta
  • 2 tablespoons butter
  • 2 cloves garlic minced
  • 1 cup heavy cream
  • ¼ cup white wine
  • ½ cup grated Parmesan cheese
  • 2 tablespoons chopped parsley
  • Salt and pepper to taste

Instructions

  • Preheat oven to 400°F (200°C).
  • Cook penne according to package instructions. Drain and set aside.
  • Melt butter in an oven-safe skillet over medium heat.
  • Add garlic, cook for 1 minute.
  • Add cream and wine. Simmer for 5 minutes.
  • Stir in Parmesan cheese until melted.
  • Add mussels to the skillet.
  • Transfer skillet to oven. Bake for 10-12 minutes until mussels open.
  • Discard any unopened mussels.
  • Add cooked penne to the skillet. Toss to coat with sauce.
  • Sprinkle with parsley, salt, and pepper.
  • Serve immediately.

Video

Nutrition

Calories: 525kcal | Carbohydrates: 49g | Protein: 20g | Fat: 27g | Saturated Fat: 16g | Polyunsaturated Fat: 2g | Monounsaturated Fat: 7g | Cholesterol: 95mg | Sodium: 414mg | Potassium: 424mg | Fiber: 2g | Sugar: 4g | Vitamin A: 1256IU | Vitamin C: 8mg | Calcium: 192mg | Iron: 3mg

Gnocchi alla Vodka with Burrata Recipe

Gnocchi alla vodka with burrata features pillowy gnocchi in a creamy vodka sauce, topped with burrata cheese, fresh basil, and Parmesan.

This gnocchi alla vodka with burrata started as a challenge to myself: that $28 pasta dish that kept tempting me at our local Italian spot? With two cuddle-loving kids at home and limited time for date nights, I wanted to bring that restaurant experience to our dining table without the reservation, or the bill. 

I fell in love with this recipe from the first time I tasted it. The gnocchi are chewy inside but firm on the inside, pillowy and soft as a cloud. The sauce is rich and luxurious, the tartness of the tomatoes mellowed out by the addition of cream and vodka. And the crown jewel, those big pieces of burrata that feel like taking a bite out of the tastiest fresh mozzarella you've ever had.

In short, this burrata gnocchi recipe is pure comfort food, heavenly for date night or for feeding a family when you want something luxe but easy.

My first attempt at making it was promising but still missed something. The sauce was good, but not great. After playing with proportions, I found that reducing the vodka completely before adding tomatoes made all the difference.

It took a few more tries to get the cream-to-tomato ration just right—enough cream for richness but not so much that it dulled the bright tomato flavor. But the real game-changer was serving this with burrata instead of regular mozzarella.

There's something magical about cutting into that creamy center that pools into the hot pasta, creating pockets of richness throughout the dish. Even on nights when I'm running on empty, this dish makes me feel like I've accomplished something special. 

What surprised me most was my children's reaction. My son, who usually orders plain pasta with butter at restaurants, started requesting "the special gnocchi" for his birthday dinner. My daughter loves helping arrange the basil leaves on top, turning each serving into her personal art project (and then refusing to eat every single one, because, toddlerhood.)

We now have this dish at least twice a month—sometimes for Sunday family dinner, other times as a midweek pick-me-up, and yet sometimes as a meal for two when the kids go to bed. It's found that sweet spot of being nice enough for company but simple enough for Wednesday night. And every time I serve it, there's a moment of quiet as everyone takes their first bite, followed by the best kind of dinner conversation—the kind where everyone's too busy enjoying their food to talk much.

Ingredients

  • Potato gnocchi - This is the star of the dish, giving a tender and fluffy texture that absorbs the sauce beautifully. I’ve found that store-bought gnocchi is convenient, but homemade versions add a personal touch that really changes the meal.
  • Olive oil - Used for sautéing, olive oil adds richness and depth to the sauce. I prefer extra virgin olive oil for its robust flavor, which enhances the overall taste. 
  • Onion - Finely chopped onion creates a flavorful base for the sauce. I’ve experimented with both yellow and sweet onions, and I find that sweet onions add a nice balance of sweetness without overpowering the dish.
  • Garlic - Fresh minced garlic brings a savory aroma and depth to the sauce.
  • Diced tomatoes - Canned diced tomatoes form the backbone of the sauce, adding acidity and sweetness. When fresh tomatoes are in season, I’ll use those instead for a brighter taste.
  • Vodka - This ingredient adds a unique depth to the sauce, enhancing the flavors of the tomatoes and cream. I’ve substituted with vegetable broth when I want a non-alcoholic version, and it still works well, though the flavor profile changes slightly.
  • Heavy cream - Used to create a rich and creamy texture, heavy cream balances the acidity of the tomatoes. 
  • Red pepper flakes - These add a touch of heat that can be adjusted to personal taste. I like to start with a small pinch and increase it if I want a spicier kick.
  • Burrata cheese - This creamy cheese adds a luxurious finish, melting beautifully into the gnocchi. I’ve found that the freshness of the burrata makes a significant difference; it’s worth seeking out a high-quality brand.
  • Fresh basil leaves - Used as a garnish, fresh basil adds a burst of color and a fragrant aroma. I often tear the leaves just before serving to release their oils, enhancing the dish's flavor.
  • Grated Parmesan cheese - This cheese adds a salty and savory element that enhances the richness of the sauce. I prefer freshly grated Parmesan over pre-packaged for its superior flavor and texture.

See the recipe card for exact quantities.

Step-by-step Instructions

If you're in the mood for a comforting and indulgent dish, this gnocchi alla vodka with burrata is a fantastic choice! I love making this recipe because it's rich, creamy, and incredibly satisfying, yet surprisingly easy to prepare. Just follow these straightforward steps, and you'll have a delicious meal ready to impress your family or guests in no time!

Boil the Gnocchi

Start by bringing a large pot of salted water to a rolling boil. The salt enhances the flavor of the gnocchi as it cooks. Once the water is boiling, add the gnocchi. Cook according to the package instructions, which typically takes about 2-3 minutes for store-bought gnocchi. You’ll know they are done when they float to the surface. Once cooked, drain the gnocchi in a colander and set them aside.

Sauté the Onion

Chopped onions are being sautéed in a stainless steel frying pan with a wooden spatula on a marble countertop, setting the stage for a delectable Gnocchi alla Vodka dish.

In a large skillet, heat a couple of tablespoons of olive oil over medium heat. Once the oil is hot, add the finely chopped onion. Sauté the onion for about 5 minutes, stirring occasionally, until it becomes translucent and soft. This step builds a flavorful base for the sauce.

Add Garlic

Chopped onions sizzle in a stainless steel pan, stirred with a wooden spatula. A hand hovers with a bowl of crushed nuts, ready to enhance the dish. This simple step could elevate your gnocchi recipe, all happening over a sleek marble countertop.

Next, stir in the minced garlic and cook for an additional 1-2 minutes. Keep an eye on the garlic to make sure it doesn’t burn; it should become fragrant but not browned. This adds a rich aroma to the sauce.

Incorporate the Vodka

Pour in the vodka and allow it to simmer for about 2-3 minutes. This simmering step is important as it allows the alcohol to cook off while concentrating the flavors. The mixture should bubble gently as it reduces.

Add Tomatoes and Spices

After the vodka has simmered, add the crushed tomatoes and red pepper flakes to the skillet. Season the mixture with salt and pepper to taste. Stir everything together to combine, and let it simmer for about 10 minutes. Stir occasionally to prevent sticking and ensure even cooking.

Stir in the Cream

Once the sauce has thickened slightly, reduce the heat and stir in the heavy cream. Cook for an additional 2-3 minutes, stirring continuously until the sauce is smooth and creamy. This step transforms the sauce into a rich, velvety texture.

Combine Gnocchi and Sauce

A hand stirs a luscious vodka-infused tomato sauce with gnocchi in a round metal frying pan using a wooden spoon. The pan, complemented by the promise of creamy burrata, rests elegantly on a white marble countertop.

Add the drained gnocchi to the skillet with the vodka sauce. Gently toss the gnocchi in the sauce to coat them evenly. Allow the mixture to cook for another 2 minutes to heat everything through and let the flavors meld.

Plate and Garnish

A pan filled with creamy tomato pasta sauce and gnocchi alla vodka sits on a marble countertop. A wooden spoon rests inside the pan. Below, a hand holds a bowl of the same dish, garnished with grated cheese and herbs, ready to inspire your next gnocchi recipe adventure.

Divide the gnocchi among serving plates. Top each serving with a generous piece of burrata cheese, allowing it to melt slightly into the warm gnocchi. Drizzle with extra virgin olive oil for added richness and garnish with fresh basil leaves for a burst of color and flavor. If desired, sprinkle with grated Parmesan cheese for an extra layer of taste.

Serve and Enjoy

A bowl of creamy tomato vodka gnocchi topped with grated cheese and fresh basil sits on a marble surface. Nearby, a spoon and an olive oil bottle are visible. A brown cloth and sprigs of basil are also present.

Serve the gnocchi alla vodka with burrata immediately while it's hot. This dish is perfect for a cozy dinner or a special occasion, and it’s sure to impress!

Storage

A white bowl filled with gnocchi in tomato sauce, topped with a dollop of ricotta cheese, shredded basil, and grated Parmesan. The dish emulates a Gnocchi alla Vodka and is garnished with a drizzle of olive oil for an irresistible finish.

If you have leftovers, allow the gnocchi alla vodka to cool to room temperature before transferring it to an airtight container. Store it in the refrigerator for up to 3 days. When reheating, add a splash of cream or a little water to the skillet to help restore the sauce's creamy consistency.

For any leftover burrata, store it in its original packaging or place it in a small container with a bit of olive oil to keep it moist. Consume the burrata within 1-2 days for the best quality. Avoid freezing burrata, as it may change in texture once thawed.

Top Tips

Choose quality ingredients: Since this dish relies heavily on its sauce, using high-quality canned tomatoes and fresh burrata can make a significant difference in flavor. Look for San Marzano tomatoes for a richer taste, and select burrata that is fresh for the creamiest texture.

Cook gnocchi just right: Be careful not to overcook the gnocchi. They should only be cooked until they float to the surface of the boiling water, which usually takes about 2-3 minutes. Overcooking can lead to a mushy texture, so keep an eye on them!

Adjust the spice level: The amount of red pepper flakes can be tailored to your taste. If you prefer a milder dish, start with a smaller pinch and gradually add more until you reach your desired level of heat. This allows you to customize the dish to suit your preferences or those of your guests.

What to Serve Gnocchi alla Vodka With Burrata

A white bowl filled with gnocchi alla vodka, topped with creamy ricotta cheese, shredded basil, and a drizzle of olive oil. A spoon and a napkin rest on the marble surface beside the bowl. Fresh basil leaves are nearby.

The richness of gnocchi alla vodka with burrata pairs well with something crisp and refreshing. A goat cheese salad brings in tangy notes that balance the creamy sauce, while its mix of greens and nuts adds a bit of crunch. For a heartier contrast, a Russian vinaigrette salad introduces earthy flavors from root vegetables, making it a vibrant addition to the table.

If you’re looking for something to soak up the extra sauce, rosemary sourdough bread is a great choice, with its herby aroma and chewy texture. A lighter option could be grilled scallops with lemon mint pinot grigio sauce, which bring a bright, slightly briny element that complements the richness of the dish. To round things out with something simple, roast air fryer asparagus adds a bit of charred depth without overpowering the main course.

Recipe

Tried and loved this recipe? Please leave a 5-star review below! Your reviews mean a lot to me, so if you've got any questions, please let me know in a comment.

A bowl of tomato-based gnocchi alla vodka topped with grated cheese and shredded basil sits on a marble surface. A dollop of cream is in the center, and a spoon rests next to the bowl. Fresh basil leaves are nearby.
Print Recipe
No ratings yet

Gnocchi alla Vodka With Burrata Recipe

Gnocchi alla vodka with burrata features pillowy gnocchi in a creamy vodka sauce, topped with burrata cheese, fresh basil, and Parmesan.
Prep Time10 minutes mins
Cook Time20 minutes mins
Total Time30 minutes mins
Course: Dinner, Lunch, Pasta
Cuisine: Italian
Keyword: gnocchi alla vodka with burrata
Servings: 4 servings
Calories: 574kcal
Author: Ksenia Prints

Ingredients

  • 1 lb 450 g potato gnocchi (store-bought or homemade)
  • 2 tablespoons olive oil
  • 1 small onion finely chopped
  • 2-3 garlic cloves minced
  • 1 can 14 oz tomatoes, diced
  • ½ cup vodka
  • ½ cup heavy cream
  • 1 teaspoon red pepper flakes adjust to taste
  • Salt and pepper to taste
  • 8 oz 225 g burrata cheese
  • Extra virgin olive oil for drizzling
  • Fresh basil leaves for garnish
  • Grated Parmesan cheese for serving

Instructions

  • Bring a large pot of salted water to a boil. Add the gnocchi and cook according to package instructions, usually until they float to the surface (about 2-3 minutes for store-bought gnocchi). Drain and set aside.
  • In a large skillet, heat the olive oil over medium heat. Add the chopped onion and sauté until translucent, about 5 minutes.
  • Stir in the minced garlic and cook for an additional 1-2 minutes until fragrant.
  • Pour in the vodka and let it simmer for about 2-3 minutes, allowing the alcohol to cook off.
  • Add the crushed tomatoes and red pepper flakes. Season with salt and pepper.
  • Simmer for about 10 minutes, stirring occasionally.
  • Reduce the heat and stir in the heavy cream, cooking for an additional 2-3 minutes until the sauce is smooth and creamy.
  • Add the cooked gnocchi to the vodka sauce and gently toss to coat the gnocchi in the sauce. Cook for another 2 minutes to heat through.
  • Divide the gnocchi among serving plates. Top each serving with a piece of burrata cheese. Drizzle with extra virgin olive oil and garnish with fresh basil leaves. Sprinkle with grated Parmesan cheese, if desired.
  • Serve immediately and enjoy your creamy Gnocchi alla Vodka with Burrata!

Video

Nutrition

Calories: 574kcal | Carbohydrates: 45g | Protein: 15g | Fat: 33g | Saturated Fat: 16g | Polyunsaturated Fat: 1g | Monounsaturated Fat: 8g | Cholesterol: 74mg | Sodium: 403mg | Potassium: 85mg | Fiber: 3g | Sugar: 2g | Vitamin A: 983IU | Vitamin C: 3mg | Calcium: 354mg | Iron: 4mg

Crispy Air Fryer Beet Chips

Crispy air fryer beet chips are a delicious and healthy snack! This beet chips recipe is so easy to make. Get that perfect beet chip crunch with minimal fat!

A black bowl filled with dark red beet chips sits on a white surface, next to a white bowl containing a creamy dip topped with chopped green herbs.

Finding healthy snacks that my kids actually enjoy has been an ongoing challenge. These crispy air fryer beet chips were created when I bought extra beets for my beet hummus.

After seeing my first-born finish his plate of air-fried plantain chips, I decided to give beets a try. Turns out they're great alternatives to store-bought chips without sacrificing that satisfying crunch. 

In all honesty, my first attempt turned out either soggy or burnt, with no middle ground. I trusted my air fryer a little too much and assumed it would work its magic like it does for my other recipes.

I learned that using a mandoline slicer for ultra-thin, uniform slices—plus spacing them out properly in the air fryer basket—makes all the difference in getting the texture just right.

What makes these beet chips a must-try is how they turn a vegetable that many people avoid into something irresistibly snackable. While my kids are doing homework or during weekend movie nights, I can quickly prep a batch that's ready in under 20 minutes.

The vibrant color makes them visually appealing, and the natural sweetness of beets creates a flavor that's more complex than regular potato chips.

If you're looking for a healthier alternative to processed snacks or simply want to incorporate more vegetables in a fun way, these beet chips deliver every time. The air fryer turns a root vegetable into a crispy, crave-worthy treat that proves healthy snacking doesn't have to be a compromise.

Ingredients

Three raw beets with greens attached are placed on a white marble surface. A bottle of olive oil is positioned in the upper left corner and a small dish of spices is in the lower right corner.
  • Beets – The earthy backbone of the dish, beets bring deep color and a natural sweetness that intensifies when roasted. I’ve tried both large and medium beets and found that medium-sized ones roast more evenly and retain a better texture. 
  • Olive oil – This is key for roasting, helping the beets develop a caramelized, slightly crispy exterior while keeping the inside tender. I always use extra virgin olive oil because its richer flavor complements the earthiness of the beets better than lighter oils.
  • Salt – A simple but essential seasoning that draws out the natural sugars in the beets and balances their earthiness. I usually start with a moderate amount and adjust after roasting, as the flavor deepens during cooking.
  • Optional seasonings – I’ve experimented with garlic powder, paprika, and black pepper to add layers of flavor. Smoked paprika is a favorite for adding subtle warmth without overpowering the beets. Black pepper adds a gentle bite, while garlic powder gives a savory note that pairs well if you want a bit more complexity.

See the recipe card for exact quantities.

Step-by-step Instructions

A black bowl filled with crispy, dark red beet chips sits on a marble surface. In the background, there is a white plate with a dip garnished with green herbs.

Making beet chips in the air fryer is a quick and easy way to enjoy a healthy, crispy snack without using much oil. Thinly sliced beets cook evenly and develop a satisfying crunch, making them a great alternative to traditional chips. Follow these simple steps to prepare your own beet chips at home.

Preheat the Air Fryer

Start by setting your air fryer to 350°F (175°C) and let it preheat. This temperature is ideal for getting the beet slices crispy without burning them.

Prepare the Beets

A person slices a beetroot using a green mandoline slicer over a white plate on a marble countertop. An oil dispenser is placed nearby on the left.

Wash the beets thoroughly and peel them. For even, thin slices, use a mandoline slicer if you have one. If not, a sharp knife will work—just try to cut the slices about â…› inch thick so they cook evenly and crisp up well.

Season the Beet Slices

A hand holds a white plate filled with thinly sliced raw beets, perfect for making crispy beet chips, on a light marble surface.
A hand holds a metal bowl containing thinly sliced raw beets—perfect for making crispy beet chips—viewed from above on a light-colored marble surface.

Place the beet slices in a bowl and toss them with olive oil and salt. This helps them crisp up and adds flavor. If you want, you can add other seasonings like pepper, garlic powder, or smoked paprika for a bit of extra taste.

Arrange in the Air Fryer

A hand places sliced beets into an air fryer basket lined with parchment paper, ready to make crispy beet chips. Beside it, a metal bowl holds more beet slices on the marble countertop.

Lay the beet slices in a single layer inside the air fryer basket. Avoid overlapping the slices so they cook evenly. Depending on your air fryer’s size, you might need to cook the chips in batches.

Cook and Shake

Cook the beet slices for 15 to 20 minutes. Halfway through cooking, shake the basket or turn the slices to help them cook evenly on all sides. Keep an eye on them toward the end to prevent burning; the chips should be crisp and slightly browned when done.

Cool and Serve

Remove the beet chips from the air fryer and let them cool for a few minutes. They will crisp up more as they cool. Enjoy your crunchy, healthy beet chips as a snack or side!

Storage

Once the beet chips have cooled completely, store them in an airtight container to keep them crisp. Keep the container at room temperature, away from moisture and heat. Stored this way, the chips will stay fresh and crunchy for up to 3 days. Avoid refrigerating, as this can cause them to become soft. If they lose some crispness, you can refresh them by briefly reheating in the air fryer for a couple of minutes.

A bowl of crispy beet chips sits next to a small white bowl of creamy dip topped with chopped green herbs, both artfully arranged on a white marble surface.
A hand holds a black bowl filled with crispy beet chips. Above it, a white bowl contains creamy dip topped with chopped green herbs. Both are placed on a light marble surface. Perfect for air fryer snack lovers.

Top Tips

Slice evenly: Use a mandoline slicer if you have one to get consistently thin slices. Even thickness helps the chips cook uniformly and crisp up without burning.

Don’t overcrowd the basket: Arrange the beet slices in a single layer without overlapping. Cooking in batches if needed prevents steaming and helps the chips become crispy.

Watch the cooking time: Air fryer models vary, so start checking the chips around 12-15 minutes. Shake or turn them halfway through to avoid burning and achieve an even crispness.

What to Serve with Air Fryer Beet Chips

A black bowl filled with crispy beet chips sits on a white surface next to a small white bowl containing a creamy dip garnished with chopped green herbs.

Air fryer beet chips are easy to pair with light dips and sides that echo their earthy flavor and crisp texture. A good starting point is something creamy or tangy to balance the natural sweetness of the beets. Try them with a swipe of beet hummus for a color-coordinated match, or go with roasted red pepper hummus if you’re after something smoky and a little richer. You can also plate them alongside roasted carrots with hazelnuts, which build on the same earthy notes while adding some texture and nuttiness.

For something a bit more hefty, pair your chips with spicy air fryer cabbage steaks with tahini or halloumi cheese for a saltier contrast. If you’re planning a full air fryer spread, you could round things out with air fryer zucchini fritters, air fryer jalapeno poppers, or air fryer tilapia for something more protein-rich. These combinations keep things simple but interesting, making beet chips feel right at home in a mix of snacks or small plates.

Recipe

Tried and loved this recipe? Please leave a 5-star review below! Your reviews mean a lot to me, so if you've got any questions, please let me know in a comment.

A black bowl filled with crispy Air Fryer Beet Chips sits on a white surface. Behind it, a white bowl holds a creamy dip topped with chopped green herbs.
Print Recipe
No ratings yet

Crispy Air Fryer Beet Chips

Crispy air fryer beet chips are a delicious and healthy snack! This beet chips recipe is easy to make. Get that perfect beet chip crunch!
Prep Time5 minutes mins
Cook Time20 minutes mins
Total Time25 minutes mins
Course: Appetizer, Snacks
Cuisine: American
Keyword: air fryer beet chips
Servings: 3 people
Calories: 65kcal
Author: Ksenia Prints

Equipment

  • Air Fryer

Ingredients

  • 2 medium beets
  • 1 tablespoon olive oil
  • Salt to taste
  • Optional seasonings e.g., garlic powder, paprika, black pepper

Instructions

  • Preheat the air fryer to 350°F (175°C).
  • Wash and peel the beets. Use a mandoline slicer or a sharp knife to slice the beets thinly (about â…› inch thick).
  • In a bowl, toss the beet slices with olive oil and salt. Add any optional seasonings if desired.
  • Arrange the beet slices in a single layer in the air fryer basket. You may need to do this in batches, depending on the size of your air fryer.
  • Cook for 15-20 minutes, shaking the basket halfway through to ensure even cooking. Keep an eye on them to prevent burning; they should be crispy when done.
  • Once cooked, remove the beet chips and let them cool slightly. They will become crispier as they cool.
  • Serve immediately or store in an airtight container for later. Enjoy your healthy beet chips!

Video

Nutrition

Calories: 65kcal | Carbohydrates: 5g | Protein: 1g | Fat: 5g | Saturated Fat: 1g | Polyunsaturated Fat: 1g | Monounsaturated Fat: 3g | Sodium: 43mg | Potassium: 178mg | Fiber: 2g | Sugar: 4g | Vitamin A: 18IU | Vitamin C: 3mg | Calcium: 9mg | Iron: 0.5mg

Essential Air Fryer Accessories Guide 

Air fryer accessories guide! Must-haves & nice-to-haves to take your air fryer to the next level. From basics, to trinkets you will love for cooking and baking!

A person holds the basket of an air fryer, an essential guide to modern cooking, containing slices of cooked plantains. The sleek black air fryer with a handle complements their blue top, their hand gracefully near the handle.

Air fryers are beloved for their ability to cook food quickly with minimal oil, making them ideal for preparing comfort foods like crispy chicken wings, roasted vegetables, and baked goods. They preheat faster than traditional ovens and are easier to clean, making them a practical choice for busy households.​

Buying Guide for Air Fryer Parts 

A woman with long hair stands in a kitchen, showcasing her Essential Guide to using an air fryer. She holds the basket of crispy fries, fresh from the fryer on the countertop. Nearby, a small container of oil sits by the stove, hinting at versatile cooking possibilities.

When selecting air fryer accessories, consider the size and shape of your air fryer basket, the materials (preferably nonstick and heat-resistant), and the types of dishes you frequently prepare. Opt for accessories that enhance convenience and expand your cooking options.​

Essential Air Fryer Accessories

Here are some of the "must-haves" for anyone serious about their air fryer, and serious about minimizing cleanup.

Meat Thermometer

Six glazed chicken drumsticks are arranged inside an air fryer basket. The surface below shows a small bunch of fresh herbs and part of a blue cloth, with ingredients jars and a bowl partially visible in the corners.

A digital meat thermometer ensures your meats are cooked to the perfect temperature, enhancing food safety and taste. It's especially useful for dishes like crispy air fryer turkey thighs. It's also very important to make sure your chicken is cooked properly without having it end up bone dry, like with my sticky air fryer BBQ chicken drumsticks or chicken wings with Italian seasoning.  ​

Locking Tongs

High-quality locking tongs allow you to safely flip and remove food from the air fryer without damaging the nonstick surface or burning your fingers. Perfect for making your cabbage steaks next time. 

Oil Spray Bottle

An oil spray bottle helps you apply a thin, even layer of oil to your food, promoting crispiness without excess fat. This is essential for achieving that golden finish on fries or breaded items like my air fryer cheese bites or jalapeño poppers without drenching them in oil!

Basting Brushes

Four raw salmon fillets rest on a white rectangular tray lined with parchment paper, ready for transformation into air fryer salmon. A black brush sits nearby, hinting at seasoning or marination. The backdrop remains light and unobtrusive, keeping attention on the culinary preparation.

Heat-resistant silicone basting brushes are perfect for applying marinades or sauces to your food before or during cooking, enhancing flavor and moisture.​ They have turned my air fryer salmon from drab and forgettable to a juicy, tender meal. 

Mandoline Slicer

You’ll be amazed at the difference consistent cuts make—especially when using your air fryer. Evenly sliced veggies cook more uniformly, so you won’t end up with some pieces burnt to a crisp while others are still underdone. A mandoline makes prep fast, precise, and super satisfying. Bonus: those perfectly cut veggies give your finished dish that pro-level presentation.

Parchment Paper Liners or Reusable Silicone Liners

An air fryer basket lined with paper cradles uncooked zucchini fritters, hinting at a delicious feta recipe. A spatula rests on the basket's edge, ready for action. Nearby on the marble countertop are a mixing bowl brimming with batter and an empty white plate awaiting a tasty creation.

These liners prevent food from sticking to the basket and make cleanup a breeze, after you use it, just toss it in the trash! Reusable silicone liners are an eco-friendly alternative to disposable parchment paper.​  I can be lazy sometimes, and I can't stand having to scrub melted cheese off my air fryer after making pizza in the mornings. So these liners are nothing but a blessing in the cleaning department!

Other Nice-To-Have Air Fryer Accessories

These aren't things you need to have, but I have found them super useful at getting the most out of my air fryer and I think you will as well.

Air Fryer Rack

Eight air fryer jalapeño poppers, wrapped in crispy bacon and stuffed with a savory filling, are arranged in a circular pattern inside the basket. The bacon is perfectly cooked with enticing grill marks enhancing each piece.

An air fryer rack allows you to cook multiple layers of food simultaneously, increasing your cooking capacity and efficiency.  I have heard complaints that the air fryer doesn't have enough space when it's time to cook over the holidays.  But with air fryer racks, you can make layers of yummy food at the same time.  When I meal prep, I use these racks to make a lot of my air fryer tofu or air fryer asparagus. 

Air Fryer Skewers

Skewers are great for making kebabs or roasting vegetables, providing even cooking and easy handling.​ They really help make sure that my zucchini fritters are cooked evenly throughout. 

Magnetic Air Fryer Cheat Sheet

This handy reference lists cooking times and temperatures for various foods, making it easier to plan and execute your meals.​

Egg Molds

A person holds an air fryer basket containing crispy and juicy turkey thighs. The basket is lined with brown parchment paper, resting elegantly on a white marble surface, showcasing the perfectly cooked delight.

Silicone egg molds allow you to cook perfectly shaped eggs.  These molds have been very handy, since I have been trying to cook less greasy food, and now I have crispy eggs without having them doused in oil.  And there's no reason the egg molds can only have one purpose either. They produce perfectly round pancakes, and they take my carrot cake pancakes and blueberry sourdough pancakes to the next level. 

Accessories for Baking

A kitchen counter boasts an Essential Air Fryer, a white toaster, and a baking tray of freshly baked chocolate chip cookies on parchment paper. The wall features white subway tiles, and electrical outlets are visible.

They say that you can make practically everything in the air fryer and with a couple of handy kitchen nicknacks, you can even do your baking in the air fryer. 

Adapting Baking Recipes for the Air Fryer

You don’t need special recipes to bake in your air fryer—just a few smart tweaks. Here’s how to turn your go-to baked goods into air fryer magic:

  • Reduce the Temperature: Lower the baking temp by 25°F (about 15°C) from the original oven recipe. Example: If a recipe calls for 350°F, set the air fryer to 325°F.
  • Adjust the Time: Start checking for doneness at half to three-quarters of the original bake time. Muffins: usually take 10–15 minutes Mini cakes: about 15–20 minutes, depending on size
    Use a toothpick or cake tester to check the center.
  • Don’t Overfill: Only fill molds or pans about two-thirds full to avoid overflow during rising.
  • Preheat for Consistency: While not always necessary, preheating your air fryer for 2–3 minutes helps ensure even cooking and rise.
A cupcake with light blue frosting, decorated with green and pink sprinkles, is placed on a white plate. It is wrapped in a white paper liner and sits on a white-textured surface beside a light pink cloth.

Cupcake Silicone Molds

These molds are ideal for baking cupcakes or muffins in the air fryer, offering easy release and cleanup.​

Cake Baking Pans

Compact cake pans fit inside the air fryer, allowing you to bake small cakes or desserts without heating up your kitchen.​

Quick Air Fryer Spiced Tilapia Recipe

Make a quick and easy air fryer tilapia recipe that's flaky and crispy in just 10 minutes! Perfect for busy weeknights, this spiced tilapia is a delicious, low-carb option.

A gray plate with seasoned chicken pieces, garnished with cilantro and lemon wedges, rests on a marble surface. The quick recipe is completed with a wooden bowl of salt. A hand holds a fork, poised to enjoy the feast—a testament to easy cooking without an air fryer.

Getting everyone in the house to eat fish used to feel like climbing a steep hill in flip-flops. Between picky eaters and the lingering smell of seafood in the house, it just didn't seem worth the effort most weeknights. That all changed when I discovered how tilapia cooks perfectly in the air fryer!

This Middle Eastern-inspired spice blend turned our fish nights better. The combination of cumin, coriander, turmeric, and sumac creates the perfect balance that complements the mild flavors of the tilapia. I was surprised by what the sumac brings to the dish—its bright, lemony flavor makes the fish taste fresh without being "fishy."

This recipe is perfect for busy parents who need quick meals. The entire process just takes 20 minutes from start to finish, with only 10 minutes of actual cooking time. I can prepare everything, take a quick shower, and I can serve a healthy, protein-rich dinner that didn't need that much effort.

It wasn't until my third attempt that I realized how much of a difference patting the fish dry before seasoning could make. That small step changed the texture drastically. My husband noticed it right away, saying it was just as good as the fish from our favorite restaurant.

Now, it's become a regular part of our meal rotation, and to my surprise, my kids actually cheer when they see the air fryer come out on "fish night"—something I never expected from my family!

Ingredients

Three fillets of spiced tilapia are placed on a round gray plate. Surrounding the plate are small dishes containing various spices, including ground spices in shades of brown, yellow, orange, and red, and a small dish of salt—perfect for an air fryer recipe.
  • Tilapia fillets - This is the primary protein in the recipe.
  • Cumin - This spice adds a warm, earthy flavor to the fish.
  • Coriander - Gives a citrusy note that complements the fish. 
  • Turmeric - Adds a warm color and a subtle earthy flavor. If you want to omit turmeric, you can replace it with a pinch of curry powder, which will give a similar color and a slightly different flavor.
  • Paprika - This spice adds mild sweetness and vibrant color. If you prefer a bit of heat, you can use smoked paprika.
  • Sumac - Adds a tangy, lemony flavor that brightens the dish. If sumac is unavailable, mix lemon zest with a little salt as a substitute to achieve a similar brightness.
  • Garlic powder - You may use fresh garlic instead of garlic powder if you want a fresher taste.
  • Olive oil - Used for cooking the fish and adding richness, you may use other oils for this.
  • Lemon wedges - Used for serving, adding a fresh and zesty flavor when squeezed over the fish.

See the recipe card for exact quantities.

Step-by-step Instructions

If you're in the mood for a quick and flavorful seafood dish, this air fryer spiced tilapia is a great choice! I love making this recipe because it’s not only easy to prepare but also results in perfectly cooked fish with a deliciously crispy exterior. Just follow these straightforward steps, and you'll have a tasty meal ready in no time!

Prepare the Spice Mixture

A person holds a small white bowl filled with a brown, granular spice mix on a marble surface, perfect for seasoning your next Spiced Tilapia Recipe. They are stirring the mixture with a fork.

Start by combining the spices in a small bowl. This mixture will enhance the flavor of the tilapia. Use a whisk or a spoon to make sure that the spices are well blended.

Prepare the Tilapia Fillets

Take the tilapia fillets and pat them dry with paper towels. This step is important as it will help the olive oil and spices adhere better to the fish. Once dried, brush each fillet lightly with olive oil. This will add flavor and help achieve a nice texture during cooking.

Coat the Fillets

A gray plate presents four spiced tilapia fillets, their surfaces richly seasoned with brown spices. Resting on a white marble surface, a hint of spice playfully dusts the area around the plate, ready for your favorite air fryer recipe.

Evenly coat the tilapia fillets with the spice mixture you prepared earlier. Make sure to cover both sides of the fillets for consistent flavor. You can use your hands or a spoon to help distribute the spices evenly.

Preheat the Air Fryer

Set your air fryer to preheat at 400°F (200°C). Preheating is essential for cooking the fish evenly and achieving a nice crispness.

Arrange in the Air Fryer

Three seasoned, uncooked fish fillets, perfect for any spiced tilapia recipe, are placed side by side inside an air fryer basket. A hand holds the handle of the air fryer basket. The surface beneath has a marbled pattern.

Once the air fryer is preheated, place the seasoned tilapia fillets in the air fryer basket. Make sure to avoid overlapping the fillets, as this can prevent even cooking. If necessary, cook in batches to for proper air circulation.

Cook the Tilapia

Three seasoned Spiced Tilapia fillets are cooked to golden brown perfection in a black air fryer basket. The air fryer, resting elegantly on a light marble surface, highlights the simplicity and convenience of this delightful recipe.

Cook the fillets in the air fryer for 8-10 minutes. Flip the fillets halfway through the cooking time to promote even browning and cooking on both sides. Keep an eye on them to avoid overcooking.

Check for Doneness

Three seasoned spiced tilapia fillets are placed in the air fryer basket. This easy recipe yields fillets with a crispy, golden-brown appearance. A hand is holding the basket on a light marble surface.

After the cooking time is complete, check the internal temperature of the tilapia using a meat thermometer. The fish should reach an internal temperature of 145°F (63°C) to ensure it is fully cooked and safe to eat.

Serve the Tilapia

A hand garnishes a plate of spiced tilapia with chopped herbs, fresh from the air fryer. Two lemon wedges complement the dish on a light marble surface.
Grilled chicken breasts seasoned with herbs and spices are served on a gray plate, garnished with fresh parsley and lemon slices. For a healthier twist, try this recipe in an air fryer. The plate is elegantly set on a marble surface.

Once cooked, remove the tilapia from the air fryer and serve immediately. Pair the fish with lemon wedges for a bright, fresh flavor that complements the spices. Enjoy your meal!

Storage

A gray plate features four pieces of seasoned, air fryer-cooked chicken breast, garnished with fresh herbs and two lemon slices. The arrangement rests elegantly on a white marble surface.

Store any leftover air fryer spiced tilapia in an airtight container in the refrigerator for up to 2 days. It's best to consume the tilapia fresh, as reheating can cause it to become dry and lose its crispy texture. If you need to store it, try to keep the fillets whole and avoid stacking them to maintain their quality. To keep the taste and texture, it's recommended to consume the tilapia immediately after cooking.

Top Tips

Adjust cooking time: Keep in mind that cooking times may vary based on the thickness of the tilapia fillets and the specific model of your air fryer. Thicker fillets may require a bit more time, while thinner ones may cook faster. It's a good idea to start checking for doneness a couple of minutes before the recommended time.

Use fresh spices: For the best flavor, make sure your spices are fresh. Stale spices can affect the taste of the dish. If you can, try toasting whole spices before grinding them to release their essential oils and enhance their flavor.

Experiment with seasonings: Feel free to customize the spice mixture to suit your taste preferences. Adding a pinch of cayenne pepper for heat or swapping out spices like paprika for chili powder can give the tilapia a different flavor profile. Don’t hesitate to get creative!

What to Serve With Air Fryer Spiced Tilapia

A pair of hands elegantly holds a round, dark plate showcasing grilled chicken breasts garnished with lemon slices and fresh herbs. A small wooden bowl filled with coarse salt rests on the plate, enticing those eager to recreate this recipe against a sleek marble backdrop.

We love having this crispy spiced tilapia with a bowl of rice but it also goes well with roasted vegetables, adding some color and texture to the plate. A side of roasted potatoes with broccoli keeps things simple but satisfying, while German roasted cauliflower brings a lightly charred, well-seasoned bite. For something cheesy and comforting, green cauliflower bake is another option.

If you're in the mood for something fresh, a crisp salad balances out the spiced fish. Ukrainian cucumber salad is light and refreshing, and quinoa cucumber salad adds a bit more heartiness. For a mix of crunch and creaminess, cucumber crispy rice salad brings a fun contrast in textures. If you're looking for more air fryer recipes to round out the meal, try lemon air fryer salmon, crispy air fryer tofu, or zucchini fritters for another easy dish.

Recipe

Tried and loved this recipe? Please leave a 5-star review below! Your reviews mean a lot to me, so if you've got any questions, please let me know in a comment.

Grilled chicken breasts on a dark plate garnished with chopped herbs and two lemon wedges. The plate is on a marble surface. Reminiscent of an air fryer recipe, the chicken is seasoned with visible spices for that extra burst of flavor.
Print Recipe
No ratings yet

Air Fryer Spiced Tilapia

Make a quick and easy air fryer tilapia recipe that's flaky and crispy in just 10 minutes! Perfect for busy weeknights, this spiced tilapia is a delicious, low-carb option.
Prep Time10 minutes mins
Cook Time10 minutes mins
Total Time20 minutes mins
Course: Main Course
Cuisine: American, Middle Eastern
Keyword: air fryer spiced tilapia
Servings: 2 servings
Calories: 295kcal
Author: Ksenia Prints

Equipment

  • Air Fryer

Ingredients

  • 2 tilapia fillets 6-8 oz each`
  • 1 teaspoon cumin
  • 1 teaspoon coriander
  • ½ teaspoon turmeric
  • ½ teaspoon paprika
  • ½ teaspoon sumac
  • ½ teaspoon garlic powder
  • 2 tablespoon olive oil
  • Salt and black pepper to taste
  • Lemon wedges for serving for serving

Instructions

  • Combine spices in a small bowl.
  • Pat tilapia dry with paper towels. Brush with olive oil.
  • Coat fillets evenly with spice mixture.
  • Preheat air fryer to 400°F (200°C).
  • Place fillets in air fryer basket, avoiding overlap.
  • Cook for 8-10 minutes, flipping halfway through.
  • Check internal temperature reaches 145°F (63°C).
  • Serve immediately with lemon wedges.

Notes

Note: Adjust cooking time based on fillet thickness and air fryer model.

Nutrition

Calories: 295kcal | Carbohydrates: 1g | Protein: 34g | Fat: 17g | Saturated Fat: 3g | Polyunsaturated Fat: 2g | Monounsaturated Fat: 11g | Cholesterol: 85mg | Sodium: 91mg | Potassium: 553mg | Fiber: 0.3g | Sugar: 0.1g | Vitamin A: 13IU | Vitamin C: 0.2mg | Calcium: 28mg | Iron: 2mg

French Onion Chicken and Rice Casserole

This French onion chicken and rice casserole with caramelized onions, tender chicken, creamy rice, and melted cheese is pure comfort in every bite.

A plate of creamy French Onion Chicken and Rice topped with melted cheese and garnished with parsley sits invitingly. Nestled on a white plate over a woven mat, it is complemented by a blue napkin, fresh parsley, and an onion gracefully adorning the background.

There are certain days in a week when our house is in pure chaos, assignments and work tasks pile up, and everyone walks through the door hungry and cranky. The last thing I want to think about is spending an hour in the kitchen preparing a complicated meal that my kids might reject anyway.

Thankfully, I have this French onion chicken and rice casserole recipe that has become my weekday dinner hero. It only needs simple ingredients like chicken, rice, onions, and cheese, most of which I have in my fridge all the time, and I can put together a meal that's filling, satisfying, and guaranteed to get everyone’s approval.

This casserole is perfect for the busiest days. I kid you not, there's not a single complaint when this hits the table. Even my daughter, who usually has plenty to say at dinner, is too focused on her plate to talk.

It's like a dish made with individual ingredients I love—caramelized onions, savory chicken, and cheese. The golden, bubbly, and crispy cheese topping is something we all look forward to.

This one-pan meal takes just 20 minutes of prep, followed by 25 minutes in the oven. This way, you can have a complete dinner on the table in under an hour. Perfect for when everyone's schedules are pulling you in different directions.

Fifteen minutes made all the difference in this dish. After too many bland, underwhelming casseroles multiple times (and hearing all about it from my pickiest eater), I came to the conclusion that properly caramelizing those onions before anything else is a non-negotiable step.

Now, my family asks for this casserole whenever they remember how much they love it. If you want a recipe that transforms simple ingredients into something crave-worthy, this one belongs in your regular lineup.

Ingredients

Ingredients for a delightful rice casserole are spread out: a block of cheese, stick of butter, whole onion, bowls of rice, cooked salmon, milk, orange liquid, another white liquid, soy sauce, minced garlic, salt and pepper mix, and lemon juice.
  • Onions, sliced - These are essential for building the flavor base of the dish. If you prefer a milder taste, you can substitute with shallots. 
  • Chicken broth - This serves as the primary liquid for the soup. If you're looking for a lighter option, you can use low-sodium chicken broth or vegetable broth for a vegetarian version. 
  • White rice - This ingredient adds heartiness to the dish, you may use any rice you want but take note of their different cooking times.
  • Cooked chicken, shredded - This is the main protein in the dish. For a quicker alternative, rotisserie chicken works well. 
  • Swiss cheese, shredded - This cheese adds creaminess and a distinct flavor, you may use other cheeses.

See the recipe card for exact quantities.

Step-by-step Instructions

A white plate presents two slices of cheesy chicken and rice casserole topped with melted cheese and garnished with parsley. Resting on a purple and white striped cloth, the dish captures the essence of homemade comfort food. In the background, a blurred bunch of green leafy parsley adds color.

When I want something hearty and satisfying, this French Onion Chicken and Rice Casserole always hits the spot. The deep, rich flavor of caramelized onions with tender chicken and creamy rice makes it feel like a hug in a baking dish. It’s the kind of meal that brings everyone to the table, and the best part? It comes together with simple steps, making it just as easy as it is comforting.

Sauté the Onions

In a large pan, melt the butter together with the vegetable oil over medium-low heat. Once the butter has melted, add the sliced onions to the pan, ensuring they are well coated in the butter mixture. Allow the onions to sit undisturbed for about 10 minutes. This initial resting period helps them soften without browning.

Caramelize the Onions

After 10 minutes, begin to stir the onions occasionally. Continue cooking them for another 20-30 minutes, stirring every few minutes to prevent sticking. The goal is to caramelize the onions until they are golden brown and have developed a rich flavor. Be patient, as this process enhances the overall taste of the dish.

Add Seasonings

A pot filled with caramelized onions, reminiscent of a French Onion Casserole, sprinkled with minced garlic, salt, and a dash of black pepper, rests on a light marble surface.

Once the onions are caramelized, add salt, pepper, and minced garlic to the pan. Stir the mixture for about 30 seconds to allow the garlic to become fragrant, being careful not to let it burn.

Combine with Broth and Rice

A pot of French Onion Chicken soup with a light brown broth reveals shreds of potatoes and pieces of onions. The surface boasts a slight oily sheen, all perfectly perched on a white marble countertop.
A silver pot filled with clear yellow broth and white rice rests on a white marble surface, reminiscent of starting a delightful French Onion Chicken and Rice Casserole. The rice is clustered in the center, hinting at flavors yet to be revealed.

Next, pour in the chicken broth and Worcestershire sauce, stirring to combine. Add the rice to the mixture and bring it to a boil. Once boiling, reduce the heat to low, cover the pan, and let it simmer for 20 minutes. This allows the rice to absorb the flavors and cook through.

Preheat the Oven

While the rice is simmering, preheat your oven to 350°F (175°C). This makes sure that the oven is ready for baking once the casserole mixture is prepared.

Incorporate Cream and Chicken

A pot containing a French Onion Chicken rice casserole sits on a marble surface. The cooked rice mixes with shredded chicken and creamy sauce, harmoniously blending flavors for an inviting dish.

After 20 minutes, remove the pan from heat and stir in the heavy cream and shredded chicken. Mix until everything is well combined.

Transfer to Baking Dish

A glass baking dish brims with an uncooked French Onion Chicken and Rice Casserole—a creamy concoction of shredded chicken, rice, and sauce mixed with yellow vegetables like corn or bell pepper. The enticing assembly rests invitingly on a pristine white countertop.

Grease a 9x13-inch baking dish to prevent sticking. Carefully transfer the chicken and rice mixture into the prepared baking dish. Spread it out evenly, to ensure that the mixture is distributed uniformly.

Top with Cheese

A glass baking dish filled with uncooked macaroni and cheese, topped with shredded cheese, resembles a delightful French Onion Chicken and Rice Casserole. The dish rests on a white surface, ready to be baked to perfection.

Sprinkle the shredded Swiss cheese generously over the top of the casserole. This will create a delicious, golden cheesy layer once baked.

Bake the Casserole

A rectangular glass baking dish filled with a cheesy French Onion Casserole sits on a white countertop. Behind it, a red and white checkered cloth cradles two wooden spoons, ready to serve up the savory delight.

Place the baking dish in the preheated oven and bake for about 10 minutes, or until the cheese has melted and is bubbly. Keep an eye on it to prevent over-browning.

Garnish and Serve

A plate with two servings of cheesy, crispy French Onion Chicken and Rice casserole garnished with herbs sits on a purple cloth. A knife rests nearby. In the background, there is a plant and a glass of iced tea.

Once baked, remove the casserole from the oven. If desired, garnish with chopped parsley for a touch of color. Serve the casserole hot and enjoy this comforting dish!

Storage

A white plate holds servings of French Onion Chicken and Rice Casserole topped with melted cheese and garnished with parsley. The plate rests on a blue-striped cloth, accompanied by a wooden spoon, an onion, and a glass of iced tea.

Store any leftover french onion chicken and rice casserole in an airtight container in the fridge for 2-3 days. If you want to keep it for a longer period, you can freeze the casserole. Allow it to cool completely, then transfer it to a freezer-safe container or wrap it tightly in plastic wrap and aluminum foil. It can be stored in the freezer for up to 3 months. When you're ready to eat it, thaw in the refrigerator overnight and reheat thoroughly before serving.

Top Tips

Broil for browned cheese: If you prefer a crispy, browned cheese topping, consider broiling the casserole for the last few minutes of cooking. Keep a close eye on it to prevent burning, and remove it from the oven once the cheese is golden and bubbly.

Add spice: For those who enjoy a bit of heat, sprinkle red pepper flakes into the mixture or on top of the casserole before baking. This adds a nice kick and enhances the overall flavor profile.

Adjust rice consistency: If you find that there is excess liquid remaining after cooking the rice, simply simmer the mixture uncovered for an additional 5 minutes. This will help evaporate the extra liquid and achieve the desired consistency for your casserole.

What to Serve with French Onion Chicken and Rice Casserole

A plate of French Onion Chicken casserole, topped with melted cheese and garnished with parsley, sits on a striped cloth. Nearby are a wooden spoon, a whole onion, fresh greens, and a refreshing glass of iced tea.

A hearty dish like french onion chicken and rice casserole pairs well with a variety of sides and appetizers. For something fresh, an appetizer platter with dips, olives, and vegetables adds color and texture to the meal. A batch of avocado hummus brings a creamy, herbaceous element that complements the dish without being too heavy.

If you're looking for another baked side, cheesy easy cauliflower casserole or cheesy cabbage casserole with cracker topping can round out the table with different flavors and textures. For those who enjoy a meal with layered flavors, french onion chicken skillet or easy chicken hashbrown casserole keeps with the theme while adding variety to the spread.

Recipe

Tried and loved this recipe? Please leave a 5-star review below! Your reviews mean a lot to me, so if you've got any questions, please let me know in a comment.

A plate with two servings of baked cheesy pasta topped with herbs sits on a white plate. The woven mat beneath holds a wooden spoon. In the background, an onion, parsley, and a purple cloth with white stripes evoke the comforting allure of a classic French Onion Chicken dish.
Print Recipe
5 from 1 vote

French Onion Chicken and Rice Casserole

This French Onion Rice Casserole combines caramelized onions, tender chicken, creamy rice, and melted cheese for a comforting dinner.
Prep Time35 minutes mins
Cook Time30 minutes mins
Total Time1 hour hr 5 minutes mins
Course: Main Course
Cuisine: American
Keyword: french onion chicken and rice casserole
Servings: 6 servings
Calories: 812kcal
Author: Ksenia Prints

Equipment

  • 9x13 Baking Dish
  • Oven
  • Large pan

Ingredients

  • 3 tablespoon salted butter
  • 3 tablespoon vegetable oil
  • 4 large onions sliced
  • 1 teaspoon salt
  • 1 teaspoon pepper
  • 1 tablespoon minced garlic
  • 4 cups chicken broth
  • 1 tablespoon Worcestershire sauce
  • 1 ½ cups white rice
  • 1 cup heavy cream
  • 3 cups cooked chicken shredded
  • 16 oz Swiss cheese shredded

Instructions

  • In a large pan, melt butter with oil over medium-low heat. Add onions, coat with butter mixture. Let sit for 10 minutes without stirring.
  • Stir occasionally for another 20-30 minutes until onions are caramelized.
  • Add salt, pepper, and garlic. Stir for 30 seconds.
  • Add chicken broth, Worcestershire sauce, and rice. Bring to a boil, then reduce heat, cover, and simmer for 20 minutes.
  • Preheat oven to 350°F.
  • Stir in heavy cream and chicken.
  • Transfer mixture to a greased 9x13 baking dish. Top with shredded Swiss cheese.
  • Bake for 10 minutes or until cheese melts.
  • Garnish with parsley if desired. Serve hot.

Notes

Store in an airtight container in the fridge for 2-3 days.
For browned cheese, broil for the last few minutes.
Add red pepper flakes for extra heat.
If excess liquid remains after cooking rice, simmer uncovered for 5 more minutes.
Use rotisserie chicken for a quicker prep.

Nutrition

Calories: 812kcal | Carbohydrates: 48g | Protein: 44g | Fat: 49g | Saturated Fat: 28g | Polyunsaturated Fat: 3g | Monounsaturated Fat: 12g | Trans Fat: 0.2g | Cholesterol: 186mg | Sodium: 1259mg | Potassium: 474mg | Fiber: 2g | Sugar: 5g | Vitamin A: 1423IU | Vitamin C: 6mg | Calcium: 752mg | Iron: 2mg
« Previous Page
Next Page »
Woman smelling food on stove

Hello! I am Ksenia, a cook and blogger passionate about comfort food that warms the heart.

More about me →

Footer

↑ back to top

About

  • About me
  • Privacy Policy

Newsletter

  • Sign Up! for emails and updates

Contact

  • Contact
  • Services
  • FAQ

As an Amazon Associate I earn from qualifying purchases.

This site is owned and operated by Prints Media. Copyright © 2025 Thermocookery. All rights reserved.

Rate This Recipe

Your vote:


A rating is required
A name is required
An email is required