Thermocookery

menu icon
go to homepage
  • About Me
  • Recipes
  • Collaborate

subscribe
search icon
Homepage link
  • About Me
  • Recipes
  • Collaborate

×
Home » Page Layouts

Soft Gingerbread Loaf Casserole

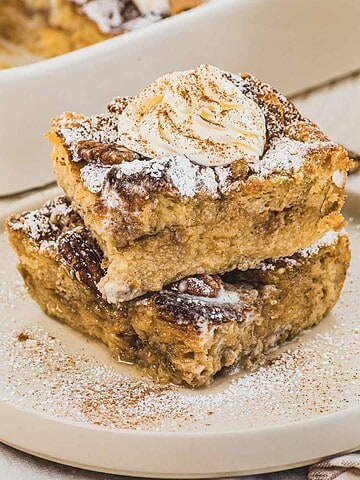
This moist and flavorful gingerbread loaf casserole is perfect for breakfast, dessert, or holiday gatherings. This easy gingerbread French toast for a crowd is best paired with a touch of whipped cream, or ice cream for a decadent touch.

A baking tray filled with golden brown bread pudding, reminiscent of a gingerbread loaf, is surrounded by cinnamon sticks, pinecones, and autumn leaves on a marble surface. A brown cloth napkin lies at the top with a few scattered whole nuts nearby.

I never worry about having bread that's close to its expiration date. Instead, I get excited because it means I can make my soft and delicious gingerbread-scented bread pudding casserole. It's warm and spicy because of ground ginger, cinnamon, and cloves, and full of comfort and scent of the holiday season. But just so you know, I call it Gingerbread French Toast to my kids to make them feel like they're eating something fancy! I love having this French toast for breakfast or in the afternoon with a nice warm cup of coffee.

I usually make this around the holidays, when we have bread slices that are about to expire and I want to treat my kids and guests to a nice breakftast that's easy to prep. It’s a great way to avoid waste and create a delicious snack. Around Christmas, I prepare this for family gatherings over brunch because its softness and flavors win everyone over. If I bring a container filled with freshly baked gingerbread loaf to a holiday potluck, I'll come home with an empty one for sure. It's a great make-ahead Christmas Day brunch recipe!

A plate of bread pudding topped with two dollops of whipped cream sits beside a gingerbread loaf casserole brimming with more goodness. A pine cone and small decorative leaf complete the cozy setting on the marble surface nearby.

The best part (for me) is, this gingerbread French toast casserole doesn't even take two hours to make. It usually takes me about 20 minutes to prepare and then around 50 minutes to bake, and that's a decent amount of baking time if you ask me. I let it cool for a bit, but I can't resist stealing a few hot bites—they're definitely worth it. I like serving this gingerbread loaf with condensed milk, cream cheese frosting or a sprinkle of powdered sugar, they make it even more delicious.

My kids love this recipe because It's super moist, fluffy, and the best gingerbread loaf casserole they've ever tried. It makes for easy breakfast or snacks that will last a few days, and it keeps really well when stored in an airtight container. Try it once and you'll find yourself purposely saving a few bread slices to make the recipe.

Ingredients

Ingredients for a delightful bread pudding casserole are displayed on a marble surface, including a bowl of cubed bread, reminiscent of gingerbread loaf, alongside butter, eggs, brown sugar, vanilla extract, milk, and a small bowl of spices.

• Day-old bread - cubed, this provides structure and absorbs the custard mixture. I love using sourdough or brioche loaf.
• Milk - forms the base of the custard.
• Eggs - bind ingredients and add richness.
• Brown sugar - sweetens and adds depth of flavor.
• Molasses - adds a rich, dark sweetness.
• Ground ginger - provides warmth and spice.
• Ground cinnamon - adds a sweet, woody flavor.
• Ground cloves - contributes a pungent, aromatic taste.
• Butter - melted, adds richness and helps with browning.

See the recipe card for exact quantities.

Step-by-Step Instructions

A plate with a serving of bread pudding topped with dollops of whipped cream is shown. In the background, a baking dish brimmed with gingerbread loaf casserole awaits. A pinecone and a small decorative ornament are nearby on the marble surface, enhancing the cozy ambiance.

This gingerbread loaf casserole is a moist and delicious holiday twist on classic gingerbread. It's perfect for those who love the flavors of gingerbread but prefer a softer, bread pudding-like texture. This easy gingerbread loaf recipe is great for breakfast or as a holiday treat.

Preheat the Oven and Prepare the Baking Dish

A hand is spraying non-stick cooking spray into a dark, rectangular baking pan on a white marble surface, preparing it for a gingerbread loaf.

Start by preheating your oven to 350°F (175°C). While the oven is heating, grease a 9x13-inch baking dish. This will ensure your gingerbread loaf casserole doesn't stick to the pan.

Prepare the Bread

Hands are placing chunks of bread from a white bowl onto a black baking tray, creating a delicious gingerbread loaf casserole. The scene is set on a pristine white marble surface.
Two hands are tearing pieces of a gingerbread loaf and placing them in a black baking tray on a marble surface. The irregular shapes seem perfect for crafting a cozy casserole or another delightful dish.

Spread the cubed day-old bread in the prepared baking dish. The stale bread will absorb the custard mixture better, giving your gingerbread loaf casserole the perfect texture.

Mix the Wet Ingredients

A hand holding a wooden-handled whisk stirs a smooth, brown liquid in preparation for a gingerbread loaf. The mixture swirls gracefully in the large stainless steel bowl resting on the marble countertop.

In a large bowl, whisk together the milk, melted butter, eggs, brown sugar, and molasses. Alternatively, you can use a stand mixer with the paddle attachment to mix these ingredients until well combined. These ingredients will form the base of your custard and give your casserole that classic gingerbread flavor.

Add the Spices

To the wet ingredients, add the dry ingredients: ground ginger, ground cinnamon, ground cloves, and salt. Whisk well to combine. These are what give this casserole its signature gingerbread taste, reminiscent of a Starbucks gingerbread loaf.

Combine Bread and Custard

Hands hold a bowl and whisk, pouring liquid over a baking pan filled with cubed bread pieces, crafting a gingerbread loaf casserole. The scene is set on a marble surface.

Pour the batter over the bread cubes in the baking dish. Gently press the bread down to ensure all pieces are soaked in the custard. This step is crucial for a moist gingerbread loaf casserole.

Bake the Casserole

A baking dish filled with golden-brown gingerbread loaf pudding. The surface is textured with chunks of bread soaked in a caramel-like glaze. A metal spoon is inserted into this delectable casserole, ready for serving.

Place the baking dish in the oven and bake for 45-50 minutes. The casserole is done when it's set and golden brown on top. A toothpick inserted into the center should come out clean.

Cool and Serve

Close-up of a spoonful of baked bread pudding in a dark baking dish. The dish boasts golden-brown chunks reminiscent of gingerbread loaf, mixed with a rich, syrupy texture, sprinkled with sugar. The bread pudding appears moist and freshly baked.
A white plate holds a serving of bread pudding, evoking the warm flavors of a gingerbread loaf. Topped with two dollops of whipped cream, a fork rests nearby. The backdrop features a marble surface and the corner of a baking dish, adding to the cozy casserole setting.

Once baked, remove the baking dish from the oven and let the loaf cool for about 10 minutes. This allows the casserole to set and makes it easier to serve. Serve your homemade gingerbread loaf casserole warm.

For an extra treat, top it with whipped cream or a scoop of vanilla ice cream. I also like to accompany it with condensed milk. You could even top it with a simple cream cheese frosting or drizzle with icing for added sweetness.

Storage

A white plate with a serving of gingerbread loaf pudding topped with two dollops of whipped cream. A silver spoon rests on the plate. The bread pudding is golden brown with a caramelized texture, reminiscent of a comforting casserole.

To store, allow it to cool completely to room temperature before covering the baking dish tightly with plastic wrap or storing portions or the gingerbread loaf in an airtight container. For optimal freshness, refrigerate the gingerbread loaf for up to 5 days.

If you want to freeze it, cut the casserole into individual portions, wrap each piece tightly in plastic wrap, and place in a freezer-safe container or bag, removing as much air as possible to prevent freezer burn. Frozen gingerbread loaf can be stored for up to 3 months.

To reheat, thaw overnight in the refrigerator if frozen, then warm in the microwave in 30-second intervals. For an extra treat, add a dollop of cream cheese frosting or a drizzle of icing when serving reheated portions to give your gingerbread loaf casserole that freshly-baked taste, reminiscent of moist Starbucks gingerbread loaf cakes.

Top Tips

Use stale bread -  For the best texture in your soft gingerbread loaf casserole, use day-old bread. This helps the bread cubes absorb the spiced custard mixture better, resulting in a moist and flavorful loaf that rivals any Starbucks gingerbread loaf.

Don't skimp on the spices - To achieve that classic gingerbread flavor, be generous with your spices. A combination of ginger, cinnamon, and cloves will give your loaf the perfect balance of warmth and sweetness. For an extra kick, consider adding a pinch of nutmeg or allspice to elevate the flavors even more.

Serve with cream cheese frosting - While the gingerbread loaf casserole is delicious on its own, serving it with a dollop of cream cheese frosting takes it to the next level. This addition makes it reminiscent of a copycat Starbucks gingerbread loaf and transforms it into a decadent dessert perfect for holiday gatherings or as a special breakfast treat.

What to Serve with Gingerbread Loaf Casserole

A white plate holds a serving of bread pudding topped with whipped cream, reminiscent of a gingerbread loaf. A fork rests beside it. In the background, a pan with more bread pudding and pinecones decorate the marble surface.

This is the perfect recipe for an afternoon snack so I like having it with a cup of coffee or chai tea latte. But it's also great for breakfast, you can pair this with savory meals like scrambled eggs and bacon.

If you're feeling extra and have time to spare, you should try my smoked salmon eggs benedict recipe, it will complement the sweetness of the gingerbread loaf. If you want to pair it with a drink that's comforting, you should try my pumpkin spice latte recipe with syrup.

If you're looking for more warm, spiced flavors, you should try out my pumpkin spice recipes: pumpkin spice muffins, glazed pumpkin spice bars, and pumpkin spice banana bread. They're all simple recipes, perfect if you want no-fuss treats!

Recipe

Tried and loved this recipe? Please leave a 5-star review below! Your reviews mean a lot to me, so if you've got any questions, please let me know in a comment.

A baking tray filled with seasoned, cooked chicken pieces is set on a marble surface. The warm aroma evokes the comfort of a gingerbread loaf, while decorative pine cones and autumn leaves surround the dish, conjuring an inviting fall atmosphere.
Print Recipe
No ratings yet

Gingerbread loaf casserole

A moist and flavorful gingerbread loaf casserole, perfect for breakfast, dessert, or holiday gatherings. Great topped with whipped cream, ice cream or condensed milk. Best paired with warm beverages and festive mocktails.
Prep Time20 minutes mins
Cook Time50 minutes mins
Total Time1 hour hr 10 minutes mins
Course: dessert / snack
Cuisine: American
Keyword: gingerbread casserole
Servings: 8 servings
Calories: 391kcal
Author: Ksenia Prints

Equipment

  • Oven
  • 1 9X13 casserole dish

Ingredients

  • 1 loaf day-old bread cubed
  • 2 cups milk
  • 4 eggs
  • ½ cup brown sugar
  • ¼ cup molasses
  • 2 teaspoon ground ginger
  • 1 teaspoon ground cinnamon
  • ¼ teaspoon ground cloves
  • ¼ teaspoon salt
  • ¼ cup butter melted

Instructions

  • Preheat oven to 350°F (175°C). Grease a 9x13-inch baking dish.
  • Spread bread cubes in the baking dish.
  • In a bowl, whisk milk, butter, eggs, brown sugar, molasses, spices, and salt.
  • Pour mixture over bread. Press bread down to soak.
  • Bake for 45-50 minutes until set and golden.
  • Let cool for 10 minutes before serving.

Video

Notes

Serve warm, optionally with whipped cream or vanilla ice cream.

Nutrition

Calories: 391kcal | Carbohydrates: 66g | Protein: 14g | Fat: 8g | Saturated Fat: 3g | Polyunsaturated Fat: 2g | Monounsaturated Fat: 2g | Trans Fat: 0.03g | Cholesterol: 90mg | Sodium: 545mg | Potassium: 432mg | Fiber: 4g | Sugar: 29g | Vitamin A: 233IU | Vitamin C: 0.2mg | Calcium: 239mg | Iron: 4mg

Pumpkin Spice Banana Bread

Don't miss out on the ultimate fall recipe with our pumpkin spice banana bread! This moist, flavorful bread blends ripe bananas and warm pumpkin spice for a deliciously spiced treat.

A loaf of pumpkin spice banana bread rests on a wooden cutting board, with a glass of milk in the background. The bread boasts a dark golden-brown crust and a textured interior, while additional crumbs are scattered on the board.

During hectic weeks, it's common to find forgotten bananas in the fruit bowl. Despite my best intentions, it's really hard to get through a Costco-sized banana pack!

But when I spot those overripe bananas, I feel nothing but excitement. Because now, I know it's the perfect opportunity to whip up a batch of banana bread. We love enjoying this bread in the afternoons, having it as is, with just a gentle smear of coconut oil for me and butter for the kids.

Sometimes, I make it with nut toppings like pumpkin seeds and walnuts. And truth be told, my kids always ask for some chocolate chips folded inside. Sometimes, I oblige.

This pumpkin banana bread is so warm and comforting, especially with the added delicious pumpkin spice flavor. Just a few minutes of prep, have it in the oven for a couple of more, and you have moist pumpkin spice banana bread, perfect for fall, or any other season.

I remember one time I had a few overripe bananas, just enough for one batch of banana bread. I made half with nuts on top and the other half with chocolate chips. My kids called me a genius for doing that, as it was the best of both worlds for sure.

Next time you look at your fruit bowl and it's speckled with brown, don't throw out your overripe bananas. Try this recipe instead—you'll love it and will be glad to find overripe bananas in your kitchen in the future.

A loaf of pumpkin spice banana bread sits on a wooden cutting board, its slices unevenly cut. Two cinnamon sticks are placed nearby on the white marble surface.

Ingredients

A marble countertop displays ingredients for baking pumpkin spice banana bread: a bowl of flour, three bananas, brown sugar, butter, eggs, canned pumpkin puree, cinnamon, vanilla extract, baking soda, and a pinch of salt.
  • Flour - I use all-purpose flour for this but feel free to use an alternative
  • Baking soda - leavening agent for rise
  • Salt - balances the sweetness
  • Pumpkin pie spice - adds warm, autumnal flavors
  • Butter - make sure it's softened, adds richness and moisture
  • Brown sugar - adds sweetness and depth
  • Eggs - bind ingredients and add structure
  • Mashed overripe bananas - main flavor and moisture source. You want to mash bananas that are yellow with brown spots, the riper, the better!
  • Pumpkin puree - you may use canned pumpkin puree, this adds additional moisture and seasonal flavor
  • Whole banana - an extra one for presentation

See the recipe card for exact quantities.

Step-by-step Instructions

A loaf of pumpkin spice banana bread is partially sliced on a wooden cutting board. Nearby are two cinnamon sticks, a beige cloth, and a glass of milk. Crumbs are scattered around the marble surface, adding to the cozy autumn vibe.

If you're craving a cozy, autumn-inspired treat, this pumpkin spice banana bread recipe is the perfect choice! Moist and flavorful, it combines the sweetness of ripe bananas with the warm spices of fall. It's a hit with both kids and adults, making it an ideal snack or breakfast option. Follow these foolproof steps to bake a delicious loaf that everyone will love.

Preheat the Oven and Prepare the Pan

A hand is holding a can, spraying a dark loaf pan on a white marble countertop, preparing for pumpkin spice banana bread. Nearby, a metal mixing bowl containing dough eagerly awaits its transformation into this delightful treat.

Preheat your oven to 350°F (175°C). Grease a 9x5 inch loaf pan with butter or non-stick cooking spray. This pumpkin banana bread recipe is perfect for using up ripe bananas and leftover pumpkin puree.

Mix the Dry Ingredients

A hand is whisking flour in a large stainless steel mixing bowl on a marble countertop, prepping for delicious pumpkin spice banana bread. Nearby, a smaller bowl holds brown sugar, perfect for the recipe, alongside an empty white dish ready for use.

For the flour mixture, in a large bowl, combine the flour, baking soda, salt, and pumpkin pie spice. Whisk these ingredients together until well mixed. This spiced pumpkin mix will give your bread a delicious pumpkin spice flavor.

Cream the Butter and Sugar

In a medium bowl, cream together the softened butter and brown sugar until light and fluffy. This can be done using a hand mixer or a stand mixer on medium speed. If you prefer, you can use buttermilk instead of butter for a different texture.

Add the Wet Ingredients

To the creamed butter and sugar, add the eggs one at a time, mixing well after each addition. Then, add the mashed overripe bananas and pumpkin puree. Mix until all the wet ingredients are well combined and smooth. Make sure to use ripe bananas for the best banana flavor. This combination of bananas and pumpkin makes for a moist and flavorful bread.

Combine Wet and Dry Ingredients

A hand is holding a red spatula, mixing brown dough infused with pumpkin spice in a metal bowl on a marble surface.

Gradually add the dry ingredients to the wet ingredients, mixing gently with a spatula or wooden spoon until just combined. Be careful not to overmix, as this can make the bread dense. This step is crucial for making moist pumpkin banana bread.

Prepare for Baking

A loaf pan filled with unbaked pumpkin spice banana bread batter sits on a light marble countertop. The smooth and even batter, infused with warm spices, is ready to be baked. The pan is rectangular with slightly curved edges.
A person positions a loaf pan filled with pumpkin spice banana bread batter on a marble surface. Slices of banana are arranged on top of the batter. Their hands are visible, gently holding the pan.

Cut the extra banana in half lengthwise. Pour the batter into the prepared bread pan, spreading it evenly. Place the banana halves on top of the batter, cut side up, for an attractive presentation. This banana pumpkin bread recipe is filled with pumpkin spice and is perfect for fall.

Bake the Bread

A loaf of moist pumpkin spice banana bread rests on a wooden cutting board, partially sliced with a knife beside it. Featuring a golden-brown crust, it sits elegantly on a white marble surface.

Place the loaf pan in the preheated oven and bake for 60-65 minutes, or until a toothpick inserted into the center of the bread comes out clean or with just a few moist crumbs, you can also use a cake tester for this. When the bread is done, it will have a delicious pumpkin spice aroma that fills your kitchen.

Cool and Serve

A loaf of sliced pumpkin spice banana bread rests on a wooden cutting board. The bread boasts a golden-brown crust and a moist, dense texture.

Once baked, remove the bread from the oven and let it cool in the pan for about 10 minutes. Then, transfer the bread to a wire rack to cool completely before slicing. Enjoy your pumpkin banana bread with your morning coffee or as a delicious snack. This quick bread recipe is one of the best of both worlds, combining the flavors of classic banana bread and pumpkin spice bread.

Storage

A loaf of sliced pumpkin spice banana bread rests on a wooden cutting board, with a glass of milk in the background. Two cinnamon sticks lie beside it, highlighting the enticing aroma. The bread showcases a delectable golden-brown crust.

To store your pumpkin banana bread, let it cool completely and then wrap it in plastic wrap. Store it in an airtight container at room temperature for up to 3 days. For longer storage, refrigerate the bread. This bread is a great addition to your collection of popular recipes and is perfect for sharing.

To refrigerate, wrap the bread tightly in plastic wrap or aluminum foil and place it in an airtight container to prevent it from drying out. When you're ready to enjoy a slice, you can eat it cold or let it come to room temperature. For a warm slice, microwave for about 10-15 seconds or heat in a preheated oven at 350°F (175°C) for about 5-10 minutes. 

Top Tips

Choose the right bananas - Use overripe bananas with plenty of brown spots for the best flavor and sweetness. The riper the bananas, the more natural sweetness and moisture they will add to your bread.

Don't overmix the batter - When combining the wet and dry ingredients, mix until just combined. Overmixing can lead to a dense and tough bread. A few small lumps in the batter are perfectly fine and will ensure a tender, moist loaf.

Add extra flavor and texture - Consider adding mix-ins like chopped nuts, chocolate chips, or dried fruit to the batter for added flavor and texture. You can also sprinkle a bit of brown sugar or cinnamon on top before baking for the perfect crust.

What to Serve with Pumpkin Spice Banana Bread

A loaf of pumpkin spice banana bread is partially sliced on a wooden cutting board. The bread boasts a golden-brown crust and a dense, moist interior. A glass of milk sits in the background on a marble surface, accompanied by a beige cloth napkin that is partially visible.

My pumpkin spice recipes always make use of my 4-ingredient pumpkin pie spice, the easiest pumpkin spice mix. This is goes well with coffee, tea, or to go with the fall theme, pumpkin spice latte. 

For other baked pumpkin spice recipes, you might want to try my pumpkin spice muffins, glazed pumpkin spice bars, and pumpkin spice cookies. They're all simple recipes, perfect for busy moms and dads!

Recipe

Tried and loved this recipe? Please leave a 5-star review below! Your reviews mean a lot to me, so if you've got any questions, please let me know in a comment.

Sliced pumpkin spice banana bread rests on a wooden cutting board with a glass of milk and cinnamon sticks nearby. The bread appears moist, with a slightly darkened crust that promises warmth and flavor.
Print Recipe
5 from 1 vote

Pumpkin Spice Banana Bread

Don't miss out on the ultimate fall treat with our pumpkin spice banana bread! This moist, flavorful bread blends ripe bananas and warm pumpkin spice for a deliciously spiced indulgence.
Prep Time15 minutes mins
Cook Time1 hour hr
Total Time1 hour hr 15 minutes mins
Course: Bread
Cuisine: American
Keyword: pumpkin spice banana bread
Servings: 10 slices
Calories: 219kcal
Author: Ksenia Prints

Equipment

  • Oven
  • Stand mixer
  • Hand Mixer

Ingredients

  • 2 cups flour
  • 1 teaspoon baking soda
  • ¼ teaspoon salt
  • 2 teaspoon pumpkin pie spice
  • ½ cup butter softened
  • ¾ cup brown sugar
  • 2 eggs
  • 2 â…“ cups mashed overripe bananas
  • ¼ cup pumpkin puree
  • 1 extra banana for presentation

Instructions

  • Preheat oven to 350°F. Grease a 9x5 inch loaf pan.
  • Mix flour, baking soda, salt, and pumpkin pie spice.
  • In another bowl, cream butter and sugar. Add eggs, bananas, and pumpkin puree.
  • Combine wet and dry ingredients.
  • Cut banana in half and place over the mixture
  • Pour into pan and bake for 60-65 minutes.

Video

Nutrition

Calories: 219kcal | Carbohydrates: 47g | Protein: 5g | Fat: 2g | Saturated Fat: 1g | Polyunsaturated Fat: 0.3g | Monounsaturated Fat: 0.5g | Trans Fat: 0.003g | Cholesterol: 34mg | Sodium: 199mg | Potassium: 260mg | Fiber: 2g | Sugar: 23g | Vitamin A: 1052IU | Vitamin C: 4mg | Calcium: 43mg | Iron: 2mg

Tried and True Sweet Potato Thanksgiving Stuffing

Made this for Thanksgiving once, and I promise it will become a cherished tradition for years to come. Thanks for sharing a meal from my kitchen to yours!

A glass baking dish filled with a baked granola mixture containing oats, nuts, and cranberries is placed on a wooden surface. A sprig of rosemary elevates the aroma. Nearby, a small bowl of cranberries and scattered oats hint at holiday cheer, akin to sweet potato stuffing’s allure.

This sweet potato stuffing recipe combines traditional side dish elements with a sweet and savory twist, bringing warmth and vibrant flavors to your Thanksgiving table.

Sweet potato stuffing is one of the first recipes I created during my early days of cooking, inspired by the need for a dish that could bridge tradition with something fresh and exciting. This sweet potato stuffing recipe uses roasted sweet potato cubes, dried cranberries, almonds, and a granola topping to create a unique take on traditional potato stuffing. Its blend of sweet and savory flavors, easy prep time, and reheating options make it a perfect addition to any holiday table. Whether you’re looking for a comforting side dish or a vibrant centerpiece for Thanksgiving or Christmas, this stuffing checks all the boxes.

I remember the first time I made stuffing for Thanksgiving. The recipe I attempted was overly complicated, involving white potatoes, bread cubes, and celery, and the result was far from the savory stuffing mixture I envisioned. My family politely ate their way around it, and I knew I had to rethink everything. That failure led me to this recipe—a dish that has since become a beloved part of our Thanksgiving table, delivering the perfect balance of roasted sweet potatoes, crunch, and bright, festive flavors.

A plate with a serving of sweet potato and cranberry casserole is in the foreground, garnished with fresh cranberries. In the background, a glass baking dish holds the rest of this delightful sweet potato stuffing.

This stuffing is versatile and practical. It can be made a day ahead and is easy to adapt to your personal preferences. Its sweet and savory combination pairs beautifully with traditional Thanksgiving recipes, making it the perfect side dish to serve alongside mashed potatoes, turkey, or vegan sausage.

Ingredients for Sweet Potato Stuffing

A pile of oats mixed with pumpkin seeds, cranberries, and raisins resembles the hearty texture of sweet potato stuffing as it spreads across the dark wooden surface.
  • Sweet potatoes: The star of this dish, roasted into tender, caramelized cubes.
  • Fresh or Dried cranberries: Add a burst of tangy sweetness to the stuffing mixture.
  • Almonds: Provide a crunchy texture and nutty flavor.
  • Granola: A toasty topping; oats, crushed crackers, or chopped nuts can be used instead.
  • Maple Syrup: Adds natural sweetness and complements the cranberries.
  • Coconut oil or Butter: Ensures the sweet potatoes brown evenly and enhances their flavor.
  • Salt and pepper: Essential for taste when seasoning.
  • Fresh parsley: Adds a bright, herbaceous finish.
  • Flour: to keep it all together
  • Ground ginger and fresh rosemary for flavor

See recipe card for exact quantities.

Directions

A close-up of a baked granola dish topped with a sprig of rosemary. The granola, reminiscent of sweet potato stuffing, contains oats and visible chunks of ingredients. A spoon rests in the dish, while a small bowl with red berries peeks out from the background.

Prep and Preheat

Preheat oven to 375°F (or 350°F for a slightly slower bake). Peel and dice the sweet potatoes into cubes, ensuring even sizes for uniform cooking.

Roast the Sweet Potatoes

A close-up view of sweet potato stuffing with cubed sweet potatoes and whole cranberries. The orange hue of the sweet potatoes contrasts beautifully with the dark red cranberries, creating a vibrant color palette.

Toss the sweet potato cubes in a large mixing bowl with olive oil, salt, and black pepper. Spread them evenly on a large baking sheet and roast for 20-25 minutes, stirring occasionally, until lightly browned and tender.

Prepare the Stuffing Mixture

In a frying pan over medium-high heat, melt 2 tablespoons of olive oil. Add the almonds and sauté for 2-3 minutes until toasted. Remove from heat and set aside.

Assemble the Stuffing 

A small white ceramic cup lies on its side, spilling several round, red cranberries onto a white textured surface. Some cranberries are scattered around the cup, as if awaiting their place in a sweet potato stuffing, their glossy skin catching the light.

In a large baking dish or casserole dish, combine the roasted sweet potatoes, toasted almonds, dried cranberries, and a drizzle of honey. Gently stir everything together, ensuring the cranberries and almonds are evenly distributed.

Add the Topping

Close-up of granola with oats, raisins, and dried berries scattered on a white textured surface, reminiscent of sweet potato stuffing's comforting blend of flavors.

Sprinkle granola over the stuffing mixture, covering the top layer evenly. This step gives the stuffing its sweet and crunchy crust.

Bake the Dish

Bake at 350°F for 15-20 minutes, or until the granola is golden brown. Remove from heat and let the stuffing cool slightly before serving.

Storage Instructions for Leftover Stuffing

This sweet potato stuffing can be stored in an airtight container in the refrigerator for up to 3 days. To reheat, preheat the oven to 350°F and warm the dish for 10-15 minutes. You can also freeze it for up to a month; just thaw in the fridge overnight before reheating.

A baking dish filled with sweet potato stuffing, topped with crunchy granola and garnished with a sprig of rosemary. Fresh cranberries and oats are artfully scattered on the wooden table. A small white bowl holds additional cranberries, adding a burst of color to the scene.

Tips and Tricks 

  • Always evenly toss the sweet potato chunks in olive oil and seasoning to ensure even roasting.
  • Add sautéed celery or vegan sausage to the stuffing mixture for a savory twist.

More Fall Flavors

When it comes to cozy autumn meals, few things pair as perfectly as roasted potatoes and broccoli with other fall-inspired recipes. To bring more seasonal flavors to your table, try these Spiced and Chewy Pumpkin Spice Cookies or Pumpkin Spice Muffins. For unique takes on classics, consider this Pumpkin Spice Bars with Cranberries and Glaze or a vibrant Roasted Carrot Dip. You can also elevate the occasion with a festive drink like the Pumpkin Pie Martini Mocktail or a classic Pumpkin Spice Latte made with Pumpkin Spice Syrup.

What I love Serving Over Thanksgiving

For Thanksgiving, your roasted vegetables can sit comfortably alongside these creative dishes: crispy Baked Butternut Squash Chips, flaky Puff Pastry Pumpkin Pockets, or a thoughtfully curated Fall Charcuterie Board. Heartier dishes like an Easy Moussaka or Cheesy Cabbage Casserole, as well as this comforting Slow Cooker Butternut Squash, bring depth and tradition to the meal.

What I love Serving Over Christmas

For Christmas gatherings, bring balance to your holiday table by pairing roasted potatoes and broccoli with sweet and savory treats like Rosemary Shortbread Cookies with Cranberry Coulis or a stunning Christmas Bruschetta. For a sweet finale, enjoy White Chocolate Bark with Cranberries and Pistachios or the indulgent Creamy Baked Feta Dip.

I love starting off this special morning with a Baked Rutabaga Casserole or Baked Oysters Mornay. For a festive main try my Chicken with Dates Casserole or Easy Chicken Hashbrown Casserole. They are sure to bring joy to every guest!

Recipe

Tried and loved this recipe? Please leave a 5-star review below! Your reviews mean a lot to me, so if you've got any questions, please let me know in a comment.

A glass baking dish brims with sweet potato stuffing, garnished with a sprig of rosemary. A spoon rests invitingly inside. Nearby, a small bowl of cranberries and scattered oats add vibrancy to the rustic table setting.
Print Recipe
No ratings yet

Almond, cranberry and sweet potato stuffing with berry granola crumble

This almond, cranberry and sweet potato stuffing with berry granola topping is a little sweet, a little salty, and a whole lot good for you. The perfect vegan Thanksgiving side dish!
Prep Time15 minutes mins
Cook Time35 minutes mins
Total Time50 minutes mins
Course: Side Dish
Cuisine: North American
Keyword: sweet potato stuffing
Servings: 6
Calories: 367kcal
Author: Ksenia Prints

Ingredients

  • 2 medium-sized sweet potatoes cut into 1-inch pieces
  • 1 cup fresh cranberries
  • 1 cup almonds chopped roughly
  • 4 tsps ground ginger
  • 2 tsps table salt
  • 4 TBs fresh rosemary chopped finely
  • 4 TBs maple syrup
  • 2 & ½ TBs cup coconut oil or butter
  • 1.5 cups Berry Blend granola (To sub for this Berry Blend granola, you can use: 1 cup gluten free oats, 2 tablespoons dried cranberries, 2 tablespoons dried currants, 2 tablespoons dried strawberries, 2 tablespoons dried blueberries)
  • ½ cup flour (gluten free or all-purpose)

Instructions

  • Preheat oven to 375F.
  • In a a large mixing bowl, mix yams, cranberries, almonds, ground ginger, salt, rosemary, 2 TBs maple syrup and 2 TBs of coconut oil (or butter). Stir well to combine.
  • In a a large mixing bowl, mix yams, cranberries, almonds, ground ginger, salt, rosemary, 2 TBs maple syrup and 2 TBs of coconut oil (or butter). Stir well to combine.
  • Coat the inside of a casserole dish thoroughly w coconut oil (or butter). Transfer yams and cranberries mixture to casserole, and spread evenly. Top with berry granola crumble mixture, trying to coat the yams as evenly as possible.
  • Cover with tin foil. Bake, covered, for 35 minutes. Test yams for doneness - if they are easily pierced through with a fork, remove from oven; if not, uncover and bake for an additional 5 minutes.
  • Plate and serve immediately.

Nutrition

Calories: 367kcal | Carbohydrates: 54g | Protein: 10g | Fat: 14g | Saturated Fat: 1g | Polyunsaturated Fat: 3g | Monounsaturated Fat: 8g | Trans Fat: 0.003g | Sodium: 820mg | Potassium: 583mg | Fiber: 9g | Sugar: 13g | Vitamin A: 10737IU | Vitamin C: 4mg | Calcium: 121mg | Iron: 3mg

One-Pan French Onion Chicken Skillet Recipe

Savor the rich flavors of this French onion chicken breasts skillet, featuring caramelized onions and melted cheese, for a delicious twist on classic French onion soup!

A skillet filled with French onion chicken breasts, crowned with melted cheese and garnished with herbs. A spoon lifts a portion, showcasing the gooey cheese stretch. In the background, a bread basket is softly blurred, adding a hint of rustic charm to this delectable scene.

As a mom of two energetic toddlers, I’m always on the hunt for quick and delicious meals that will please my little ones and my husband. That’s why I’m thrilled to share this French Onion Chicken Skillet recipe with you today. It’s become a family favorite, combining the rich, savory flavors of French onion soup with tender, juicy chicken—all cooked in just one pan for easy cleanup!

This dish starts by caramelizing yellow onions in a large skillet with a touch of thyme, filling your kitchen with that irresistible French onion aroma. Then, in the same pan, the seasoned chicken breasts are seared to golden perfection, soaking up all those delicious flavors from the onions.

I chose to use boneless, skinless chicken breasts, just like my chicken pumpkin risotto and greek chicken in the slow cooker, because they cook quickly, absorb the flavors beautifully, and provide a lean yet satisfying protein option. Their mild taste makes them the perfect canvas for the rich onion sauce and melty cheese. Plus, they’re always a hit with my family, making this a meal that’s both comforting and wholesome.

A white bowl holds a savory pappardelle pasta dish with braised chicken and mushrooms, reminiscent of French onion flavors, garnished with fresh herbs. A fork rests on a folded beige napkin beside the bowl, inviting you to indulge in this skillet-inspired creation.

Finally, everything simmers together in a savory beef broth, creating an irresistible sauce that coats the chicken beautifully. With just one skillet and about 40 minutes, you can enjoy a restaurant-worthy meal at home—with a side of air fryer asparagus or a cauliflower bake to keep the family healthy!

So what are you waiting for? All you need to make this french onion chicken breasts skillet recipe is one skillet, about 40 minutes of cooking and a bit of will!

Ingredients for French Onion Chicken Skillet Recipe

Ingredients arranged on a countertop include two onions, broth in a pitcher, butter on a plate, olive oil in a bowl, salt, pepper, chicken pieces in a skillet, leafy herbs, flour in a small bowl, bow-tie pasta, thyme sprigs, parsley and a garlic bulb for that perfect French onion chicken dish.

The three main elements of this recipe are the boneless, skinless chicken breasts, yellow onions, and pappardelle or wide egg noodles.  I recommend that you use boneless chicken and make sure to cut the chicken pieces small enough so all the chicken is fully cooked at the same time. You can use chicken thighs too. If you are looking to use another cut of chicken, like chicken thighs, I recommend my chicken and date tray bake. I prefer yellow onion because of how sweet and tender they become when you caramelize the onions. And these are my favourite noodles to use because they are perfect for soaking up the sauce. 

How to Make French Onion Chicken Breasts

Prep the Ingredients

Sliced onions seasoned with pepper and herbs sizzle in a black cast iron skillet alongside succulent French onion chicken breasts on a speckled white countertop.
A black skillet containing cooked sliced onions sits on a white speckled countertop, ready to complement the delicious French onion chicken breasts. The onions appear lightly caramelized.

Pat the chicken breasts dry and season the chicken with salt and pepper. Slice the onions thinly.

Caramelize the Onions

A black skillet filled with caramelized onions sits on a white, speckled countertop. The onions are golden brown and evenly spread across the pan, perfectly ready to complement succulent French onion chicken breasts.

Heat olive oil in a large skillet over medium-high heat. Add the sliced onions, salt, pepper, and fresh thyme. Reduce heat to medium and cook the onions for about 20 minutes, stirring occasionally. They'll soften and caramelize, changing from sharp to sweet. Once done, set them aside.

Cook the Chicken

Chunks of succulent French onion chicken are sizzling in a black cast iron skillet, resting on a white and gray speckled countertop.

In the same skillet, add more oil if needed. Dredge the chicken in a mix of flour, oregano, salt, and pepper. Return the skillet to medium-high heat. Sear the chicken for about 3-4 minutes per side, until golden brown. 

Make the French Onion Sauce

A black skillet holds a delightful dish of French onion chicken, with sliced onions, mushrooms, and chicken pieces in a savory reddish-brown sauce. This culinary masterpiece rests on a speckled white countertop.
A black skillet containing a stew with chunks of chicken breasts, onions, and a savory brown sauce sits on a white, speckled countertop.

In the same skillet, add the beef broth and caramelized onions, scraping up any browned bits. Nestle the chicken it into the onion sauce. Reduce heat, cover, and simmer until the chicken is cooked through and the sauce has thickened, about 10-12 minutes.

Prepare the Pasta

While the chicken cooks, prepare your pasta according to package directions.

Finish the Dish

A black cast iron skillet on a speckled countertop is filled with succulent French onion chicken breasts, topped with shredded cheese, ready for baking.

Once the chicken is cooked, top with shredded Gruyère cheese. Cover the skillet and let the cheese melt, or broil until bubbly and browned.

Serve and Enjoy!

Plate the French onion skillet chicken over buttered noodles, garnishing with fresh parsley if desired.

This easy one-skillet dinner comes together in less than an hour, perfect for a delicious weeknight meal. The combination of tender chicken, caramelized onions, and melty cheese creates a comforting dish you'll want to make again and again!

Storage for this Chicken Recipe

This dish reheats well, making it good for leftovers. Keep the chicken and sauce separate from the pasta in containers in the fridge for up to 3 days. To reheat, warm the chicken and sauce in a skillet over medium heat, and make fresh pasta to serve it with.

Dishes that Pair Well with French Onion Chicken

For a complete and comforting dinner, consider offering this skillet dish alongside Easy Moussaka or buttermilk chicken and potatoes for a Mediterranean-inspired pairing. 

A creamy option like Kabocha Squash Soup or an Easy Slow Cooker Butternut Squash dish is perfect for a cold evening. For those who love baked pasta, the Creamy Leek and Mushroom Pasta Bake or Creamy Vegan Pasta Bake are indulgent options.

Recipe

Tried and loved this recipe? Please leave a 5-star review below! Your reviews mean a lot to me, so if you've got any questions, please let me know in a comment.

A close-up of a cast-iron skillet reveals a cheesy baked French onion chicken dish with visible herbs. A serving spoon lifts a portion, showcasing the melted cheese and browned tops. The skillet rests on a speckled countertop, inviting you to savor the hearty blend of flavors.
Print Recipe
5 from 1 vote

French Onion Chicken Skillet

Savor the rich flavors of this French Onion Chicken Skillet, featuring caramelized onions and melted cheese for a delicious twist on classic French onion soup!
Prep Time10 minutes mins
Cook Time40 minutes mins
Course: Dinner, Soups
Cuisine: American
Keyword: french onion chicken breasts skillet
Servings: 3
Calories: 402kcal
Author: Ksenia Prints

Equipment

  • Cast iron skillet or frying pan

Ingredients

  • 4 tablespoons olive oil
  • 2 large yellow onions
  • Kosher salt (to taste)
  • Freshly ground black pepper (to taste)
  • 2 teaspoons chopped fresh thyme leaves
  • 2 cloves minced garlic
  • 1 pound boneless skinless chicken breasts
  • ½ teaspoon dried Mexican oregano
  • 2 tablespoons all-purpose flour
  • 1 cup beef broth or beef bone broth
  • 1 cup shredded Gruyère cheese
  • Freshly chopped parsley (optional garnish)
  • 8 ounces pappardelle or wide egg noodles
  • 2 tablespoons butter

Instructions

  • Pat the chicken dry and season chicken breasts with salt and pepper.
  • Halve the onions and slice into ¼-inch pieces. Mince the garlic.
  • In a large pan or skillet, heat 2 tablespoons of olive oil over medium heat. Add the onions, a pinch of salt, black pepper, and thyme leaves.
  • Reduce heat to medium-low and cook, stirring occasionally, until onions are caramelized but still intact, about 20 minutes.
  • Stir in the garlic, then remove the pan from the heat. Transfer the cooked onions to a bowl and set aside.
  • In a medium bowl, mix the flour, oregano, salt, and pepper. Cut the chicken into 1-inch pieces and toss in the flour mixture until evenly coated.
  • In the same skillet, heat the remaining 2 tablespoons of oil over medium-high heat. Add chicken to the skillet.
  • Cook until chicken is browned on all sides and mostly cooked through, about 6 minutes. Make sure the chicken is fully cooked by measuring it with a thermometer (it should be 165F). 
  • Add the beef broth and caramelized onions to the skillet. Bring the mixture to a boil.
  • Reduce heat to low and simmer until chicken is cooked through and broth reduces and thickens, about 12 more minutes.
  • Meanwhile, cook the pasta according to package directions. Drain and toss with 2 tablespoons of butter in a serving dish.
  • Sprinkle Gruyère cheese over the chicken. Cover the skillet with a lid and remove from heat. Let stand until the cheese melts, about 2 minutes.
  • Serve the French Onion Chicken over the pasta and garnish with chopped parsley, if desired.

Nutrition

Calories: 402kcal | Carbohydrates: 14g | Protein: 34g | Fat: 23g | Saturated Fat: 4g | Polyunsaturated Fat: 3g | Monounsaturated Fat: 15g | Trans Fat: 0.02g | Cholesterol: 98mg | Sodium: 190mg | Potassium: 724mg | Fiber: 2g | Sugar: 5g | Vitamin A: 64IU | Vitamin C: 9mg | Calcium: 43mg | Iron: 1mg

Roasted Potatoes with Broccoli Recipe

This roasted potatoes with broccoli recipe is perfect for any occasion—a healthy side dish or a comforting meal. Whether paired with creamy mushroom pasta sauce or enjoyed straight from the oven, it’s absolutely delicious and sure to become a favorite in your home. 

A sheet pan filled with roasted potatoes with broccoli, lemon slices, and red peppers. A spoon rests on the pan. Nearby are small bowls of spices and a jar on a rustic wooden surface.

Years ago, if you had asked me where I was, my answer wouldn't have been about a place but a feeling—a sense of turbulence that made every moment feel both electrifying and unnerving. It wasn’t the tray of roasted lemon potatoes, broccoli, and bell peppers before me that had me lost in thought but the storm inside.

The potatoes kissed with golden turmeric, the broccoli and peppers vibrant with the last notes of summer—these were simple things. But this simple dish was more important to me than I realized at the time.

Life had become an emotional rollercoaster, a rush of fleeting highs and sharp drops, pulling me further into something I didn’t quite understand. But amidst all the confusion, cooking was my anchor.

It started small: salads, quick lunches, and baked potatoes. Then, one evening, this dish—roasted lemon potatoes, broccoli, and bell peppers—filled the house with warmth and reminded me of a simpler time, a clearer sense of self.

A baking tray filled with roasted potatoes with broccoli and cherry tomatoes glistens invitingly. A silver spoon rests on the tray, ready to serve. Nearby, small bowls of spices and seasoning sit elegantly on a wooden surface adorned with a rustic burlap cloth.

It wasn’t just the food that nourished me—it was the time I spent in the kitchen, re-establishing my connection with myself. This dish, with its bright, zesty flavors, has become a symbol of those quiet moments of peace and the rediscovery of balance. A reminder that even in the most uncertain times, there’s always a way to find comfort in the familiar.

Ingredients for Roasted Potatoes with Broccoli 

A plate of roasted vegetables with lemon slices, featuring roasted potatoes with broccoli, sits on a rustic cloth. A fork is placed on the plate. In the background, a baking sheet brims with more of these savory delights.
  • Red potatoes: For a waxy texture and crispy finish, chop them into small, even pieces. Any size included baby potatoes can be used. 
  • Heads of broccoli: Cut into small florets for even roasting alongside the potatoes.
  • Olive oil: Helps the vegetable roast to golden perfection.
  • Salt and pepper: Essential for seasoning and enhancing the natural flavors.
  • Paprika, garlic powder (or garlic cloves), and thyme: A flavorful combination to coat the vegetables.
  • Lemon: Adds a tangy brightness to the dish.

See the recipe card for exact quantities.

Directions to Make Roasted Potatoes and Broccoli Recipe

A rustic wooden table showcases a tray of roasted potatoes with broccoli and lemon slices. A small plate, ready with a fork, holds a portion beside the tray. Nearby, bowls of spices rest on a burlap cloth, enhancing the scene's earthy charm.

Prepare the Oven Roasted Veggies

Preheat the oven to 425°F (220°C) and line a large sheet pan with parchment paper. Dry the potatoes thoroughly and cut them into small pieces, about the size of a quarter. Chop the broccoli into small florets and set them aside. Toss the potatoes in half the oil, salt, and spices, and arrange them on one side of the prepared baking sheet with parchment paper.

Roast the Potatoes First

Place the pan or baking sheet in the oven and roast the potatoes for 15–20 minutes, depending on their size. This step ensures they become crispy roasted without overcooking the broccoli.

Add the Broccoli

Remove the sheet pan from the oven and push the potatoes to one side. Toss the broccoli with the remaining oil and spices, then place it on the other side of the pan. Return the pan to the oven and roast for an additional 10–15 minutes until the roasted broccoli is tender and slightly charred.

Finish  and Serve

A plate of roasted vegetables, featuring broccoli, lemon slices, and red peppers, sits on a rustic wooden table. A fork rests on the plate. In the background, a tray holds more roasted vegetables, including roasted potatoes with broccoli and small condiment bowls add a tempting allure.

Remove the vegetables from the oven and stir them well to combine. Transfer to a serving dish and sprinkle with fresh lemon juice for a final burst of flavor.

Storage Instructions for Broccoli and Potatoes

A tray of roasted potatoes with broccoli, yellow squash, and red bell peppers. The vegetables are perfectly seasoned and appear crispy, set on a rustic wooden surface with a small bowl of sauce in the background.

Leftovers can be stored in an airtight container in the fridge for up to five days. To restore their crispy texture, they can be reheated in the oven or air fryer. Leftover roasted potatoes and broccoli pair wonderfully with creamy mushroom and leek pasta or as a topping for a satisfying vegetarian pasta dish.

Top Tips For The Perfect Roasted Vegetable Side Dish

  • Experiment with flavors by adding red pepper flakes, vegan parmesan, or a splash of white wine.
  • Cut the potatoes evenly to ensure they cook at the same time.
  • Use an oven thermometer for consistent results when roasting.
  • Toss the vegetables halfway through roasting for even browning.

More One-Pan Dinners

If you love the simplicity of roasted potatoes and broccoli, you’ll enjoy exploring more one-pan dinner ideas that keep cooking and cleanup easy. Try the Green Cauliflower Bake for a hearty dish or the Sweet Potato Casserole with Hazelnuts for a nutty twist on a classic. For something vibrant, the Recipe for Carrot Casserole delivers satisfying flavors, while the Creamy Vegan Broccoli Casserole highlights plant-based comfort food.

Protein-packed options like the Salmon Casserole with Cauliflower or the Winter Comfort Instant Pot Chicken and Pepper Stew are perfect for chilly nights, and the Chicken with Dates Casserole adds a sweet and savory touch to your table. Don’t miss the Sheet Pan Chicken Sausage and Veggies for a quick, colorful meal.

More Broccoli-Inspired Dishes

For those who adore broccoli, there are even more ways to enjoy this versatile vegetable. The Creamy Broccoli Stems Soup makes use of often-overlooked parts of the plant, while the Broccoli Kale Soup is a vibrant, nutrient-rich option. For a lighter dish, the Broccoli Salad offers crunch and fresh flavors, perfect for pairing with your roasted potatoes and broccoli.

Recipe

Tried and loved this recipe? Please leave a 5-star review below! Your reviews mean a lot to me, so if you've got any questions, please let me know in a comment.

A rustic wooden table showcases a baking sheet filled with roasted broccoli, potatoes, and lemon slices. Beside it, a plate holds a portion of the vegetables and sweet potato stuffing, accompanied by a fork. Small bowls of spices rest on a burlap cloth nearby.
Print Recipe
No ratings yet

Roasted Potatoes with Broccoli Recipe

Roasted potatoes, broccoli and bell peppers are golden from a sprinkling of turmeric and fragrant with the last remaining dry summer herbs. 
Prep Time10 minutes mins
Cook Time30 minutes mins
Total Time40 minutes mins
Course: Side Dish
Cuisine: Middle Eastern, vegan
Keyword: roasted potatoes with broccoli
Servings: 4 servings
Calories: 291kcal
Author: Ksenia Prints

Equipment

  • Baking sheet
  • Oven

Ingredients

  • 1 lb potatoes
  • 2-3 lemons
  • 2 crowns of broccoli
  • 2 bell peppers
  • ½ teaspoon turmeric
  • 1 TB paprika
  • ½ TB dried minced onion
  • 1 teaspoon chilli powder
  • 1 teaspoon garlic powder
  • ½ tablespoon dried oregano
  • ½ tablespoon dried thyme
  • â…› cup olive oil
  • Salt and pepper  to taste

Instructions

  • Chop all vegetables coarsely: slice potatoes and lemons, break broccoli into florets, and cut bell peppers into thick strips.
  • In a large bowl, combine vegetables with seasonings and olive oil. Mix well until all vegetables are evenly coated. 
  • Cover a baking sheet with parchment paper or a silicone mat. Arrange vegetables in a single layer.
  • Roast at 425F for 30 mins. Serve immediately, making sure to get all the dressing out of the pan. Roasted lemon potatoes, broccoli and peppers will keep in the fridge in a sealed container for five days, their flavours intensifying.

Nutrition

Calories: 291kcal | Carbohydrates: 51g | Protein: 12g | Fat: 8g | Saturated Fat: 1g | Polyunsaturated Fat: 1g | Monounsaturated Fat: 5g | Sodium: 120mg | Potassium: 1685mg | Fiber: 14g | Sugar: 10g | Vitamin A: 3949IU | Vitamin C: 399mg | Calcium: 198mg | Iron: 5mg

Spiced and Chewy Pumpkin Spice Cookies

These spiced and chewy pumpkin spice cookies are packed with warm cinnamon and the perfect blend of pumpkin spice. It's like the perfect fall treat with every bite!

A plate of homemade pumpkin cookies is stacked high. One cookie has a bite taken out of it, revealing a soft interior. The cookies are sprinkled with sugar and cinnamon, and the plate rests on a light-colored surface.

As the leaves begin to turn and the air grows crisp, there's something magical about the aroma of these pumpkin cookies filling the house. With two lively toddlers running around, finding time to bake can be a challenge, but these cookies are a busy mom's secret weapon. They're quick to prepare, absolutely delicious, and even sneak in a bit of vegetable goodness with the pumpkin puree. Plus, the kids absolutely love helping to mix the dough and shape the cookies!

This chewy cookie recipe is all about simplicity and capturing the cozy flavors of fall. The combination of pumpkin pie spice, brown sugar, and pumpkin puree creates a harmony that's both comforting and irresistible. They turn out soft and chewy, perfect for little hands to hold – making them an excellent choice for after-school snacks or as a special treat on chilly evenings.

What makes these cookies truly special is how easy to make they are, and how they bring the family together. There's something about the process of measuring ingredients, mixing the dough, and waiting eagerly by the oven that creates lasting memories. And when the timer finally dings, the joy on the children's faces as they bite into a warm, freshly baked cookie is priceless. It's these simple moments of togetherness that make the busyness of life with toddlers all worthwhile.

A hand reaches for a plate of pumpkin cookies on a marble surface. Nearby, there's a glass of milk, scattered crumbs, and cinnamon sticks. A textured beige cloth is placed beside the plate.

Ingredients

Top view of baking ingredients on a marble surface. Includes a bowl of flour, pumpkin puree, brown sugar, granulated sugar, spices, baking powder, salt, two eggs, a bowl of oil, and a canister of flour.
  • Flour: The foundation for our cookie structure
  • Baking soda: Gives the cookies their rise and chewiness
  • Pumpkin pie spice: A blend that captures autumn's flavor. The cloves and nutmeg here are what makes this stand out!
  • Salt: Balances and enhances the other flavors
  • Butter: Adds richness and contributes to texture
  • Sugar and brown sugar: Provide sweetness and moisture
  • Egg: Binds the ingredients and adds structure
  • Vanilla extract: Complements the pumpkin spice flavor
  • Pumpkin puree: The star ingredient, bringing color and flavor. You can use homemade pumpkin puree or your favorite canned pumpkin puree, I promise I won't tell.
  • Chocolate chip cookies or walnuts (optional): for a spark of flavor
  • Sugar + Cinnamon mix (optional): for a smattering of sweetness

See recipe card for exact quantities.

Step-by-step directions

A white plate holds a stack of pumpkin cookies sprinkled with sugar on a marble surface. A glass of milk and a beige cloth sit nearby. One cookie is partially eaten and placed off to the side.

Preparation

A white bowl filled with flour is placed on a marbled surface. Beside it is a small wooden scoop resting in a glass bowl containing a dark powder, likely a spice or cocoa. A metal whisk is partially visible in the flour.
A stainless steel mixing bowl contains an orange batter, likely for baking. An electric mixer with purple handles rests on the bowl's edge. A small jar with a wooden spoon is nearby on a marble countertop.

Start by preheating the oven to 375°F. In a medium bowl, combine the flour, baking soda, homemade pumpkin pie spice, and salt. In a separate large bowl, cream the softened butter with both sugars until fluffy. Add the egg, vanilla, and pure pumpkin puree to the butter mixture, mixing well. Scrape down the sides of the bowl as needed.

Making the Cookie Dough

A person is using a purple electric mixer to blend brown dough in a stainless steel bowl on a marble countertop.

Gradually add the dry ingredients to the wet, stirring until just combined. Avoid overmixing. For variation, add ½ cup of dark or white chocolate chips or chopped walnuts, if desired. This pumpkin cookie recipe is versatile and can accommodate various mix-ins.

Chill Batter

Refrigerate the dough for at least an hour to let flavors meld and make it easier to handle. This step is crucial for achieving soft and chewy pumpkin cookies.

Shaping the Cookies

A cookie sheet with raw cookie dough balls is placed on a marble countertop. A hand is holding a small scoop to form more dough balls. A small round bowl with dough residue is partially visible in the bottom right corner.

After chilling, use a cookie scoop to drop spoonfuls of dough onto a lined baking sheet. For extra flavor, mix 2 tablespoons of sugar with 2 teaspoons of cinnamon. You can roll the dough balls in the cinnamon sugar coating, or sprinkle it on top. Return to the fridge for another 30 minutes.

Bake the Cookies

A baking tray with ten round, golden-brown biscuits on a light marble surface. The tray shows signs of use, with darkened areas and some staining. The biscuits are evenly spaced across the tray.

Bake for 10-12 minutes. At the 6-minute mark, take the cookies out and gently tap the sheet on the counter to flatten them slightly. Use a cookie cutter or glass to shape the edges if desired, then return to the oven to finish baking. The cookies should be super soft when done.

Serve the Cookies

A white plate filled with a stack of round pumpkin cookies sits on a marble surface. The cookies are golden-brown, appearing soft and slightly textured.

Let the cookies cool on the baking sheet for 5 minutes before transferring to a wire rack. Once cooled completely, arrange on a plate and serve. These chewy pumpkin cookies are best enjoyed with a glass of milk or a warm cup of tea.

A partially eaten pumpkin cookie is on a white marble surface, with crumbs scattered around it. A plate of similar cookies is in the background, and a beige cloth is partially visible to the left.

Storage

A white plate with several cinnamon sugar cookies on a marble countertop. A glass of milk and cinnamon sticks are in the background. A beige cloth is partially visible in the foreground, and a single cookie is placed off to the side.

Keep these soft pumpkin cookies in an airtight container at room temperature for up to 5 days. The dough can be frozen for up to 3 months - portion it into individual cookie shapes before freezing for easy baking later.

Accompanying Dishes

A white plate stacked with pumpkin cookies, lightly dusted with sugar, positioned on a marble surface. A glass filled with milk is in the background.

Looking for a pumpkin overload? These cookies pair beautifully with a warm cup of chai tea or a pumpkin spice latte. For a more decadent treat, crumble them over vanilla ice cream. You can also make cookie sandwiches by spreading cream cheese frosting between two cookies - it's reminiscent of a miniature pumpkin roll. 

If serving as part of a whole fall-themed meal, then try this kabocha squash soup or butternut squash soup. My slow cooker roasted butternut squash makes for a great side that cooks on its own. This sweet carrot casserole is also gorgeous alongside this dessert!

For more pumpkin-scented desserts and bakes, check out my pumpkin spice muffins or my glazed pumpkin spice bars.  If you're looking for more pumpkin-themed treats, check out our vegan Pumpkin Pie recipe for a classic fall dessert duo.

Recipe

Tried and loved this recipe? Please leave a 5-star review below! Your reviews mean a lot to me, so if you've got any questions, please let me know in a comment.

A white plate holds a stack of pumpkin cookies topped with a sprinkle of sugar and cinnamon. One cookie has a bite taken out. In the background, a glass of milk is partially visible. A beige napkin and cinnamon sticks are nearby on the marble surface.
Print Recipe
No ratings yet

Pumpkin Spice Cookies

These fall cookies have the perfect amount of pumpkin flavor in them, alongside a smattering of spice! These cookies are soft, easy and have a lot of pumpkin essence!
Prep Time10 minutes mins
Cook Time12 minutes mins
Cooling time1 hour hr 30 minutes mins
Course: Dessert
Cuisine: American
Keyword: pumpkin spice cookies
Servings: 12 cookies
Calories: 209kcal
Author: Ksenia Prints

Equipment

  • hand-held mixer
  • Mixing bowls
  • Baking sheet
  • Ice cream scoop

Ingredients

  • 2 ¼ cups flour
  • 1 teaspoon baking soda
  • 1 tablespoon Pumpkin pie spice
  • ½ teaspoon salt
  • 1 cup butter softened
  • ¾ cup sugar
  • ¾ cup brown sugar
  • 1 egg
  • 1 teaspoon vanilla
  • ½ cup fresh pumpkin puree or canned pumpkin puree
  • ½ cup chocolate chips or walnuts chopped (optional)
  • For topping optional
  • 2 tablespoons sugar optional
  • 2 teaspoons cinnamon optional

Instructions

  • Preheat oven to 375°F.
  • Mix flour, baking soda, pumpkin pie spice, and salt.
  • Cream butter and sugars. Add egg, vanilla, and pumpkin puree.
  • Combine wet and dry ingredients. Add ½ cup of chocolate chip or walnuts, if desired.
  • Refrigerate for at least 1 hour.
  • For an extra burst of sweetness, mix sugar with cinnamon in a small bowl.
  • Drop spoonfuls of batter onto baking sheet. Sprinkle cookies with mixed sugar and cinnamon topping, or press each cookie into the sugar-cinnamon mix.
  • Refrigerate for 30 mins.
  • Bake for 10-12 minutes. After 6 minutes, take the cookies out of the oven and tap them on the counter to flatten slightly. To straigthten the edges, use a large cookie cutter or glass and twist it around the cookies. Return to the oven to finish baking.
  • When cookies come out of the oven, leave cookies to cool on the baking sheet for 5 minutes and then transfer to a cookie drying rack to cool completely.

Video

Nutrition

Calories: 209kcal | Carbohydrates: 46g | Protein: 4g | Fat: 1g | Saturated Fat: 1g | Polyunsaturated Fat: 0.2g | Monounsaturated Fat: 0.3g | Trans Fat: 0.002g | Cholesterol: 16mg | Sodium: 220mg | Potassium: 101mg | Fiber: 1g | Sugar: 27g | Vitamin A: 1643IU | Vitamin C: 1mg | Calcium: 46mg | Iron: 2mg

Green Cauliflower Bake Recipe with Roasted Cauliflower and Chimichurri

This cauliflower bake recipe is a heartfelt addition to my family’s table—a reminder of the joy in simple ingredients and shared meals. I hope it brings you the same comfort and happiness.

A white ceramic dish showcases a delightful cauliflower bake recipe, with broccoli and cauliflower florets smothered in a vibrant green herb sauce. Set against a dark background, the dish vividly highlights the colors of the vegetables and sauce.

Cauliflower has always been a staple in my kitchen, beloved for its versatility and ability to adapt to almost any flavor profile. In this cauliflower bake recipe, roasted cauliflower takes center stage, transforming into a comforting casserole that’s both wholesome and flavorful. Its tender florets soak up the vibrant herb sauce, creating a dish that’s as nourishing as it is memorable. Whether served as a side dish or the main event, this baked cauliflower recipe is perfect for any family gathering.

The inspiration for this cauliflower bake recipe came after a trip to Argentina, where I fell in love with their cuisine's bold, fresh flavors. I was especially drawn to chimichurri, a sauce brimming with fresh herbs and garlic - which made it onto my top 10 Argentinian dishes list. While I admired the traditional preparation, I wanted to give it my own twist—adapting it to the comfort foods I grew up with. Combining these bold flavors with roasted cauliflower created a dish that feels like a warm hug, blending the vibrancy of Argentina with the heartiness of a classic casserole dish.

A plate with roasted cauliflower pieces, both green and purple, sits on a teal-rimmed white plate. A fork and knife are placed beside the plate, suggesting a delightful cauliflower bake recipe. In the background are a small dish with oil and a baking dish with more cauliflower. Sprigs of herbs are scattered.

What I love most about this cauliflower casserole is its versatility. I often prepare it as a side dish for family dinners, where it sits proudly next to a roast or a creamy potato bake. But it’s equally at home as a standalone meal, paired with a crusty loaf of bread to soak up the herb sauce. Watching my family enjoy it around the table brings back memories of my childhood, where simple ingredients created dishes that were more than food—they were moments shared.

Ingredients for Loaded Cauliflower Bake

A large purple cauliflower, perfect for a vibrant cauliflower bake recipe, is surrounded by smaller white florets on a rustic, textured surface with green sprigs scattered around. The backdrop is a plain dark color.
  • Cauliflower: Two heads of cauliflower broken into bite-sized florets, providing a tender and slightly nutty base when roasted.
  • Greens and Herbs: Four cups of fresh greens—scallions, kale, spinach, cilantro, parsley, and watercress—offering a vibrant, aromatic flavor.
  • Water: Just enough to help blend the herb sauce into a smooth, pourable consistency.
  • Olive Oil: Adds richness to the sauce and ensures the cauliflower bakes beautifully.
  • Red Wine Vinegar: A tangy note that balances the earthy flavors of the cauliflower and greens.
  • Garlic: Four cloves, finely minced, bringing a bold, savory depth to the sauce.
  • Dried Oregano: A tablespoon for an earthy, herbaceous kick.
  • Salt and Pepper: To season both the cauliflower and the sauce, enhancing every bite.
  • Chili Flakes: A teaspoon or more for a gentle heat that ties the flavors together.

See the recipe card for exact quantities.

Directions to Make Loaded Cauliflower Casserole

Prepare the Roasted Cauliflower

A head of purple cauliflower takes center stage, encircled by white florets and fresh dill sprigs on a textured surface—an appetizing scene reminiscent of a cauliflower bake recipe. The backdrop is a dark, neutral hue that adds depth to the arrangement.

Preheat your oven to 350°F. Wash the cauliflower, cut it into florets, and pat dry. Lightly oil a large casserole dish or baking dish, then add the cauliflower florets, spreading them out in a single layer.

Make the Herb Sauce

A blender container filled with leafy greens, ginger, and other vegetables is ready for blending, reminiscent of prepping ingredients for a vibrant cauliflower bake recipe. Various green herbs are scattered around the base of the blender.

Trim and chop your greens and herbs, removing tough stems and white ends from the scallions. Add them to a food processor and pulse until finely chopped. Stir in garlic, dried oregano, salt, pepper, and chili flakes, then add water and red wine vinegar. Process until smooth, then drizzle in olive oil while the machine runs to create a creamy, emulsified sauce.

Bake the Cauliflower

A white baking dish filled with roasted cauliflower florets, showcasing a delicious cauliflower bake recipe. Each floret is coated in a green herb mixture, with some lightly charred for added flavor. A sprig of parsley adds a touch of freshness, and a small cup of olive oil sits beside on the burlap surface.

Pour the herb sauce over the cauliflower florets, tossing gently to coat each piece evenly. Cover the dish with foil and bake in the preheated oven for 45 minutes. Remove the cover, increase the heat to 375°F, and roast for an additional 5 minutes to develop a golden finish. The cauliflower bake recipe is ready when a fork easily pierces the florets.

Storage Instructions 

Store any leftovers in an airtight container in the refrigerator for up to three days. To reheat, transfer the dish to a microwave-safe bowl or bake in the oven at 325°F until warmed through. Avoid freezing, as the texture of the roasted cauliflower may become mushy.

Top Tip for Perfect Baked Cauliflower Casserole Recipe

A plate with roasted cauliflower topped with herbs is on a table, showcasing a delicious cauliflower bake recipe. The background includes a baking dish with more cauliflower, a fork and knife, a small bowl of olive oil, and a tin of "Azeite Saloio." Fresh herbs are scattered around.

Roasting the cauliflower first adds depth and enhances its nutty flavor while remaining a low-carb dish. If you’re short on time, use frozen cauliflower florets, but ensure they’re thawed and patted dry before baking.

Side Dish Recipes

For side dish inspiration, try these flavorful options: Air Fryer Cheese Bites are crispy on the outside and gooey inside, perfect for a quick and crowd-pleasing snack. Roast Air Fryer Asparagus is a vibrant, tender vegetable dish that pairs beautifully with any main course. If you're looking for plant-based protein, Crispy Air Fryer Tofu offers a crunchy texture that’s irresistible. For a pastry treat, Homemade Mushroom Savoury Pastries are flaky and filled with earthy mushrooms. And for a dip with bold, smoky flavors, the Roasted Eggplant and Tomato Dip (Moroccan Zaalouk) is a must-try.

More Easy Dinners

Simplify dinner time with these comforting meals: Instant Pot Fish Soup delivers rich flavors in a fraction of the time. The sweet-savory balance of the Chicken with Dates Casserole is an elegant yet easy choice. For a hearty and comforting meal, One-Pot Buttermilk Chicken and Potatoes Casserole combine tender chicken and creamy potatoes. Creamy Kabocha Squash Soup brings cozy flavors to your table with minimal effort, and Crispy and Juicy Air Fryer Turkey Thighs are a quick way to enjoy tender turkey any night.

More Hearty Vegetable Recipes

Elevate your vegetable dishes with these hearty recipes: The Salmon Casserole with Cauliflower combines tender fish and vegetables in a creamy bake. For cheesy comfort, the Easy Cauliflower Casserole or this one with tomatoes and capers are delightful options. The Slow Cooker Butternut Squash is a simple yet flavorful fall dish. Creamy Leek and Mushroom Pasta Bake blends rich flavors with satisfying textures. The Comforting Lentils and Rice with Caramelized Onions is a wholesome and filling choice.

For a vegan option, the Creamy Vegan Broccoli Casserole or cauliflower "steak" delivers indulgent creaminess without dairy or meat. The Cheesy Cabbage Casserole with Cracker Topping is a nostalgic bake that skips canned soup for fresher flavors.

  • A bowl of vintage Southern pimiento cheese dip topped with sliced jalapeños, surrounded by crackers and fresh veggies.
    Vintage Southern Pimento Cheese Dip
  • Cheese ball with crackers, honey dip, dried fruit, and a cherry on top, served on a wooden board—a delightful take inspired by the classic pineapple cheese ball recipe.
    Vintage Pineapple Cheese Ball With Pecans
  • A skillet with rice, black beans, sweet potato, melted cheese, jalapeño slices, and lime wedges.
    Southwest Sweet Potato, Black Bean, and Rice Skillet
  • A bowl of creamy cheesy broccoli soup sits on a wooden board, alongside kitchen utensils and a plant in the background—perfect comfort food for slow cooker enthusiasts.
    Slow Cooker Cheesy Potato Soup With Broccoli

Recipe

Tried and loved this recipe? Please leave a 5-star review below! Your reviews mean a lot to me, so if you've got any questions, please let me know in a comment.

A baked dish of roasted cauliflower florets with a charred appearance, seasoned with herbs and spices reminiscent of pouding chomeur. Parsley leaves garnish the top, while fresh parsley and a small bowl of olive oil are visible in the background.
Print Recipe
No ratings yet

Roasted cauliflower bake in green herb sauce

Inspired by chimichurri and a great way to use up leftover greens, roasted cauliflower in green herb sauce is a quick and easy side dish for a weeknight meal.
Prep Time15 minutes mins
Cook Time45 minutes mins
Course: Side Dish
Cuisine: Argentinian, South American
Keyword: cauliflower bake
Servings: 6
Calories: 168kcal
Author: Ksenia Prints

Ingredients

  • 2 heads of cauliflower broken into florets
  • 4 cups of green and herbs of your choice - make sure to include some scallions kale, spinach, cilantro, parsley and watercress are all good options.
  • ¼ cup water
  • ½ cup olive oil
  • ¼ cup red wine vinegar
  • 4 cloves garlic finely minced
  • 1 tablespoon dried oregano
  • 1 tablespoon coarse salt
  • 1 teaspoon ground black pepper
  • 1 teaspoon chilli flakes or more, to taste

Instructions

  • Preheat oven to 350F. Oil a casserole dish well. Cut cauliflower into florets, and arrange in casserole dish.
  • Trim all of your herbs and greens - remove stems, cut off the white ends from the scallions. Chop roughly.
  • Add greens and herbs to the bowl of a food processor. Process until everything is chopped finely. Add the rest of the ingredients except the oil, water and vinegar, and process a few more times to combine well. Add water and vinegar, and process until everything is mixed well and makes a unified sauce with few lumps (this may take up to five minutes). Finally, add oil in a slow drizzle, helping the sauce emulsify. Taste and correct seasonings.
  • Pour sauce on cauliflower, cover, and bake for 45 minutes - OR, if sauce is tamer, bake cauliflower with a drizzle of olive oil and salt, and then serve with the uncooked green herb sauce. Remove cover in the last 5 and increase heat to 375F. The dish is ready when cauliflower pierces easily with a fork.

Nutrition

Calories: 168kcal | Carbohydrates: 2g | Protein: 0.3g | Fat: 18g | Saturated Fat: 3g | Polyunsaturated Fat: 2g | Monounsaturated Fat: 13g | Sodium: 1170mg | Potassium: 34mg | Fiber: 1g | Sugar: 0.1g | Vitamin A: 115IU | Vitamin C: 1mg | Calcium: 21mg | Iron: 1mg

Pumpkin Spice Muffins

These easy-to-make pumpkin spice muffins are perfectly soft and moist with a hint of pumpkin pie spice. Enjoy plain or with cream cheese frosting!

A muffin tray with nine baked muffins in brown paper liners, topped with oats. One of the muffin spaces is filled with oats. The tray is on a marble countertop.

There's always a serotonin boost when I prepare health meals or treats for my kids, especially those they won't notice are healthy. This muffins are just such a great snack; they're yummy and filling. 

Whenever we all crave something sweet, I whip these up. They take less than an hour to bake, and we like to switch up the toppings every once in a while. Most of the adults who've tried these like oats or almond slices as toppings, while the kids prefer cream cheese frosting with mini chocolate chips or sprinkles. But honestly, these are great to enjoy without anything—they're that good.

The warm, comforting taste of these muffins, especially with the fall vibes, is something I really look for even in different seasons. It's a good thing that the recipe is simple and doesn't require any seasonal ingredients, so I can make it anytime.

With simple prep and a short baking time, these easy pumpkin spice muffins can be ready in under an hour. They're an ideal choice for quick snacks, great to squeeze in on an eventful day! I love this recipe and I'm sure you'll love it to!

A muffin topped with oats is placed on a piece of newspaper on a marble surface. In the background, a black muffin tray with more muffins is visible.

Ingredients

Ingredients for baking are arranged on a marble surface, including flour, oats, eggs, brown sugar, white sugar, cinnamon, pumpkin puree, salt, baking powder, and oil.
  • Flour - I use all-purpose flour for this
  • Sugar - sweetens and helps with browning
  • Brown sugar - adds moisture and a deeper sweetness
  • Pumpkin pie spice - provides warm, autumnal flavors
  • Baking soda - leavening agent for rise
  • Eggs - help bind ingredients and add structure
  • Pumpkin puree - the main flavor and moisture source in these muffins
  • Oil - keeps these muffins moist and tender. I use neutral-tasting grapeseed oil, but you can use any oil you like.
  • Vanilla extract - enhances the overall flavor profile.

See recipe card for exact quantities.

Step-by-step Instruction

A muffin tray with eight freshly baked muffins in brown paper wrappers, topped with oats. One muffin space is empty. The tray is placed on a marble countertop.

If you're craving a taste of autumn any time of year, these pumpkin spice muffins are the perfect treat! Packed with warm, cozy flavors and a moist, tender texture, these muffins are sure to become a family favorite. Whether you're enjoying them for breakfast, as a snack, or even as a light dessert, they're sure to satisfy your pumpkin spice cravings. Follow these simple steps to create delicious muffins that will fill your home with the inviting aroma of fall. Let's get baking!

Preheat the Oven and Prepare the Pan

Start by preheating your oven to 375°F (190°C). This ensures the oven is at the right temperature when you're ready to bake. While the oven is heating, line a 12-cup muffin tin with paper liners or lightly grease each cup with cooking spray.

Mix the Dry Ingredients

A bowl filled with flour is placed on a marble countertop. A metal whisk rests on the edge of the bowl. Nearby, there is a small glass jar containing a brown spice with a wooden scoop inside.
Hands are shown mixing dry ingredients in a white bowl with a fork. The bowl contains flour, brown sugar, and possibly other baking ingredients. A small jar with a teaspoon and some spice is placed nearby on a marble countertop.

In a large bowl, combine the flour, sugar, brown sugar, pumpkin pie spice, baking soda, and salt. Whisk these ingredients together until they're well mixed. This step ensures that the leavening agents and spices are evenly distributed throughout the batter.

Prepare the Wet Ingredients

Hands holding a white bowl with an orange mixture being whisked. The bowl is placed on a marble surface. A whisk is partially submerged in the liquid, which appears to be a sauce or dressing.
A person is holding a white bowl filled with a brownish-orange mixture, possibly batter, on a marble surface. A whisk is in the mixture, suggesting it is being stirred or mixed.

In a separate medium-sized bowl, whisk together the eggs, pumpkin puree, oil, and vanilla extract until smooth. Make sure the pumpkin is evenly incorporated with the other wet ingredients.

Combine Wet and Dry Ingredients

A marble countertop holds a metal mixing bowl with an electric hand mixer resting beside it. Inside the bowl is a partially mixed orange batter. A small jar with a spoon is nearby.

Pour the wet ingredients into the bowl with the dry ingredients. Using a spatula or wooden spoon, gently fold the mixtures together until just combined. Be careful not to overmix; some small lumps in the batter are fine. Overmixing can lead to tough muffins.

Fill the Muffin Cups

A muffin tray with twelve paper liners filled with light brown batter, placed on a marble countertop. Some batter has dripped onto the tray rim. There are glass jars partially visible at the bottom right corner.

Divide the batter evenly among the prepared muffin cups, filling each about â…” full.

Make Oat Topping (Optional)

Overhead view of a marble countertop with a muffin tray containing batter, two jars of oats, and a small jar with a spoon inside.

If desired, mix the oat topping by combining oats, brown sugar and pumpkin pie spice in a small bowl. Top each muffin with a tablespoon of oat topping.

Bake Pumpkin Muffins

A hand holds a muffin tray with twelve lined compartments, each filled with a brown batter and topped with oats, against a marble surface.

Place the muffin tin in the preheated oven and bake for 20-22 minutes. The muffins are done when a toothpick inserted into the center of a muffin comes out clean or with just a few moist crumbs.

Cool and Serve

A tray containing eleven muffins topped with oats rests on a marble surface. Each muffin is in a brown paper liner. Beside the tray, there is a small jar of cinnamon with a wooden spoon inside.

Remove the the tray from the oven and allow the muffins to cool in the tin for about 5 minutes. Then, transfer them to a wire rack to cool completely. Enjoy your homemade pumpkin spice muffins!

Storage

A freshly baked muffin topped with oats sits on a piece of newspaper on a marble surface. The muffin wrapper is partially open, revealing the moist texture and scattered crumbs. A baking tray is blurred in the background.

To store leftover pumpkin spice muffins, allow them to cool completely to room temperature. Once cooled, place the muffins in an airtight container or resealable plastic bag. For optimal freshness, store at room temperature for up to 3 days. If you want to keep them longer, you can refrigerate them for up to a week. When storing in the refrigerator, place a paper towel at the bottom of the container and another on top of the muffins to absorb any excess moisture. This helps maintain their texture. To enjoy a refrigerated muffin, you can eat it cold or let it come to room temperature for about 30 minutes. For a warm muffin, microwave for 10-15 seconds or until it reaches your desired temperature. Always check that the muffin is warmed to your liking before serving.

Top Tips

Don't overmix the batter: When combining the wet and dry ingredients, mix just until they're incorporated. Overmixing can lead to tough, dense muffins. A few small lumps in the batter are perfectly fine and will ensure your muffins stay tender and fluffy.

Use room temperature ingredients: Take your eggs and pumpkin puree out of the refrigerator about 30 minutes before you start baking. Room temperature ingredients blend more easily and create a smoother batter, resulting in more evenly textured muffins.

Add a topping for extra flavor and crunch: Before baking, consider sprinkling the muffin tops with a mixture of sugar and cinnamon, or add a streusel topping. This not only enhances the flavor but also gives a great textural contrast to the soft muffin.

What to Serve with Pumpkin Spice Muffins

A sliced muffin with oats on top is placed on a piece of old newspaper on a marble surface. The muffin has a golden brown color and a crumbly texture.

These pumpkin spice muffins are great with coffee that aren't that sweet to highlight the muffins' flavors. But to go all out with the Fall flavors and serve these muffins with pumpkin spice latte with syrup! If want something different, try my pumpkin pie martini mocktail.

This recipe is just in time for my pumpkin spice recipe, make your own with just 4 ingredients!

Recipe

Tried and loved this recipe? Please leave a 5-star review below! Your reviews mean a lot to me, so if you've got any questions, please let me know in a comment.

A tray of freshly baked muffins topped with oats. The muffins are wrapped in paper liners with printed text. Some oats are scattered on the tray between the muffins.
Print Recipe
No ratings yet

Pumpkin Spice Muffins

Indulge in these easy-to-make pumpkin spice muffins, perfectly soft and moist with a hint of pumpkin pie spice. Enjoy plain or with cream cheese frosting!
Prep Time10 minutes mins
Cook Time20 minutes mins
Total Time30 minutes mins
Course: baking
Cuisine: American
Keyword: pumpkin spice muffins
Servings: 12 muffins
Calories: 274kcal
Author: Ksenia Prints

Equipment

  • Oven

Ingredients

  • 1 ¾ cups flour
  • 1 cup sugar
  • ½ cup brown sugar
  • 1 tablespoon pumpkin pie spice
  • 1 teaspoon baking soda
  • ¼ teaspoon salt
  • 2 eggs
  • 1 15 oz can pumpkin puree
  • ½ cup oil
  • 1 teaspoon vanilla

Oat Topping (optional):

  • ½ cup oats
  • ¼ cup brown sugar
  • 1 teaspoon pumpkin pie spice

Instructions

  • Preheat oven to 375°F. Line muffin tin.
  • Mix dry ingredients.
  • In another bowl, whisk eggs, pumpkin, oil, and vanilla.
  • Combine wet and dry ingredients.
  • Fill muffin cups.
  • If making, mix the oat topping in a small bowl. Top each muffin with 1 tablespoon of oat topping.
  • Transfer muffins to the oven and bake for 20-22 minutes.
  • Serve immediately

Video

Notes

Nutritional info is calculated WITHOUT oat topping.

Nutrition

Calories: 274kcal | Carbohydrates: 43g | Protein: 3g | Fat: 10g | Saturated Fat: 1g | Polyunsaturated Fat: 3g | Monounsaturated Fat: 6g | Trans Fat: 0.04g | Cholesterol: 27mg | Sodium: 155mg | Potassium: 124mg | Fiber: 2g | Sugar: 27g | Vitamin A: 5924IU | Vitamin C: 2mg | Calcium: 28mg | Iron: 2mg

Quebec Pouding Chomeur Recipe with Homemade Date Syrup

Discover my pouding chomeur recipe, a traditional Quebec dessert featuring rich maple syrup poured over the cake!

A bowl of dessert featuring a scoop of vanilla ice cream topped with small pieces of candied bacon sits invitingly alongside vibrant blueberries and sliced kumquats. In the background, a bowl of kumquats and another pouding chomeur are visible. A spoon rests in the bowl, ready to enjoy.

My love language has and always will be food, and pouding chomeur holds a special place in my heart. This traditional French-Canadian dessert, also called “poor man’s pudding” or “pudding of the unemployed,” traces its roots to Quebec’s Great Depression era, where resourceful workers’ families made simple desserts using pantry staples.

Inspired by that history, I wanted to create a version of this recipe that merges nostalgia with flavors my family loves. Instead of the usual maple syrup and heavy cream, I use homemade date syrup for a caramel-like base that feels indulgent yet not overly sweet.

My first taste of French Canadian pounding chômeur was during a sugar shack feast outside Quebec City. The amber-hued caramel sauce, made from pure maple syrup, settled at the bottom of the baking dish as a smooth and creamy foundation for the golden brown pudding cake on top. I couldn’t get enough of its rich yet comforting simplicity.

When I got home, I found this recipe to recreate those flavors, but with my own twist, using date syrup instead of maple sap. Not only is it a delicious recipe, but it's a testament to my love of Quebec: apple picking, the cider route, and, of course, the food!

A table setting with bowls of yogurt topped with fruit and nuts, surrounded by dates, blueberries, and a plate of small orange fruits. The table features a blue mat, an orange cloth, and a round wooden board next to a jar of dried dates and a dish of pouding chomeur.

This pouding chomeur recipe has become a centerpiece of our holiday celebrations, from Thanksgiving dinners to Christmas gatherings. It’s always served warm, straight from the oven, with scoops of vanilla ice cream or a dollop of whipped cream.

My family craves the combination of the soft cake batter, caramelized date syrup, and creamy toppings every season. Mum used to say desserts should bring people together, and this dessert does exactly that.

What Is Date Syrup?

A marble countertop features Medjool dates in a green container, a glass jar, and a small bowl. Alongside, a cutting board holds a knife and halved dates for making pouding chomeur. A pinch bowl of salt sits nearby, with an orange cloth, a red vase flower, and a blue cloth completing the scene.

Date syrup, or silan, is a natural sweetener made by simmering Medjool dates and water until the liquid reduces to a thick, caramel-like sauce. It’s less cloying than white sugar or maple syrup, with a smooth and creamy texture perfect for desserts like pouding chomeur.

Date syrup brings a nuanced sweetness that pairs beautifully with butter and sugar in traditional recipes. If you’ve never used it, it’s a pantry addition that can transform desserts into wholesome and indulgent.

Ingredients for Maple Pudding

A flat lay of baking ingredients on a marble surface, including dates, flour, sugar, eggs, butter, milk, and a small bowl of honey—perfect for making pouding chomeur. An orange cloth and green plant add color next to a blue placemat underneath some items.

The Date Syrup:

  • Medjool dates, soaked to release their natural caramel sweetness.
  • Boiling water to soften and extract the rich flavors of the dates.

For the Pouding Chômeur:

  • All-purpose flour is the base of the cake batter.
  • Almond flour for added depth and a nutty texture.
  • Baking powder to ensure the pudding cake rises perfectly.
  • Salt to balance the sweetness.
  • Unsalted butter and sugar are creamed together to create a fluffy batter.
  • Eggs, added one at a time for smooth incorporation.
  • Milk (or non-dairy milk) for a silky consistency in the batter.
  • Pure vanilla extract for a hint of aromatic warmth.

For Serving:

  • Chopped Medjool dates, for a chewy, caramelized topping.
  • Vanilla ice cream or whipped cream to complement the dessert’s richness.

See recipe card for exact quantities. 

Directions to Bake Pouding Chomeur

Make the Date Syrup:

See my post on homemade date syrup for a more detailed description.

A table setting features a large oval dish with dark sauce reminiscent of pouding chômeur, a smaller rimmed dish with similar sauce, a bowl of dates, and an open jar. A mustard-colored cloth and a small vase with greenery add charm to the white and blue tablecloth.

Combine Medjool dates and 1 cup of boiling water in a bowl. Let sit for at least an hour. Blend the softened dates with water until smooth, then strain through a nut bag or cheesecloth. Repeat with another cup of boiling water to extract all the liquid.

Transfer the liquid to a saucepan and bring to a boil. Reduce the heat to medium and simmer, stirring frequently, until it thickens to the consistency of honey.

Prepare the Pouding Chômeur

Preheat the Oven and Reheat the Syrup:

Preheat your oven to 375°F. Coat a 9x12 baking dish generously with butter.

Gently warm the date syrup and whisk in 1 tablespoon of flour. Pour the syrup into the prepared dish.

Combine Dry Ingredients:

A person mixes flour in a brown bowl with a spoon on the countertop, preparing for a traditional pouding chomeur. Nearby, dried dates glisten next to a small bowl of salt and a wooden cutting board. In the foreground, a plant with small green flowers adds a touch of freshness.

In a separate bowl, mix the all-purpose flour, almond flour, baking powder, and salt.

Cream Butter and Sugar:

A white mixing bowl holds creamed butter and sugar, with three cracked egg yolks nestled in the center. On a marble countertop, blurred flowers accompany a small dish with dates, evoking the essence of a warm kitchen preparing pouding chomeur. A blue cloth accents the background elegantly.
A person uses a purple electric hand mixer to blend ingredients in a white bowl, preparing the classic Canadian pouding chômeur. Nearby, there are some dates and a small plant, adding a touch of nature to the scene.

In a large bowl, cream butter and sugar together until light and fluffy. Add the eggs one at a time, whisking until smooth.

Finish the Batter:

A person carefully adds liquid ingredients from a small container into a white mixing bowl containing flour and butter, preparing for the pouding chômeur recipe. The bowl sits on a blue surface beside a basket of flour and a plant, creating an inviting kitchen scene.
A person holds a baking sheet with an oval dish featuring a swirl-patterned pouding chômeur. Next to it are a jar of dates, a jar of sugar, an orange cloth, and a vase with flowers, all elegantly arranged on a light-colored surface.

Add the dry ingredients to the wet mixture, alternating with milk and vanilla extract. Pour the cake batter over the syrup in the baking dish.

Bake:

A freshly baked pie in a black and white oval dish rests on a wooden board, reminiscent of a classic pouding chomeur. Surrounding it are jars of dried fruits, a small dish of blueberries, an orange cloth, and a sprig of herbs in a vase. A few small bowls contain ingredients.

Bake for 40–45 minutes, or until the top is golden brown and a toothpick inserted comes out clean.

Storage Instructions for Pouding Chomeur

Store leftovers in an airtight container in the fridge for up to three days. To reheat, place individual portions in a microwave or oven until warmed through.

Three small bowls of dessert, reminiscent of pouding chomeur, are topped with vanilla ice cream, berries, and dried fruit on a table. Nearby are bowls of blueberries and orange berries alongside a jar of cherries. A blue cloth, orange cloth, and fresh oranges complete the vibrant scene.

Top Tip for Pouding Chomeur

To make pouding chômeur with a smooth and creamy texture, use high-quality Medjool dates for the syrup and ensure your batter is well-mixed.

Avoid overbaking, as the pudding cake should remain moist with its self-saucing caramel layer.

Accompanying Dishes

Our pounding hour with homemade date syrup pairs beautifully with several dishes for a hearty meal or festive celebration. For a cozy main course, consider the Easy Chicken Hashbrown Casserole, the Creamy Vegan Broccoli Casserole, or the Cheesy Cabbage Casserole with Cracker Topping. These comforting dishes create a well-rounded menu that complements the dessert’s rich flavors.

More Thanksgiving and Christmas Dishes

For holiday gatherings, explore additional Thanksgiving and Christmas dishes like the festive Christmas Bruschetta Holiday Appetizer, a stunning Fall Charcuterie Board, or the decadent White Chocolate Bark with Cranberry and Pistachio. Don’t miss treats like Chocolate-Covered Marshmallow Treats or savory dishes such as Baked Brie with Honey and Nuts. Crowd-pleasers like the Creamy Leek and Mushroom Pasta Bake or the Creamy Vegan Pasta Bake make fantastic additions to your table.

More Desserts

A partially mixed dessert, reminiscent of a pouding chomeur, boasts a creamy topping swirled with dark sauce in a white oval dish. Nearby, an empty bowl with a spatula on a wooden board rests atop a blue cloth. Some dates and a plant are artfully arranged in the foreground.

For dessert lovers, there’s a wide range of choices to follow up your pouding chomeur. Try Pumpkin Spice Bars with Cranberries and Glaze, a comforting Carrot Casserole, or the festive Sweet Potato Casserole with Hazelnuts. Sweet drinks like the Pumpkin Spice Latte or mocktails such as the Christmas Gin Mocktail, Chai White Russian Mocktail, and Pumpkin Pie Martini Mocktail add a delightful finish. These recipes promise to enhance any occasion where pouding chomeur takes center stage.

  • Three crumbly Cherry Pie Crumb Bars stacked on a white plate, with a fork and measuring spoons nearby on a napkin—perfect for anyone searching for their next favorite recipe.
    Fresh Cherry Pie Crumb Bars
  • Hashbrown Breakfast Casserole with melted cheese on a white plate, surrounded by eggs, vegetables, and crispy bacon.
    Hashbrown Breakfast Casserole With Beef and Bacon
  • A plate of sheet pan tochos loaded with ground beef, tomatoes, sour cream, and fresh herbs.
    Crispy Sheet Pan Ground Beef Tochos (Tater Tot Nachos)
  • A serving of cheesy broccoli and cauliflower casserole, made from a classic cheese casserole recipe, sits on a white plate with a fork.
    Kid-Friendly Broccoli Cauliflower Cheese Casserole Recipe
See more Casseroles →

Recipe

Tried and loved this recipe? Please leave a 5-star review below! Your reviews mean a lot to me, so if you've got any questions, please let me know in a comment.

Three ramekins filled with pouding chomeur topped with vanilla ice cream, blueberries, and nuts. Accompanied by a small bowl of orange berries and scattered blueberries on a blue cloth. Oranges and a fork are in the foreground.
Print Recipe
No ratings yet

Pouding chomeur with date syrup

Our pouding chomeur with homemade date syrup is a healthier take on the traditional Quebec bread pudding. Sweetened with homemade Medjool date syrup, this sticky bread pudding is perfect with a serving of vanilla ice cream and some berries!
Prep Time30 minutes mins
Cook Time1 hour hr
Total Time1 hour hr 30 minutes mins
Course: Dessert
Cuisine: French, Quebec, Quebecois
Keyword: pouding chomeur
Servings: 12
Calories: 295kcal
Author: Ksenia Prints

Ingredients

Homemade Date Syrup (silan):

  • 2 cups Natural Delights Medjool dates pitted
  • 1 ½ - 2 cups water boiling hot
  • 1 tablespoon flour

Gluten free pouding chomeur:

  • 1 cup all-purpose flour
  • ½ cup almond flour
  • 2 teaspoon baking powder
  • ½ teaspoon salt
  • ½ cup unsalted butter or coconut oil
  • 1 cup sugar
  • 2 eggs
  • ¾ cup milk or non dairy milk
  • 1 teaspoon pure vanilla extract

For serving:

  • Additional chopped Medjool dates
  • Vanilla ice cream optional
  • Ground cheries and blueberries optional

Instructions

To make date syrup (silan):

  • Soak Medjool dates in 1 cup of boiling hot water for at least 1 hour. Transfer to a blender or food processor and blend (it’s ok if some chunks remain). Sieve date mixture through a nut bag or double cheesecloth placed over a strainer, getting as much liquid out as possible. Return date mixture to blender, add another cup of boiling hot water and blend again, and sieve through the nut bag or cheesecloth again. You should end up with about 1 ½ cups of date liquid. Save the pulp to use in smoothies, French toast or mix with oatmeal.
  • Transfer the date liquid to a saucepan, and bring to a boil. Lower heat to medium and continue boiling, stirring often, until it reaches the consistency of honey. Remove from heat - you should end up with about 1 cup of date syrup, and liquid will thicken further upon cooling.
  • See my blog post on homemade date honey syrup for more info:  https://immigrantstable.com/homemade-date-syrup-silan/

To make healthy pouding chomeur:

  • When ready to bake, prepare a 9x12 casserole dish by coating it generously with butter or coconut oil. Preheat the oven to 375 F.
  • Reheat the date syrup and add 1 tablespoon of flour. Pour the syrup into the bottom of a prepared casserole dish. In a small bowl, mix gluten free flour, almond flour, baking powder and salt.
  • In a large bowl using a hand-held mixer or the bowl of a standing mixer, cream together sugar and butter (or coconut oil). You should reach a fluffy, cohesive consistency.
  • Add the eggs one at a time, continuing to beat the mixture as you do.
  • With the mixer working on low speed, add half the dry ingredients, then the milk and vanilla extract, and finish with the rest of the dry ingredients.
  • Pour the cake mixture atop the hot date syrup. Transfer gluten free pudding chomeur to the oven, and bake for 40-45 minutes, until the top is golden brown.
  • Serve gluten free pudding chomeur with more chopped dates, optional vanilla ice cream. Halved ground cherries and blueberries also work very well with it.

Nutrition

Calories: 295kcal | Carbohydrates: 45g | Protein: 4g | Fat: 13g | Saturated Fat: 8g | Polyunsaturated Fat: 0.4g | Monounsaturated Fat: 1g | Trans Fat: 0.003g | Cholesterol: 29mg | Sodium: 186mg | Potassium: 216mg | Fiber: 2g | Sugar: 34g | Vitamin A: 101IU | Calcium: 90mg | Iron: 1mg

Creamy Kabocha Squash Soup in the Slow Cooker

Enjoy a creamy Kabocha squash soup in the slow cooker! This easy, healthy, and vegan squash soup recipe is perfect for a cozy fall meal.

A black bowl filled with orange pumpkin soup, garnished with a swirl of cream and a sprig of fresh thyme, sits on a black saucer. A silver spoon rests in the bowl. A gray cloth napkin is in the background on a marble surface.

This is the perfect soup recipe for the Fall season! Nothing beats a warm, smooth, and creamy bowl of soup after a long, tiring day. 

This velvety Kabocha squash soup is sweet and nutty because of the squash's natural flavor, but it's also savory thanks to the sautéed garlic and onions. You can customize it all you want, make it as peppery as you wish.

With the slow cooker, you can pop all the ingredients in, set it for 6-8 hours (3-4 if you don't have that long), and go about your day. You'll have time to spend with the kids, do some chores, go out for a quick errand, read a book, whatever you want! You have free time with this recipe. 

I like preparing this recipe because my kids love it. They enjoy how creamy it is, and it's a win for me that they're eating squash without even realizing it. It's a great way to sneak in some extra vegetables!

The slow cooking process allows the flavors to meld and intensify, resulting in a rich, comforting soup with minimal effort. This hands-off approach is perfect for busy days when you want a nutritious meal but don't have time to stand over the stove. And the slow cooker is not just for soup, I use it to make the most delicious slow cooker greek chicken, gingerbread oatmeal, and even gingerbread fudge.

A bowl of pumpkin soup garnished with cream and fresh thyme, placed on a black plate. A silver spoon rests in the bowl. Thyme sprigs are scattered on the white marble surface nearby. A gray cloth is partially visible in the background.

Ingredients

A whole green squash is centered on a marble surface surrounded by a glass bottle of oil, a whole onion, two garlic cloves, a small bowl of cream, and a lid with pepper and spices.

Kabocha squash, peeled and cubed - it's best to use fresh Kabocha for this, but you can you use frozen squash if you can find it.
Onion, chopped - adds a savory base flavor
Garlic cloves, minced - provides aromatic, pungent taste
Vegetable broth - creates soup base and adds depth of flavor
Cream (optional) - enriches texture and flavor. Use coconut cream for a vegan kabocha squash soup.
Olive oil - used for sautéing and adds richness
Black pepper - adds mild heat and enhances overall flavor
Non-stick cooking spray - helps prevent sticking during cooking

See the recipe card for exact measurements.

Step-by-step Instructions

A bowl of creamy orange soup garnished with a swirl of cream and a sprig of thyme. A silver spoon rests on the edge of the black bowl, which sits on a dark plate against a marble surface.

Craving a warm, comforting soup that's both nutritious and delicious? This Kabocha Squash Soup is your answer! Creamy and rich, it showcases the natural sweetness of kabocha squash. Easy to make and packed with vitamins and fiber, it's perfect for a cozy weeknight dinner or as an impressive starter. Follow these simple steps to create a velvety smooth soup that'll surely become your new fall favorite. It's great way to enjoy more vegetables in a satisfying meal!

Prepare the Base

A person stirs chopped onions in a pot with a wooden spoon on a marble countertop. Nearby are a small dish with pepper, an oil bottle, and a plate.

Heat oil in a large pan over medium heat. Add the chopped onion and minced garlic to the pan. Sauté these ingredients for about 5 minutes, stirring occasionally, until they become soft and translucent. This process helps to release their flavors and create a savory base for your soup.

Transfer to Slow Cooker

A black slow cooker on a marble countertop contains sautéed onions with a wooden spoon resting inside. Nearby are a small bowl of salt and pepper, a bottle of oil, and a small plate.

Once the onion and garlic are softened, transfer them to your slow cooker. Be sure to scrape all the flavorful bits from the pan into the slow cooker as well.

Add Remaining Ingredients

A glass of amber-colored liquid is placed in the center of a marble countertop. Nearby, there is a metal lid with some white and black specks, a wooden bowl, and a small bottle of olive oil. A spoon rests in a small dish.
A slow cooker filled with cubed squash on a marble countertop. A hand holds a wooden spoon stirring the squash. Nearby are a small dish with seasoning, an oil bottle, and a white plate.
A hand pours liquid from a jar into a slow cooker filled with cubed butternut squash. A wooden spoon rests inside the cooker. An olive oil bottle and a plate are visible on the white countertop.

To the slow cooker, add the cubed kabocha squash, vegetable broth, salt, and pepper. Give everything a gentle stir to combine the ingredients.

Slow Cook

A black slow cooker filled with orange-colored soup containing visible potato chunks. The cooker is placed on a white marble surface. The ingredients appear to be simmering in a savory broth.

Cover the slow cooker with its lid. If you're planning to cook it throughout the day or even overnight, set it to low and let it cook for 6-8 hours. If you're short on time, you can set it to high and cook for 3-4 hours. The soup is ready when the squash is very tender and easily mashed with a fork.

Blend the Soup

A black slow cooker filled with creamy orange soup is shown from above. An immersion blender is partially submerged in the soup, indicating it is being blended. The slow cooker is placed on a white marble surface.

Once the cooking time is complete, it's time to puree the soup. If you have an immersion blender, you can blend the soup directly in the slow cooker until it's smooth. If using a regular blender, carefully transfer the soup in batches and blend until smooth, then return it to the slow cooker.

Final Touches

A hand pours cream from a small pitcher into a slow cooker filled with orange soup, while another hand stirs with a wooden spoon. The scene is set on a white surface, and a colorful bracelet is visible on one wrist.

If you're using cream, stir it into the pureed soup now. This will give the soup a richer, creamier texture. Taste the soup and adjust the seasoning if needed, adding more salt or pepper to your preference.

Serve

Bowls of orange soup with cream swirl and herbs are on a marble surface. A pot with more soup and a ladle is nearby. Silver spoons are in the bowls, and sprigs of thyme are scattered around. Gray napkins are placed to the side.
A black bowl of creamy soup garnished with a sprig of thyme and a swirl of cream. A silver spoon rests in the bowl. The background features a gray cloth napkin and a marble surface.

Your kabocha squash soup is now ready to serve. Ladle it into bowls and serve hot. You can garnish with a drizzle of cream, some fresh herbs, or toasted pumpkin seeds if desired.

Storage

Two black bowls of pumpkin soup sit on a white marble surface. Each bowl has a swirl of cream on top and a sprig of thyme. Spoons rest in both bowls, and a few thyme sprigs are scattered nearby.

To store Kabocha Squash Soup, allow the soup to cool to room temperature before transferring it to an airtight container. For optimal freshness, refrigerate the soup for up to 4-5 days. If you want to freeze it, portion the soup into freezer-safe bags or containers, removing as much air as possible to prevent freezer burn. Frozen soup can be stored for up to 3 months. To reheat, thaw frozen soup in the refrigerator overnight. Then, heat the soup in a pot over medium heat, stirring occasionally, until it reaches a simmer and is heated through. You can also use a microwave, heating in 1-minute intervals, stirring between each interval, until warm. If the soup has thickened after storage, you can thin it with a little broth or water while reheating. If you added cream to the soup before storing, it may separate slightly when reheated; simply whisk it well to recombine. 

A bowl of pumpkin soup garnished with cream and a sprig of thyme. A silver spoon rests in the bowl. Additional thyme sprigs are placed beside the bowl on a marble surface. A gray cloth napkin is in the background.

Top Tips

Roast the squash for extra flavor: Before adding the kabocha squash to the soup, consider roasting it in the oven. Cut the squash into cubes, toss with olive oil, and roast at 400°F (200°C) for about 25-30 minutes.

Use an immersion blender for ease and safety: Be careful when blending hot liquids to avoid splatters. If the soup is too thick after blending, gradually add more broth to reach your desired consistency. If you don't have an immersion blender, let the soup cool slightly before transferring it in batches to a regular blender.

Garnish for added texture: While the soup is deliciously creamy on its own, adding a garnish can elevate the dish. Try toasted pumpkin seeds, a swirl of cream, or a sprinkle of crispy bacon bits for contrasting texture and additional flavor.

What to Serve with Slow Cooker Kabocha Squash Soup

A bowl of orange soup garnished with a swirl of cream and fresh thyme, placed on a dark plate. A spoon rests in the bowl. Sprigs of thyme are scattered on a light marble surface nearby. A gray cloth is in the background.

This slow cooker kabocha squash soup pairs well with my no knead Italian rosemary sourdough bread (vegan). The bread's texture and rosemary flavor complement the soup's creamy consistency and subtle sweetness.

For a complete meal with varied textures, try serving this soup alongside my Middle Eastern quinoa salad recipe. The quinoa and vegetables provide a nice contrast to the smooth soup. Any grain-based side dish works well with this soup, offering a satisfying meal with different textures and flavors.

If you're looking for more recipes to pair with this soup, consider exploring other grain salads or crusty bread options to find your preferred combination.

More Delicious Recipes

If you love this recipe, you will love this butternut squash soup with apples and creamy coconut milk or slow cooker butternut squash. For something lighter, these crispy butternut squash chips, squash with rice pilaf, or bulgur salad with roasted butternut squash and leeks.

For another soup that warms both the stomach and the soul, try my classic chicken soup.

Recipe

Tried and loved this recipe? Please leave a 5-star review below! Your reviews mean a lot to me, so if you've got any questions, please let me know in a comment.

A bowl of Slow Cooker Creamy Kabocha Squash Soup garnished with a swirl of cream and a sprig of thyme. The soup is placed on a black plate, and a silver spoon rests inside the bowl. A gray cloth napkin is visible in the background on a marble surface.
Print Recipe
No ratings yet

Slow Cooker Kabocha Squash Soup

Enjoy a creamy Kabocha squash soup in the slow cooker! This easy, healthy, and vegan squash soup recipe is perfect for a cozy fall meal.
Prep Time15 minutes mins
Cook Time6 hours hrs
Total Time6 hours hrs 15 minutes mins
Course: Soup
Cuisine: American
Keyword: Creamy Kabocha Squash Soup in the Slow Cooker
Servings: 6 servings
Calories: 177kcal
Author: Ksenia Prints

Equipment

  • Slow Cooker
  • Immersion Blender

Ingredients

  • 1 kabocha squash about 3 lbs, peeled and cubed
  • 1 onion chopped
  • 2 garlic cloves minced
  • 4 cups vegetable broth
  • 1 teaspoon salt
  • ¼ teaspoon black pepper
  • ½ cup cream or coconut cream, optional
  • 2 tablespoon olive oil

Instructions

  • Heat oil in a pan. Sauté onion and garlic until soft, about 5 minutes.
  • Transfer onion and garlic to slow cooker.
  • Add cubed squash, broth, salt, and pepper to slow cooker.
  • Cover and cook on low for 6-8 hours or on high for 3-4 hours, until squash is very tender.
  • Use an immersion blender to puree soup until smooth. (Or transfer to a regular blender in batches.)
  • Stir in cream or coconut cream, if using.
  • Adjust seasoning if needed.
  • Serve hot.

Video

Notes

Be careful when blending hot liquids. If soup is too thick, add more broth to reach desired consistency.

Nutrition

Calories: 177kcal | Carbohydrates: 18g | Protein: 2g | Fat: 12g | Saturated Fat: 5g | Polyunsaturated Fat: 1g | Monounsaturated Fat: 5g | Cholesterol: 22mg | Sodium: 1027mg | Potassium: 576mg | Fiber: 3g | Sugar: 6g | Vitamin A: 2677IU | Vitamin C: 20mg | Calcium: 62mg | Iron: 1mg

Easy Slow Cooker Butternut Squash Recipe

Enjoy juicy slow cooker butternut squash with a perfectly tender texture! This easy recipe delivers flavorful, comforting squash that's perfectly cooked and lightly sweetened.

A baked dish of mashed sweet potatoes garnished with nuts, herbs, and a pat of butter sits in a black-handled white oval baking dish on a marble countertop. A wooden spoon and sprigs of fresh thyme are placed nearby.

It's great to have a healthier alternative to mashed potatoes (it's one of the most requested sides in my household). As a mom of two who enjoys preparing quick and nutritious dinners, this crockpot butternut squash recipe is one of my best picks.

With simple ingredients such as butter, brown sugar, and a touch of salt and black pepper, I find that cooking butternut squash in the slow cooker makes it perfectly comforting and lightly sweet! It's so simple that you can customize yours to whatever flavor you prefer. With a few extra steps, you can even transform it into a butternut squash soup.

Slow Cooker Makes Life Easy

Oval dish with orange mashed sweet potatoes topped with nuts, a slice of butter, and sprigs of thyme. The dish is placed on a wooden board, with a gray cloth partially visible in the background.

The squash is cooked in a slow cooker (also called a crockpot), which means less hands-on time. You only have to stir it once or twice during cooking. You can prepare your main dish or help the kids with homework while it cooks. The cooking time is around 6-8 hours on low or 3-4 hours on high, and this includes a quick mashing at the end. I love roasted butternut squash, but this recipe involves so much less work that I often end up choosing this recipe instead. Another recipe that I love is this delicious slow-cooker chicken marinara.

This particular recipe is a household favorite. I first made it for Thanksgiving when my kids were 5 and 3, and since then, it has become a regular staple all fall long. It's easier than roasting a whole butternut squash in the oven, and the slow cook method really brings out the vegetable's natural sweetness. I even serve this at holiday gatherings outside of Thanksgiving, and it's an easy side dish to prepare for potlucks! I just adjust the sweetness for different preferences. It's nutrient-rich and a hit with both adults and kids!

With easy prep and hands-off cooking time, you can prepare this butternut squash with minimal effort! An excellent choice for busy weeknights or holiday meals, perfect for busy moms! Simply peel and cube the squash on a cutting board, place it in the crock, cover and cook. You can even freeze butternut squash and prepare it this way for future meals.

Ingredients

A butternut squash, a glass of water, a bowl with what appears to be butter, a dish of brown sugar, and a plate with ground pepper are arranged on a marble surface.
  • Butternut squash: I usually use fresh, whole squash, but pre-cut cubes work, too.
  • Butter: adds richness and enhances the natural flavors of the squash
  • Brown sugar: brings out the squash's natural sweetness
  • Salt: enhances all the flavors
  • Black pepper: adds a subtle warmth
  • Water: helps create steam for even cooking

See the recipe card for exact quantities.

Step-by-step Instructions

If you're looking for a comforting, nutritious side dish but don't want to spend hours in the kitchen, this crock pot butternut squash is the answer! This recipe delivers perfectly cooked squash with minimal effort but maximum taste.

Prepare the Butternut Squash

A butternut squash partially peeled, with strips of skin and a black peeler placed on a white marble surface.

Start by peeling the butternut squash. Use a sharp vegetable peeler or a knife to remove all the skin. Cut the squash in half lengthwise and scoop out the seeds with a spoon. Then, cut the squash into cubes. Don't worry if they're not perfectly uniform - they'll all cook down and be mashed later. This is the easiest way to cook butternut squash in the slow cooker.

Season the Squash

A slow cooker is filled with diced butternut squash. A hand is holding a small round container, pouring its contents over the squash. A wooden spoon with some creamy substance on it rests inside the cooker. The background is a white countertop.

Place the butternut squash cubes in your slow cooker. Add the butter (cut into small pieces for even distribution), brown sugar, salt, and pepper. For added flavor, you can include chili powder or use vegetable broth instead of water. Pour the liquid over everything. This will create steam and help the squash cook evenly.

Cook the Squash

A hand holds a fork, mashing chunks of cooked butternut squash in a white oval dish on a marble surface. The squash is orange and appears soft, with some liquid surrounding it.

Cover and cook the squash in the crockpot on low for 6-8 hours or on high for 3-4 hours. The cooking time may vary depending on your slow cooker and the size of your squash cubes. It's done when the squash is soft and very tender and can be easily mashed with a fork. This slow cooker recipe is much easier than trying to roast the squash in the oven.

Mash and Season

A white oval dish filled with creamy mashed sweet potatoes garnished with a sprig of thyme. The dish is on a marble surface alongside a wooden spoon, a gray cloth, and sprigs of fresh thyme.

Once the squash is cooked, use a potato masher or a large fork to mash it right in the slow cooker. Stir well to incorporate all the seasonings evenly. Taste and adjust the seasoning if needed. You might want to add a bit more salt, pepper, or brown sugar to suit your taste.

Serve

A bowl of mashed butternut squash topped with chopped nuts, a sprig of thyme, and two pats of butter. The dish is in a white serving bowl placed on a wooden surface with a light gray cloth nearby.

Your slow cooker butternut squash is now ready to serve! You can keep it warm in the slow cooker until you're ready to eat. Serve it as is, or add some extra toppings for variety. This recipe is great for those who love butternut squash but want an easy preparation method.

Storage

To store cooked squash, allow it to cool to room temperature before transferring it to an airtight container. It will be kept in the refrigerator for up to 5 days. To freeze butternut squash, place cooled squash in freezer-safe containers or bags, removing as much air as possible. Frozen squash can be stored for up to 3 months. To reheat, thaw in the refrigerator overnight if frozen. Reheat in the microwave, stirring occasionally, or on the stovetop over low heat, adding a splash of milk or water if it seems dry.

A black dish filled with mashed butternut squash, garnished with hazelnuts, thyme, and two pats of butter. The dish is on a wooden coaster. A gray napkin is partially visible in the background.
Slow Cooker Butternut Squash. Photo Credit: Thermocookery.

Top Tips

Cut squash into uniform pieces. Try to chop the butternut squash into roughly equal-sized cubes. This ensures that all pieces cook at the same rate, giving you a consistently tender result.

Don't skip the butter. Butter not only adds richness but also helps create a smooth, velvety texture. If you're avoiding dairy, you can substitute a plant-based alternative.

Adjust sweetness to taste. Everyone's preference for sweetness is different. Start with the amount of brown sugar in the recipe, but feel free to add more at the end if you like it sweeter.

What to Serve with Slow Cooker Butternut Squash

This great side recipe for slow-cooker butternut squash is perfect for customization! Feel free to use different spices to create new versions of this dish. For example, I love using mashed squash to make butternut squash mac and cheese or even a cozy butternut squash soup.

It pairs wonderfully with mains like Cajun-Style Baked Turkey Breast with Vegetables, Chicken with Dates Casserole, or One-Pot Buttermilk Chicken and Potatoes Casserole.

For a vegetarian option, serve it alongside Creamy Vegan Pasta Bake or a light side like Roasted Carrots with Hazelnuts or Roast Air Fryer Asparagus. Pair it with baked chicken breasts and a crisp green salad for a simple weeknight dinner. Try it alongside Easy Sautéed Lion’s Mane Mushrooms for an elevated twist.

More Casseroles

If you're looking for more comforting casseroles, don’t miss the Creamy Leek and Mushroom Pasta Bake, Cheesy Cabbage Casserole, or Salmon Casserole with Cauliflower. Unique options like the Breakfast Baked Rutabaga Casserole or Easy Moussaka are worth trying. This healthy recipe for slow-cooker butternut squash is versatile and sure to become a favorite!

  • A serving of cheesy Beef Enchilada Casserole with beans and vegetables on a plate, garnished with fresh cilantro.
    Beef Enchilada Casserole Recipe
  • A plate of Amish Country Casserole with cheesy noodles, ground meat, and peas, garnished with chopped parsley.
    Classic Amish Country Casserole Recipe
  • A fork lifts a cheesy, layered chicken casserole with herbs from a gray plate.
    King Ranch Chicken Casserole
  • A plate of gnocchi with creamy sauce and herbs, served with orange slices on a red checkered napkin.
    Slow Cooker Sausage Biscuit Gravy Casserole 
See more Casseroles →

Recipe

Tried and loved this recipe? Please leave a 5-star review below! Your reviews mean a lot to me, so if you've got any questions, please let me know in a comment.

A black ceramic dish filled with mashed butternut squash, garnished with chopped hazelnuts and a sprig of thyme. A pat of butter melts in the center. The dish rests on a round wooden board, with a light gray cloth in the background.
Print Recipe
No ratings yet

Delicious and Easy Slow Cooker Butternut Squash Recipe

Enjoy juicy slow cooker butternut squash with a perfectly tender texture! This easy recipe delivers flavorful, comforting squash that's perfectly cooked and lightly sweetened.
Prep Time10 minutes mins
Cook Time8 hours hrs
Course: Main
Cuisine: American
Keyword: slow cooker butternut squash
Servings: 6
Calories: 75kcal
Author: Ksenia Prints

Ingredients

  • 1 large butternut squash (about 3 lbs)
  • 2 tablespoons butter
  • 2 tablespoons brown sugar
  • ½ teaspoon salt
  • ¼ teaspoon black pepper
  • ¼ cup water

Instructions

  • Peel squash, remove seeds, and cut into 1-inch cubes.
  • Place squash in slow cooker.
  • Add butter, brown sugar, salt, and pepper.
  • Pour water over the ingredients.
  • Cover and cook on low for 6-8 hours or on high for 3-4 hours. Squash is done when tender.
  • Mash with a fork or potato masher if desired.
  • Stir to combine all ingredients evenly. Serve hot

Notes

Adjust seasoning to taste before serving.

Nutrition

Calories: 75kcal | Carbohydrates: 19g | Protein: 1g | Fat: 0.3g | Saturated Fat: 0.1g | Polyunsaturated Fat: 0.1g | Monounsaturated Fat: 0.05g | Cholesterol: 1mg | Sodium: 206mg | Potassium: 453mg | Fiber: 3g | Sugar: 7g | Vitamin A: 13296IU | Vitamin C: 26mg | Calcium: 70mg | Iron: 1mg

Comforting Lentils and Rice with Caramelized Onions

Discover my childhood lentils and rice recipe featuring caramelized onions. This one pot dish is perfect as a hearty main or a side dish.

A white dish showcases a savory lentils and rice recipe, beautifully garnished with chopped cilantro and crispy fried onions. A wooden spoon rests on a patterned white cloth beside the dish.

Lentils and rice is more than just a recipe; it's a tradition cherished in many cultures around the world. This lentils and rice recipe, adapted from my childhood Mujadara, is a blend of humble ingredients like lentils, rice, and caramelized onions, cooked together to create something far greater than the sum of its parts.

As a child, my first encounter with Middle Eastern lentils and rice, referred to as Mujadara, was at an afterschool program. It was served to us, garnished with crispy onions and a side of lemon wedges, and I still remember how the flavors instantly felt like home.

Over time, this dish has become one of my favorite recipes when I need something simple yet soul-warming. The combination of fluffy rice, tender lentils, and sweet fried onions creates a one-pot meal that’s filling, nutritious, and budget-friendly.

Whether you choose brown rice, white basmati rice, or long-grain white rice, this dish is endlessly adaptable. It’s vegan-friendly, affordable, and perfect as a main dish or a hearty side dish to share with loved ones.

A plate showcasing a delicious lentils and rice recipe is topped with caramelized onions and garnished with chopped parsley. A fork rests beside the plate on a patterned tablecloth, ready for you to enjoy this flavorful dish.

This lentils and rice recipe has become one of my go-to meals because it embodies everything I love about cooking: simplicity, flavor, and a deep connection to tradition. The ingredients are pantry staples, and the cooking time is manageable, making it an easy meal for busy weeknights.

You can customize it to suit your preferences by using different kinds of lentils, like green lentils, brown lentils, or even red or yellow lentils, for a softer texture. Every bite tells a story; I hope you’ll love this recipe as much as I do.

Ingredients for Lentil and Rice Recipe with Caramelized Onions

A close-up of a wooden cutting board features coriander seeds, black peppercorns, white rice, and a partially sliced onion. The spices and ingredients are spread out like a prelude to a flavorful lentils and rice recipe, showcasing their textures against the wood surface.
  • Brown or green lentils: Nutty and hearty, these hold their shape well during cooking.
  • Rice (white basmati rice or brown basmati rice): Choose your favorite; white rice cooks faster, while brown rice adds a nuttier flavor.
  • Onion and garlic: Chopped onions and minced garlic add depth and aroma.
  • Ground cumin, coriander, and cinnamon: These spices create a warm, fragrant base for the dish.
  • Red onion: Optional, but perfect for caramelizing and garnishing the finished dish.
  • Oil: Essential for sautéing the spices and caramelizing the onions.
  • Cilantro or parsley: Fresh herbs to sprinkle over the finished dish for a bright touch.
  • Lemon wedges: Adds tanginess and balances the rich flavors.
  • Water: Needed to cook the lentils and rice.
  • Salt: Enhances the flavor of every ingredient.

See recipe card for exact quantities. 

Directions to Make This Recipe

In the foreground, a plate showcases a delicious lentils and rice recipe garnished with caramelized onions and fresh herbs. A blurred serving dish brimming with more of this delightful dish sits in the background, while a fork rests elegantly on a patterned cloth beside the plate.

Preparing the Lentils

Start by rinsing 1 cup of lentils under cold water and soaking them for 20 minutes. Soaking helps reduce cooking time, but you can skip this step if needed. Heat oil in a large pot, then add the spices and minced garlic, cooking until fragrant. Add the chopped onions and sauté until the onions are translucent, stirring occasionally.

Add the lentils to the pot along with 2 cups of water and salt. Simmer the lentils until they are tender, about 20 minutes, or longer if they were not soaked. Drain the lentils and set them aside.

Cooking the Rice

Rinse 1 cup of rice—whether it’s white basmati rice or brown rice—until the water runs clear. Add the rice to the pot with 2 cups of water, salt, and the cooked lentils. Stir the rice and lentils together, then cover them with a lid and bring them to a boil. Lower the heat to a simmer and cook for 25 minutes or until the rice and lentils are tender and the water has been absorbed.

Caramelizing the Onions

A bowl of caramelized onions sits on a marble countertop, perfect to top off a savory lentils and rice recipe. Behind it, two whole onions and a halved onion rest on a wooden cutting board. A ceramic pitcher is nearby, while onion skins are scattered around.

While the rice mixture cooks, heat oil in a skillet and add sliced red onions. Cook until the onions are caramelized, golden, and slightly crispy. See my guide on how to get the perfect caramelized onions. Transfer the onions to a plate and set aside for garnish.

Assembling the Dish

A cutting board with chopped cilantro and a knife sits beside a small white bowl of more cilantro. In the background, a plate showcases caramelized onions, perfect companions for your lentils and rice recipe.

Once the rice is done, fluff the rice gently with a fork and transfer the rice and lentils to a serving platter. Garnish with crispy onions, chopped herbs, and lemon wedges. Serve this lentils and rice dish immediately, letting everyone season to their taste with additional lemon or herbs. Serve alongside air fryer asparagus or roasted cauliflower.

Storage Instructions for Lentils and Rice Recipe

A dish of Mujadara, a classic lentils and rice recipe, is served in a white, round baking dish. Topped with crispy fried onions and garnished with fresh chopped parsley, it rests enticingly on a patterned tablecloth with a wooden spoon beside it.

Store leftovers in an airtight container in the refrigerator for up to 4 days. Reheat gently on the stovetop or microwave, adding a splash of water to prevent mushy rice. This lentils and rice recipe also freezes well—portion into freezer-safe containers and enjoy within 3 months.

Top Tips for This Rice and Lentil Side Dish

Type of lentils: Use brown or green lentils for a firm texture or red lentils if you prefer a softer consistency.

Caramelized onions: Cook until the onions are caramelized but not burnt to achieve the perfect balance of sweetness.

Brown rice instead of white rice: Adjust water and cook time if using brown basmati rice.

Instant Pot option: For a quicker meal, cook the lentils and rice in an Instant Pot following similar proportions.

For More Lentil Recipes

If you're looking for more lentil recipes to warm your heart and feed your soul, you’re in luck. Start with the comforting Easy Moussaka Recipe, a layered dish full of savory flavors that pairs wonderfully with a fresh salad. Or, try Red Lentil Stew, a nourishing, hearty dish that’s perfect for chilly evenings. For a quick and satisfying meal, check out Mujadara for One Meal Mug.

What to Serve With It

If you’re on the hunt for more dinner ideas to make weeknight meals exciting, I’ve got you covered.

For a crispy and juicy dish that requires little effort, try the Crispy and Juicy Air Fryer Turkey Thighs, perfect for a busy day. The Baked Turkey Tenders Recipe is another great choice if you want a lean protein with minimal prep. If you're craving something with bold flavors, check out the Cajun-Style Baked Turkey Breast with Vegetables, a full meal in one pan. And for a cozy, plant-based dish, the Creamy Vegan Pasta Bake is a must-try.

For a lighter option, try the Salmon Casserole with Cauliflower, or for something a little more exotic, the Chicken with Dates Casserole will surely surprise your taste buds. Lastly, if you love cooking with an Instant Pot, don’t miss out on this Easy and Delicious Instant Pot Fish Soup.

  • A fork lifting a cheesy, golden baked Tuna Casserole with peas and herbs from a baking dish.
    Vintage Tuna Rice Casserole (No Canned Soup!)
  • A close-up of a decadent Hot Chocolate Cobbler with ice cream, marshmallows, and a gold spoon on a white plate.
    Hot Chocolate Cobbler Recipe
  • A slice of Pancake Breakfast Casserole topped with diced tomatoes and herbs sits on a white plate.
    Pancake Breakfast Casserole Recipe
  • Two pieces of Eggnog French Toast casserole stacked on a plate, topped with whipped cream and sprinkled with powdered sugar.
    Eggnog French Toast Casserole
See more Casseroles →

Recipe

Tried and loved this recipe? Please leave a 5-star review below! Your reviews mean a lot to me, so if you've got any questions, please let me know in a comment.

A white dish filled with rice, lentils, and roasted potatoes is topped with chopped cilantro and fried onions. A wooden spoon and a patterned cloth napkin are partially visible beside the dish, adding to its rustic charm.
Print Recipe
5 from 2 votes

Authentic Rice and Lentil Recipe

An earthy dish of rice and lentils, punctuated with fragrant garlic and toasted spices, and topped with fresh herbs and crispy, caramelised onions. A feast for the eyes and the mouth, and the best thing to eat on a cold winter's day.
Course: Main
Cuisine: Middle Eastern
Keyword: Rice and lentil recipe
Servings: 6
Calories: 385kcal
Author: Ksenia Prints

Ingredients

  • 1 cup of brown or green lentils
  • 1.5 cups of rice if using whole grain, adjust rice cooking time to longer, about 40-45 minutes, and you may need to double cumin and garlic as whole grain rice has a more pronounced taste
  • 1 tablespoon cumin ground
  • 1 tablespoon coriander ground
  • 1 teaspoon cinnamon  ground
  • ½ teaspoon chili powder optional
  • 2 garlic cloves optional
  • 1 onion chopped finely
  • 2 tablespoons salt or more - to taste
  • 4 tablespoon oil
  • 1 onion sliced into half-moons (optional but highly recommended)
  • ½ bunch of chopped cilantro or parsley for serving (parsley is traditional, but I love the taste of cilantro)
  • Lemon wedges for serving
  • Labaneh or Greek yogurt  for serving (optional)

Instructions

  • Rinse lentils and soak them in 4 cups of water for 20 minutes (If you don't have time to soak your lentils, that's ok - they'll just need longer to cook).
  • Mince garlic finely. Chop onion finely.
  • Heat 2 tablespoons of oil in a large, heavy-bottomed pot. Add cumin, coriander, cinnamon, garlic and chili, if using, and toast lightly, for about a minute. Add onions to the spices, stir until coated, and saute until golden, stirring occasionally, about 10 minutes.
  • If lentils were soaking, drain the water. To the pot with onions and spices, add 1 cup of lentils and enough water to coat them, plus one more cup of water and 1 teaspoon of salt. Raise heat to medium-high and cook lentils for 20 minutes if the lentils were soaked (25-30 if they weren't soaked), testing for doneness (lentils should be cooked through but not mushy).
  • While lentils are cooking, rinse your rice 3-5 times in cold water, until water comes out clean. Let rice soak in 4 cups of water while lentils are cooking.
  • When lentils are cooked through but not mushy, to the same pot as the lentils add rice, 1 teaspoon of salt and 2 cups of water (if using whole-grain rice, you'll want more water, about 2.5 cups). Cover with a lid, raise heat to medium high and bring to a boil. Once water is boiling, lower heat to very low and let cook for about 25 minutes, until most of the water has evaporated and rice is cooked through. Fluff rice through gently with a fork, cover with lid and let rest for another 10 minutes.
  • Optional: While rice is cooking, heat 2 tablespoons of oil in a pan. When oil has heated through, add slivered onions. Let cook on low-medium heat until onions have browned and caramelised.
  • Chop cilantro or parsley finely.
  • When rice is cooked through, pour contents of pot into big serving platter. Mix rice and lentils gently. Top with chopped herbs and caramelized onions. Taste and adjust flavours - dish may need more salt, as for your liking.
  • Serve with more herbs on the side, individual lemon wedges and, if you're eating dairy, labaneh. It will be a magical dish!

Nutrition

Calories: 385kcal | Carbohydrates: 60g | Protein: 12g | Fat: 10g | Saturated Fat: 1g | Polyunsaturated Fat: 3g | Monounsaturated Fat: 6g | Trans Fat: 0.04g | Sodium: 2338mg | Potassium: 460mg | Fiber: 11g | Sugar: 2g | Vitamin A: 475IU | Vitamin C: 11mg | Calcium: 57mg | Iron: 4mg

Creamy Leek and Mushroom Pasta Bake Recipe

This leek and mushroom pasta bake recipe is delicious, comforting, and full of heart. Whether you follow the recipe exactly or make it your own, it’s a great recipe to keep in your rotation for cozy nights and family dinners.

A white casserole dish filled with baked leek and mushroom noodle kugel rests on a wooden board. A serving is placed on a plate in the foreground, garnished with fresh dill. The kugel is golden brown with visible noodles and mushroom slices.

The pairing of tender leeks and earthy mushrooms creates a dish that feels like an embrace—a meal meant to be shared with loved ones. The creaminess of the sauce, paired with perfectly cooked noodles, transforms simple ingredients into a story of tradition, family, and nourishment.

A collection of white mushrooms scattered on a dark surface, reminiscent of ingredients for a delectable leek and mushroom pasta. The mushrooms vary slightly in size and texture, with some stems visible. The image is focused, highlighting the natural, smooth surface of these culinary gems.

Mushrooms have always held a special place in my heart. Growing up, I spent weekends foraging in the forest with my family. Those quiet moments, where we searched under mossy trees and shared our finds, cultivated my deep appreciation for nature’s gifts. Leeks were another family favorite, their mild sweetness always elevating any meal. These ingredients became a natural choice for recipes that remind me of home.

Leek and mushroom pasta became one of my most cherished dishes because it brings together my family’s traditions and my own creative love for pasta. Every time I prepare it, I think of those childhood afternoons spent in the forest and the meals that followed—always hearty, always satisfying.

If you’re looking for more kugel recipes that carry that same nostalgic warmth, my Jerusalem Kugel or my grandmother's carrot kugel are the next recipes you have to check out!

Ingredients for Mushroom and Leek Pasta

  • Leeks: Slice thinly after cutting them in half lengthwise and giving them a good rinse to remove grit.
  • Mushrooms: A mix of cremini and white button mushrooms adds earthy depth and texture.
  • Garlic: Essential for enhancing the leek mixture with aromatic warmth.
  • Butter and Olive Oil: Helps soften the vegetables while adding richness to the dish.
  • Eggs, milk, sour cream: to keep all the ingredients together and create a creamy sauce.
  • Cooked Egg Noodles: preferably a broad type

See recipe card for exact quantities. 

Directions to Make Creamy Mushroom Leek Pasta Recipe

A white bowl filled with creamy leek and mushroom pasta topped with fresh herbs rests on a blue and white striped cloth.

Cook the Noodles

Bring a large pot of well-salted water (2 tablespoons salt) to a boil. Add the noodles and cook according to package instructions until just shy of al dente—they'll finish cooking in the oven. Before draining, reserve 1½ cups of the starchy pasta water (this is crucial for creating a silky, cohesive sauce).

Prepare the Leek and Mushroom Mixture

A frying pan with sliced mushrooms and chopped green onions, the perfect base for a delightful leek and mushroom pasta, being sautéed.

Heat butter and olive oil in a large skillet over medium heat. Add the sliced leeks with a pinch of salt and cook until very tender, stirring often, about 8 minutes. Add the mushrooms and cook until they release their liquid and become golden brown, about 10 minutes. Sprinkle the flour over the vegetables and stir for 1 minute to create a light roux—this will help thicken your sauce naturally. Add the garlic and cook for 1 minute more until fragrant.

Tip: Don't rush the mushroom cooking—letting them develop a golden color adds depth of flavor that prevents blandness.

Make the Creamy Sauce

A stainless steel bowl brimming with leek and mushroom pasta sits on a kitchen counter. In the foreground, a knife rests on fresh dill.

In a large bowl, whisk together the sour cream, heavy cream, milk, lightly beaten eggs, dill, salt, pepper, nutmeg, onion powder, and lemon juice until completely smooth. This dairy-rich mixture replaces the original tofu blend for superior creaminess and flavor.

Tip: Make sure the cream mixture is well-combined before adding to prevent any lumps in your final dish.

Combine and Bake

A white dish filled with creamy leek and mushroom pasta mixed with herbs is placed on a blue and white striped cloth.

Add the cooked noodles to the mushroom mixture in the skillet. Pour in the creamy sauce and 1 cup of the reserved pasta water. Toss gently, adding more pasta water as needed until you achieve a creamy, saucy consistency. Transfer everything to a buttered 9x13 inch baking dish.

Mix the panko breadcrumbs with melted butter and sprinkle evenly over the top. Bake at 375°F for 25-30 minutes until the top is golden brown and the edges are bubbly.

Tip: The breadcrumb topping not only adds texture but also helps seal in moisture during baking.

Storage Instructions for Leek and Mushroom Pasta

A plate of leek and mushroom pasta with herbs, garnished with fresh dill, rests on a wooden surface. The pasta is a light color, presented simply without any additional sides or utensils.

Store leftover pasta in an airtight container in the fridge for up to 3 days. To reheat, transfer to a skillet with a splash of vegetable broth or reserved pasta water and heat gently over medium. This method helps restore the creamy texture.

More Pasta Recipes to Try

For more pasta inspiration, check out this Creamy Vegan Pasta Bake and the Easy Weeknight Slow Cooker Chicken Marinara. You are also going to love this baked feta with orange and olives pasta!

More One-Pot Wonders!

If you're looking for more one-pot wonders, there’s a collection of hearty and easy-to-make casseroles that are perfect for any occasion. The One-Pot Buttermilk Chicken and Potatoes Casserole is a rich, creamy dish that’s perfect for a family dinner, while the Salmon Casserole with Cauliflower brings a lighter yet comforting option to the table.

For something with Mediterranean flavors, try the Easy Moussaka Recipe, or go for the cheesy indulgence of the Cheesy Easy Cauliflower Casserole. These dishes, along with others like the Chicken with Dates Casserole and Baked Brie with Honey and Nuts Recipe, offer a comforting range of flavors that are as satisfying as they are easy to make.

  • Two sausage sandwiches with peppers and onions on a white plate, in front of a kitchen appliance.
    Crockpot Sausage and Peppers
  • Four easy chicken tacos on a white plate, topped with red onion, green onions, and cilantro—perfect for those craving Buffalo chicken tacos with a fresh twist.
    Easy Cast-Iron Buffalo Chicken Tacos
  • Creamy Crack Potato Soup topped with shredded cheese, bacon, and green onions in a white bowl on a wooden table.
    Slow Cooker Crack Potato Soup With Frozen Hash Browns
  • A bowl of cheesy bean dip, inspired by Nacho Soup, topped with jalapeños and tortilla strips, surrounded by chips and fresh vegetables—a perfect recipe for sharing.
    Slow Cooker Nacho Soup Recipe
See more Dinner →

Recipe

Tried and loved this recipe? Please leave a 5-star review below! Your reviews mean a lot to me, so if you've got any questions, please let me know in a comment.

A close-up of noodle casserole on a plate with dill garnish, set beside a large white baking dish, its creamy layers reminiscent of roasted potatoes with broccoli. The ensemble rests invitingly on a wooden surface.
Print Recipe
No ratings yet

Mushroom leek pasta bake

This mushroom leek pasta bake is a creamy, earthy dish, a perfect marriage of spongy mushrooms, pungent leeks, and sharp, bright, fragrant dill.
Prep Time10 minutes mins
Cook Time1 hour hr 10 minutes mins
Total Time1 hour hr 20 minutes mins
Course: Main
Cuisine: Jewish cuisine
Keyword: mushroom and leek pasta
Servings: 10 servings
Calories: 408kcal
Author: Ksenia Prints

Ingredients

  • 18 ounce package egg noodles preferably broad
  • 4 tablespoons butter
  • 2 tablespoons olive oil
  • 3 large leeks
  • 1 pound mushrooms mixed kinds, here I used king and white, because that's what I had at the time (500 grams)
  • 3 tablespoons flour
  • 4 cloves garlic
  • 1½ cups reserved pasta water
  • 1 cup sour cream preferably full-fat
  • ¾ cup heavy cream
  • ¾ cup milk
  • 4 large eggs whisked
  • 2 tablespoons fresh dill chopped, to taste (optional)
  • 2 tablespoons lemon juice
  • 1 teaspoon onion powder
  • ¼ teaspoon nutmeg
  • ½ teaspoon black pepper

Instructions

  • Preheat oven to 375°F. Butter a 9x13 inch baking dish.
  • Bring a large pot of well-salted water (2 tablespoons salt) to boil. Cook noodles until just shy of al dente. Reserve 1½ cups pasta water before draining.
  • Heat butter and olive oil in a large skillet over medium heat. Add leeks with a pinch of salt and cook until very tender, about 8 minutes (was 5 minutes). Add mushrooms and cook until they release liquid and become golden, about 10 minutes (was 7 minutes). Sprinkle flour over vegetables and stir for 1 minute. Add garlic and cook 1 minute more.
  • In a large bowl, whisk together sour cream, heavy cream, milk, beaten eggs, dill, salt, pepper, nutmeg, onion powder, and lemon juice until smooth. (completely different from original tofu processor method)
  • Add the cooked noodles to the mushroom mixture. Pour in the creamy sauce and 1 cup of the reserved pasta water. Toss gently, adding more pasta water as needed for a creamy, saucy consistency. (more detailed than original)
  • Transfer to a buttered 9x13 inch baking dish. Drizzle with more olive oil or melted butter. Bake at 375°F for 25-30 minutes until golden and bubbly.

Notes


Nutrition

Calories: 408kcal | Carbohydrates: 47g | Protein: 14g | Fat: 19g | Saturated Fat: 9g | Polyunsaturated Fat: 2g | Monounsaturated Fat: 6g | Trans Fat: 0.04g | Cholesterol: 154mg | Sodium: 72mg | Potassium: 440mg | Fiber: 3g | Sugar: 6g | Vitamin A: 1037IU | Vitamin C: 6mg | Calcium: 115mg | Iron: 2mg

Crispy and Juicy Air Fryer Turkey Thighs

Enjoy juicy air fryer turkey thighs with crispy skin! This easy recipe delivers delicious, flavorful meat that's perfectly cooked on the inside and crispy on the outside.

Two cooked chicken breasts seasoned with herbs are served on a white plate alongside sprigs of thyme. A crispy and juicy air fryer sits nearby, reminiscent of perfectly cooked turkey thighs, offering a culinary promise on the marble surface.

With simple spices such as garlic powder, paprika, thyme, and cayenne pepper, these turkey thighs are savory and a bit garlicky! It's so simple that you can customize yours to whatever flavor you prefer. 

The turkey thighs are cooked with an air fryer and this means less hands-on time, you only have to flip them halfway through the cooking time. You can prepare your side dishes or watch an episode of your favorite show as you cook. It takes around 40 minutes to cook and this already includes the resting time. 

This particular recipe is a household favorite, I even serve this with dips sometimes, and this is an easy dish to prepare for potlucks! I just adjust the spice for the kids. It's protein-packed and you can't get enough of it!

With easy prep and short cooking time, you can prepare easy turkey thighs in under an hour! An ideal choice for quick dinners, perfect for busy moms!

A plate with two pieces of crispy and juicy air fryer turkey thighs. One thigh is being sliced with a knife and fork, revealing the tender meat inside. Sprigs of fresh thyme are placed on the plate for garnish.

Ingredient Highlight: Turkey Thighs

These bone-in thighs are naturally more tender and juicy than turkey breast, thanks to their higher fat content and dark meat richness. That’s why they’re perfect for the air fryer: the skin crisps up beautifully while the meat stays succulent inside, giving you the best of both worlds with minimal effort.

In this recipe, I love using frozen turkey thighs—they're budget-friendly, easy to store, and taste just as amazing once cooked. Just be sure to fully thaw them and pat them dry for maximum crispiness. Whether you’re seasoning with paprika and garlic like in this version, or trying different flavors like I do with my baked turkey tenders or Cajun-style baked turkey breast with vegetables, turkey always brings satisfying flavor to the table.

Turkey thighs are also perfect for batch cooking—make extra and repurpose them later in a dish like Texas French toast casserole with leftover turkey.

Turkey Thighs Cooking Instructions

A fork and knife slice into a piece of crispy and juicy air fryer turkey thigh on a plate, with two seasoned pieces visible. Sprigs of fresh thyme are placed beside the turkey. The dish rests elegantly on a white marble surface.

If you're craving juicy, flavorful turkey with crispy skin but don't want to prep and cook an entire turkey, these air fryer turkey thighs are the answer! This recipe delivers perfectly cooked turkey with minimal effort but maximum taste.

Prepare the Turkey Thighs

Start by patting the turkey thighs dry with paper towels. This helps ensure a crispy skin when cooked. Next, gently loosen the skin from the meat by carefully running your fingers or a spoon between the skin and the flesh. Be cautious not to tear the skin, as it helps keep the meat moist during cooking.

Season the Turkey

A hand holds a round gray plate with two raw chicken thighs, seasoned to perfection with paprika and herbs, awaiting transformation into crispy and juicy delights. The plate rests elegantly on a white marble surface, promising the flavors of air fryer turkey thighs.

In a small bowl, mix the salt, black pepper, garlic powder, paprika, and dried thyme. This seasoning blend will give your turkey thighs a delicious flavor. Drizzle the olive oil or avocado oil over the turkey thighs and use your hands to evenly coat them, including underneath the loosened skin. Then, rub the seasoning mixture all over the thighs, making sure to cover all sides and get some under the skin for maximum flavor.

Preheat the Air Fryer

Set your air fryer to 380°F (193°C) and let it preheat for 5 minutes. This ensures that the air fryer is at the right temperature when you start cooking.

Cook the Turkey Thighs

An air fryer sits on a countertop with its basket open, revealing two pieces of seasoned raw chicken on parchment paper, promising crispy and juicy results. The sleek black appliance contrasts beautifully with the white countertop.

Place turkey thighs in the air fryer basket, leaving some space between each piece to allow for even cooking. Air fry the thighs for 25-30 minutes, flipping them over halfway through the cooking time.

Check for Doneness

A person holds an air fryer basket containing crispy and juicy turkey thighs. The basket is lined with brown parchment paper, resting elegantly on a white marble surface, showcasing the perfectly cooked delight.

After the initial cooking time, check the internal temperature of the thickest part of the thighs with a meat thermometer. The turkey is fully cooked when it reaches 165°F (74°C). If needed, continue air frying in 5-minute increments until the desired temperature is reached.

Rest and Serve

Two crispy and juicy roasted chicken thighs seasoned with herbs are placed on a white plate. Sprigs of thyme are scattered on the plate. A small ceramic jug is visible in the background on a marble surface, enhancing this elegant presentation.

Once cooked, remove the turkey thighs from the air fryer and let them rest for 5 minutes. This allows the juices to redistribute throughout the meat, ensuring a juicy result. For extra flavor, you can brush the thighs with melted butter or drizzle them with your favorite sauce before serving.

Storage

A close-up of a white plate featuring two crispy and juicy turkey thighs, garnished with sprigs of thyme. A fork and knife are being used to slice through the tender meat, showcasing its succulent interior. The plate rests elegantly on a marble surface.

To store air fryer turkey thighs, allow them to cool to room temperature before transferring to an airtight container. For optimal freshness, refrigerate the turkey thighs for up to 3-4 days. If you want to freeze them, wrap each thigh individually in plastic wrap or aluminum foil, then place them in freezer-safe bags or containers, removing as much air as possible to prevent freezer burn. Frozen turkey thighs can be stored for up to 3 months. To reheat, thaw frozen thighs in the refrigerator overnight if necessary. For best results, reheat in the air fryer at 350°F (175°C) for about 5-7 minutes, or until heated through. Alternatively, you can use an oven at 350°F (175°C) for 15-20 minutes. If using a microwave, heat in 1-minute intervals until warm, but be aware that this method may result in less crispy skin.

Top Tips

Pat dry turkey thighs for crispy skin - Before seasoning, thoroughly pat the turkey thighs dry with paper towels. This removes excess moisture from the skin, which is crucial for achieving that crispy, golden-brown exterior. The drier the skin, the crispier it will become during cooking.

Season under the skin - Gently loosen the skin from the meat and apply some of your seasoning mixture directly to the flesh underneath. This ensures that the flavors penetrate deep into the meat, not just on the surface, resulting in a more flavorful dish overall.

Don't overcrowd the basket -Make sure to leave some space between the turkey thighs in the air fryer basket. This allows hot air to circulate freely around each piece, ensuring even cooking and crispy skin all around. If necessary, cook in batches rather than overcrowding the basket.

What to Serve with Air Fryer Turkey Thighs

A white plate holds two crispy and juicy turkey thighs, seasoned to perfection and garnished with sprigs of thyme. A small white ceramic jug is partially visible in the background on a marble surface.

This air fryer turkey thighs are great to pair with butternut squash chips, their texture and flavor go well with the turkey thighs. This recipe also contrasts well with my fall charcuterie board with roasted vegetables. 

If you're looking for another turkey recipe, my baked turkey tenders recipe is one of my go-tos!

Recipe

Tried and loved this recipe? Please leave a 5-star review below! Your reviews mean a lot to me, so if you've got any questions, please let me know in a comment.

Two crispy and juicy grilled chicken thighs seasoned with herbs rest on a white round plate. Sprigs of fresh thyme are artfully arranged beside them, creating a picturesque scene against the light-colored marble background.
Print Recipe
No ratings yet

Air Fryer Turkey Thighs

Enjoy juicy air fryer turkey thighs with crispy skin! This easy recipe delivers delicious, flavorful meat that's perfectly cooked on the inside and crispy on the outside.
Prep Time10 minutes mins
Cook Time30 minutes mins
Total Time40 minutes mins
Course: Main
Cuisine: American
Keyword: Crispy and Juicy Air Fryer Turkey Thighs
Servings: 4 servings
Calories: 67kcal
Author: Ksenia Prints

Equipment

  • Air Fryer
  • Air fryer sheets

Ingredients

  • 4 bone-in turkey thighs
  • 2 tablespoons olive oil or avocado oil
  • 1 teaspoon salt
  • ½ teaspoon black pepper
  • 1 teaspoon garlic powder
  • 1 teaspoon paprika
  • ½ teaspoon dried thyme
  • ¼ teaspoon cayenne pepper optional, for a little heat

Instructions

  • Pat the turkey thighs dry with paper towels.
  • In a small bowl, combine the salt, black pepper, garlic powder, paprika and dried thyme. Mix well.
  • Loosen the skin from the turkey thighs by gently running your fingers or a spoon between the skin and the meat. Be careful not to tear the skin.
  • Drizzle the olive oil or avocado oil over the seasoned turkey thighs, and use your hands to rub the oil all over the thighs, ensuring they are evenly coated. Spread some of the oil underneath the loosened skin.
  • Rub the seasoning mixture evenly over the turkey thighs, making sure to cover all sides, including under the skin.
  • Preheat your air fryer to 380°F (193°C) for 5 minutes.
  • Place the turkey thighs in the air fryer basket, leaving some space between each piece for even cooking.
  • Air fry the turkey thighs for 25-30 minutes, flipping them over halfway through the cooking time.
  • Check the internal temperature of the thickest part of the thighs with a meat thermometer. The thighs are fully cooked when the internal temperature reaches 165°F (74°C).
  • If the thighs are not yet fully cooked, continue air frying in 5-minute increments until the desired temperature is reached.
  • Once cooked, remove the turkey thighs from the air fryer and let them rest for 5 minutes before serving.
  • Optionally, you can brush the thighs with melted butter or drizzle them with your favorite sauce before serving.

Video

Notes

Cooking times may vary depending on the size and thickness of the turkey thighs, as well as the make and model of your air fryer. Always use a meat thermometer to ensure the thighs are cooked to a safe internal temperature.

Nutrition

Calories: 67kcal | Carbohydrates: 1g | Protein: 0.4g | Fat: 7g | Saturated Fat: 1g | Polyunsaturated Fat: 1g | Monounsaturated Fat: 5g | Cholesterol: 1mg | Sodium: 586mg | Potassium: 18mg | Fiber: 0.2g | Sugar: 0.04g | Vitamin A: 58IU | Vitamin C: 0.2mg | Calcium: 5mg | Iron: 0.3mg

Baked Brie with Honey and Nuts Recipe for Warm Cheesy Goodness

This easy-baked brie cheese with honey recipe is a melty party appetizer ready in just 15 minutes. Serve warm with crackers for an easy cheesy treat!

A bowl of baked brie drizzled with honey, topped with pecans and herbs sits in the foreground. Behind it are a fresh peach, slices of baguette, pecans in a bowl, and a dish of canned peaches, all beautifully arranged on a rustic wooden surface.

When I think of comfort food for hosting during a cold winter night, my mind immediately drifts to a warm, melty baked brie with honey. It’s a dish that fills my heart and home with its cozy aroma and oozy goodness. Whenever I have friends or family over and don't have a lot of time to prep or cook, this easy appetizer becomes my go-to for sharing something delicious without much fuss.

I love using what I have in the pantry, like a wheel of brie, canned peaches, and a drizzle of honey. Creating something special that looks inviting and brings everyone together around the table feels good. And what's even better, it takes mere minutes to throw together.

A Dish That Brings Us Together

This dish's inspiration comes from my family's tradition of using pantry staples to make something out of nothing, a true representation of food from the heart. This baked brie recipe reminds me how a simple combination of ingredients, when made the right way, can become extraordinary. With roots in resourcefulness, it’s a dish that thrives on flexibility, ensuring that I can whip it up even when unsure what to serve.

Whether a casual weeknight dinner or a festive gathering, this dish is a warm hug on a plate. It's a comforting dip to cuddle on the couch, with a cup of warm spiced cranberry juice or white Russian mocktail in one hand and a baguette slice with cheese dip on top, with snow outside. It takes us back to adventures in German Christmas Markets, oddities we saw in the Netherlands, and how scared we got at haunted vacation spots in the US.

A hand dips a piece of baguette into a wooden bowl filled with a peach mixture topped with chopped nuts. Nearby, creamy Brie cheese drizzled with honey adds richness to the scene, alongside two whole peaches, pecans, more baguette slices, and a metal bowl with halved peaches in syrup.

Warm brie, topped with honey and nuts, is my favorite comfort food. The way the cheese melts and mingles with the sweetness of the honey creates a flavor experience that’s simply irresistible. Each bite, served alongside crunchy baguette slices or pumpkin bread, offers a delightful contrast of textures. This baked brie with honey is more than just an appetizer; it’s a dish filled with memories and the joy of sharing good food with those I love.

Ingredients for Baked Brie Recipe

A rustic scene showcases a bowl of pecans in the foreground, paired beautifully with a bowl of peach halves and fresh peaches. Nearby, Brie cheese drizzled with honey sits enticingly on a wooden surface adorned with light fabric, inviting a feast for the senses.
  • Wheel of Brie – A rich, creamy cheese with a rind that keeps it gooey inside when baked.
  • California Cling Peaches – Adds a bright, sweet touch that pairs well with the cheese.
  • Pecans – Offers a buttery crunch that balances the cheese and honey.
  • Fresh Herbs – Thyme, basil, or sage add an aromatic layer that lifts the dish.
  • Honey – Drizzled on top for sweetness and a slightly caramelized texture when baked.
  • Baguette or Crackers – Ideal for scooping up all that melty cheese goodness.

See recipe card for exact quantities.

Directions to Make Easy Baked Brie Appetizer Recipe

Preheat and Prepare the Brie

Preheat the oven to 325°F. Place the brie in a small baking dish or oven-safe ceramic dish. If you prefer, you can remove the rind of the brie for a softer texture. I like to use parchment paper in the dish to make cleanup easy, but it’s optional.

Add the Toppings

A wooden bowl with diced peaches atop a Brie cheese wheel drizzled with honey sits on a cloth. In the background, a bowl with sliced peaches and thyme is visible, alongside a whole peach and scattered pecans on the table.

Top the brie with cubed peaches and sprinkle the pecans evenly. Fresh herbs go next, adding both flavor and color. Finally, drizzle a tablespoon of honey over everything, which will caramelize and bring a slight sweetness to the top of the brie as it bakes.

Bake the Brie

A ceramic bowl filled with a peach dessert topped with chopped nuts and a hint of Brie cheese with honey. In the background, whole peaches, pecans, and another dish featuring yellow fruit rest on a rustic wooden table.

Bake the brie in your preheated oven for 15-20 minutes. You’ll know it’s ready when the brie is soft and melted, the pecans are golden, and the honey has a nice, caramelized look. If you like, score the top of the brie with a knife beforehand for easier scooping. Remove the baked brie from the oven and let it cool slightly before serving.

Serve

A hand dips a slice of bread into a bowl of melted brie cheese with honey, topped with peaches and pecans. Fresh peaches and a loaf of bread rest on the wooden surface in the background, enhancing the rustic dining ambiance.

Serve this warm, ooey-gooey brie straight from the baking dish with a platter of toast, crackers, or baguette slices on the side. It’s best enjoyed fresh from the oven, with the honey drizzled on top and each bite a mix of creamy cheese, sweet honey, and nutty crunch.

Storage Instructions for Baked Brie with Honey Recipe

Leftover brie cheese with honey can be stored in an airtight container in the fridge for up to two days. To reheat, stir it in the oven on a baking sheet at 300°F for 10 minutes until warm. You can also enjoy it cold as a spread for crackers or toast.

Top Tips for Making Baked Brie with Honey

  • Serve with a Variety of Dippers – Crackers, toast, rosemary sourdough bread, sliced apples, or a crusty baguette work well to scoop up every bit.
  • Use a Ripe Brie – A softer, riper wheel of brie will yield a meatier texture.
  • Experiment with Nuts – Pecans are lovely, but walnuts or pistachios add their own unique flavors.
  • Add a Twist with Fruit—If you don't have peaches, Fresh figs, dried apricots, or even cherry or apricot thyme jam are great alternatives.

What to Serve with Baked Brie with Honey and Nuts Appetizer

A rustic wooden bowl filled with peach dessert topped with crushed nuts and a hint of brie cheese with honey sits on a wooden table. Pecans are scattered nearby, and blurred peaches are visible in the background, enhancing the cozy, homemade ambiance.

If you want to make this a full meal, this baked brie cheese with honey recipe pairs beautifully with a fall charcuterie board and crisp green asparagus for contrast. Another of my favorite cheese dips is this baked feta with date dip, roasted carrot, and whipped feta dip. For more delicious cheesy dishes, try these easy air fryer cheese bites, pizza for breakfast, or cheesy cabbage casserole.

Sometimes, I serve this baked brie as an appetizer or side to a larger, more substantial meal. For a dinner that is just as quick and easy as my appetizer, my go-to is this salmon casserole with cauliflower, a hearty instant pot chicken stew, or an old-fashioned pasta bake.

Recipe

Tried and loved this recipe? Please leave a 5-star review below! Your reviews mean a lot to me, so if you've got any questions, please let me know in a comment.

A wooden bowl holds a dessert topped with chopped nuts, diced peaches, and a hint of Brie cheese with honey. A fresh peach and scattered pecans adorn the rustic wooden surface. White cloth napkins are draped delicately nearby.
Print Recipe
No ratings yet

Baked brie with peaches, pecans, herbs and honey

California cling peaches, chopped pecans, a drizzle of honey and a sprinkle of herbs, and you've got everyone drooling over gooey baked brie with peaches.
Prep Time5 minutes mins
Cook Time15 minutes mins
Total Time20 minutes mins
Course: Appetizer
Cuisine: Entertaining, Frensh, North American
Keyword: brie cheese with honey
Servings: 4
Calories: 281kcal
Author: Ksenia Prints

Equipment

  • Ceramic dish for baking in the oven

Ingredients

  • 1 wheel of brie
  • 1 can California cling peaches chopped into cubes
  • ¼ cup pecans crushed
  • 5 fresh thyme/ tarragon branches
  • 3 basil leaves or 3 sage leaves, sliced finely
  • Honey
  • Baguette or crackers of your choice  for serving

Instructions

  • Preheat oven to 325F.
  • Unwrap brie and place it in an oven-safe ceramic dish. Top with cubed California cling peaches and pecans. Sprinkle with chopped fresh herbs. Drizzle with honey as desired.
  • Bake in a 325F oven for 15-20 minutes, until brie has melted and topping has browned a bit on top. Serve immediately with baguette slices or the crackers of your choice.

Nutrition

Calories: 281kcal | Carbohydrates: 13g | Protein: 14g | Fat: 20g | Saturated Fat: 10g | Polyunsaturated Fat: 2g | Monounsaturated Fat: 7g | Cholesterol: 57mg | Sodium: 370mg | Potassium: 282mg | Fiber: 2g | Sugar: 10g | Vitamin A: 758IU | Vitamin C: 5mg | Calcium: 127mg | Iron: 1mg

One-Pot Baked Buttermilk Chicken Casserole Recipe with Potatoes

What is chicken and potatoes if not the quintessential comfort food! Create the meal of the week with a flavorful roast buttermilk chicken casserole featuring tender chicken thighs marinated in garlic and buttermilk paired with crispy potatoes.

A dish of buttermilk roasted chicken garnished with herbs is served on a plate, accompanied by a small bowl of sauce. In the background, there's a salad with sliced tomatoes and greens on a black slate platter, and a glass of amber liquid nearby, alongside roasted potatoes.

This buttermilk chicken and potatoes casserole is the comfort food that instantly brings warmth to the heart and the home. Inspired by my family's drive to make sure everything in the fridge gets used, I revived this hearty dish, making it perfect for today’s busy family life. It all started with a carton of buttermilk that was about to expire, the basis of the marinade for the chicken, making it tender and flavorful with hardly any effort.

It’s a “something from nothing” recipe that everyone needs in the back of their family recipe book. It uses ingredients we already have in the kitchen to create a meal full of flavor and heart.

This casserole has become my favorite meal on St. Patrick’s Day like my St. Patrick's Day breakfast Leprechaun toast. The blend of simple, hearty ingredients reminds me of how people used to cook back in the day, using whatever they had. The result is comforting, filling, and free from waste. One pan, minimal cleanup, and the family gather around to enjoy a meal that feels like a cozy hug.

Secret for Best Marinade for Herbed Buttermilk Chicken

A plate featuring buttermilk chicken and sliced potatoes, garnished with fresh parsley. A fork rests on the side. The plate boasts a decorative floral pattern, and the table surface is dark and textured.

The secret to this tender and juicy chicken is the buttermilk marinade. The buttermilk's acidity breaks down the meat's fibers, leaving it moist and flavorful. I love mixing it with fresh garlic and thyme for that extra bit of herbaceous goodness. Garlic and buttermilk are excellent, infusing the chicken with a tangy richness that elevates the whole dish. After coating the chicken, let it sit for at least 2 hours, but for best results, I always aim for overnight.

Soy Sauce and Buttermilk Marinade 

When marinating chicken, buttermilk is a fantastic choice as it tenderizes the meat by breaking down the fibers, making it juicy and flavorful. Marinating for at least 2 hours is ideal, but you can go up to 24 hours for the best results. Marinating longer than 24 hours can start to alter the texture of the chicken, so it's best not to exceed that.

As for soy sauce, it adds a savory depth to the marinade, but you shouldn’t marinate chicken in soy sauce alone for too long, as the high salt content can make the chicken too salty.

Top Tips:

If you accidentally add too much soy sauce, you can mellow the flavor by adding more buttermilk or a touch of honey. Avoid using too much acidity (like vinegar) in your marinade for extended periods, as it can cause the meat to become tough.

Equipment 

  • Large mixing bowl
  • Baking dish
  • Oven
  • Tongs
  • Knife and cutting board
  • Aluminum foil

How to Make Buttermilk Chicken Casserole

A plate and dish of buttermilk chicken and potatoes garnished with chopped parsley. A spoon rests in the dish, while a small bowl of yogurt with olive oil sits nearby on a dark, textured surface.

Prepare the Buttermilk Marinade

Place the chicken parts into a large bowl. Add olive oil and toss until the chicken is well-coated. Next, mix in the red wine vinegar, soy sauce, buttermilk, Herbes de Provence, ground ginger, barberries, black pepper, and salt. Cover the bowl and let the chicken marinate in the refrigerator for at least 2 hours. The buttermilk helps tenderize the chicken, ensuring it’s juicy and flavorful.

Preheat the Oven and Prep the Potatoes

Start by preheating your oven to 360°F. Get a large roasting pan or baking sheet ready for the chicken and potatoes. Pat the chicken dry with paper towels to help the skin get crispy during roasting.

If you’re using large potatoes, cut them into wedges for quicker cooking. Smaller, new potatoes can be left whole or halved depending on their size. This will give the casserole a nice mix of textures.

Roast the Chicken 

Once marinated, transfer the chicken to the prepared baking sheet or roasting pan, arranging the pieces skin-side up. Surround the chicken with the prepared potatoes, drizzling the potatoes with a little olive oil and seasoning them with salt and pepper to taste. Pour ¼ cup of the remaining marinade over the chicken to enhance the flavor. Bake in the preheated oven for 45 minutes, basting the chicken occasionally as it cooks.

Finish Roasting

A bowl of roasted buttermilk chicken garnished with fresh herbs sits on a dark surface. Beside it, a spoon rests on the edge of the bowl. Nearby are two decorative plates, a fork, and a small bowl of yogurt topped with olive oil and accompanied by golden potatoes.

Once the chicken has reached an internal temperature of 165°F and the potatoes are golden and crispy, take the casserole out of the oven. Let it rest for a few minutes before serving. This casserole pairs wonderfully with a side salad or steamed vegetables for a balanced meal.

Storage Instructions for Baked Chicken 

If you have leftovers, store them in an airtight container in the refrigerator for up to 3 days. To reheat, place them in a 350°F oven until warmed through. This casserole also freezes beautifully. You can freeze portions in individual containers for up to 3 months. When you’re ready to eat, thaw them overnight in the fridge and bake them again until heated.

Accompanying Dishes

A plate with succulent buttermilk chicken, garnished with chopped herbs, sits on a decorative dish. Accompanying it are roasted potatoes. In the background, there's a larger dish featuring the same delightful fare and a small bowl of yogurt with a drizzle of oil.

This dish pairs beautifully with a simple Greek salad, or you can serve it alongside air fryer asparagus or air fryer cheese curds. For a heartier option, try serving it with my easy pasta bake or cauliflower casserole. For a complimentary dessert option, I recommend my grandmother's sweet, cinnamon carrot dessert bake.

More Casseroles You Have to Try

This buttermilk chicken casserole has become one of my go-to meals, and it’s easy to see why. It’s a dish that feels familiar yet special, much like a traditional Greek moussaka (eggplant) casserole with layers of roasted vegetables. The best part? It’s surprisingly easy to make and perfect for feeding a crowd. My family can't get enough chicken and date casserole, chicken hashbrowns casserole, and cheesy cabbage casserole.

  • A fork holds creamy pasta bake with peas above a cheese-topped casserole dish.
    Tuna Noodle Casserole Recipe With Ripples Chips
  • A spoon scoops cheesy green bean casserole, made with fresh green beans and topped with melted cheese and herbs, from a white baking dish.
    Cheesy Green Bean Casserole with Fresh Green Beans
  • A slice of slow cooker apple pie cinnamon roll casserole is topped with whipped cream and icing on a plate, with apples and milk in the background.
    Slow Cooker Apple Pie Cinnamon Roll Casserole
  • A baking dish of cherry cobbler made with an easy cherry pie casserole recipe sits on a white surface, with servings on plates, fresh cherries, and a spoon nearby.
    Easy Cherry Pie Casserole Recipe
See more Casseroles →

Recipe

Tried and loved this recipe? Please leave a 5-star review below! Your reviews mean a lot to me, so if you've got any questions, please let me know in a comment.

A plate of buttermilk chicken thighs and sliced potatoes garnished with fresh parsley. The dish is richly browned and appears to be seasoned with herbs.
Print Recipe
5 from 1 vote

Baked buttermilk chicken & potatoes

This oven baked buttermilk chicken and potatoes is an easy sheet pan meal that makes use of buttermilk to tenderize chicken and flavor potatoes. Make this easy one pan meal and discover how good crispy buttermilk chicken and potatoes can be!
Prep Time15 minutes mins
Cook Time45 minutes mins
Resting Time2 hours hrs
Total Time3 hours hrs
Course: Main
Cuisine: Russian
Keyword: buttermilk chicken and potatoes
Servings: 10
Calories: 164kcal
Author: Ksenia Prints

Ingredients

  • 1 whole chicken cut into parts (thighs, wings, drumsticks, etc.), 1 kilogram (approx)
  • ¼ cup Olive oil 
  • ¼ cup Red wine vinegar
  • ½ cup Soy sauce
  • 1 cup Buttermilk
  • 1 teaspoon Herbes de Provence seasoning
  • 1 teaspoon ground ginder
  • 8 pieces barberries
  • ½ teaspoon black pepper
  • 1 teaspoon salt plus more for potatoes
  • 2 pounds Potatoes of your choice

Instructions

  • Directions
  • Preheat oven to 360F. Prepare a large roasting pan or baking sheet. Pat chicken dry with paper towels.
  • If using large potatoes, cut them into wedges. If using small, new potatoes, wash them and leave whole, or cut into halves.
  • Transfer chicken parts to a large bowl. Add olive oil and mix well. Add vinegar, soy sauce, buttermilk, and seasonings. Cover bowl and transfer buttermilk chicken to the refrigerator to marinade for 2 hours.
  • Transfer chicken to baking sheet or roasting pan. Surround with potatoes. Drizzle potatoes with olive oil and season with salt and pepper, to taste. Pour ¼ cup of the remaining marinade on chicken. Season.
  • Transfer to 360F oven to bake for 45 minutes, basting the chicken as it cooks.

Notes

Tip: If you have more buttermilk or curdled milk, you can also use it to boil the potatoes. You can also cook pasta in buttermilk or curdled milk - just use it the same way you use water.

Nutrition

Calories: 164kcal | Protein: 14g | Fat: 11g | Saturated Fat: 3g | Polyunsaturated Fat: 2g | Monounsaturated Fat: 5g | Trans Fat: 1g | Cholesterol: 57mg | Sodium: 53mg | Potassium: 144mg | Vitamin A: 107IU | Vitamin C: 1mg | Calcium: 8mg | Iron: 1mg

Fried Turkey Tenders Recipe with Turkey Breast Tenderloin 

Try this oven baked turkey tenders recipe for juicy, flavorful boneless turkey tenderloin. Perfect for a quick family dinner, ready in under 40 minutes!

A plate of breaded and fried chicken tenders garnished with parsley on white paper. A small bowl of red dipping sauce is partially visible in the background.

My kids love fried chicken breast tenders, but I try to switch things up every couple of weeks. This baked turkey tenders recipe is a great and healthier alternative to their usual request. These tenders are crispy on the outside and juicy on the inside, with a savory flavor from the Parmesan cheese and a hint of garlic. 

The tenders are made in the oven, which helps achieve a crispy exterior without the need for deep frying. This baking method also means less hands-on time, allowing you to prepare side dishes like an easy homemade corn casserole or help with homework while dinner cooks. It takes about 30 minutes to prepare and cook, with an additional 5 minutes of resting time.

The first time I made these for my kids, just like with my air fryer turkey thighs, they didn't even notice it wasn't their usual chicken tender recipe. They even asked for seconds! It's become a go-to meal in our house when we want something familiar but a bit healthier. With simple ingredients like flour, breadcrumbs, and Parmesan cheese, it's an easy-to-follow recipe that results in a protein-packed and tasty meal that's sure to please even picky eaters.

A plate of breaded chicken strips garnished with parsley sits on a white surface. Nearby, a small bowl of tomato sauce is garnished with parsley. A tray with more chicken strips and a beverage with a lemon slice are in the background.

Ingredient Highlight: Turkey Breast Tenderloin Strips  

A gray plate of raw chicken breast fillets is surrounded by small bowls of flour, breadcrumbs, garlic powder, and grated cheese. An egg, a bottle of olive oil, and a can of cooking spray are also arranged on a marble surface.

Pre-cut turkey breast tenderloin strips is one of those hidden gems in the poultry aisle. This cut comes from a specific muscle just beneath the turkey breast (similar to the chicken tenderloin) and is prized for being especially soft and quick to cook. While it's not the same as the whole turkey breast, it shares the same mild flavor and high protein content.

 A simple blend of garlic salt, Parmesan, and pepper is all you need, but you can easily switch things up with bold spices. For instance, if you love heat, try seasoning it with Cajun spice — like in this Cajun-style baked turkey breast with vegetables, where the flavors come alive with every bite.

Turkey tenderloin isn’t just for breaded recipes either. It’s part of a bigger world of underappreciated turkey cuts that deserve a second look. You can explore beyond the tenderloin with a rich turkey Bolognese made with ground turkey. And if you ever have leftovers — enjoy them the next morning in this Texas French toast casserole with leftover turkey.

Instructions to Cook Turkey Tenderloin Tenders 

A plate with breaded chicken strips garnished with parsley is accompanied by a small bowl of red dipping sauce. The food is placed on a white plate with parchment paper, and the background features a light-colored surface.

Preheat the Oven

Start by preheating your oven to 425°F (218°C). This high temperature will help achieve a crispy exterior on the turkey tenders while keeping the inside juicy.

Prepare the Baking Sheet

A hand sprays cooking oil onto a worn baking sheet with a wire rack on a marble countertop. The canister is white with a black label.

Take a large baking sheet and place a cooling rack on top of it. This setup allows air to circulate the turkey tenders, ensuring even cooking and crispiness. Spray the cooling rack with non-stick cooking spray to prevent the turkey from sticking.

Set Up the Breading Station

Three white bowls on a marble surface: the top contains breadcrumbs, the middle has flour, and the bottom holds whisked eggs.

Prepare three shallow dishes for the breading process:

  • In the first dish, place the flour.
  • In the second dish, pour the egg substitute.
  • In the third dish, combine the panko, Parmesan cheese, garlic salt, and black pepper. Mix these ingredients well.

Bread the Turkey Tenders

A hand is coating a piece of raw chicken in flour. Nearby, there are bowls with bread crumbs and beaten eggs on a marble surface, set up for a breading process.
A hand dips a piece of raw chicken into a bowl of beaten eggs. Nearby are two other bowls: one with flour and another with breadcrumbs. The setup is on a light gray marble surface, likely for preparing breaded chicken.
A person dips a piece of chicken in breadcrumbs. Three bowls are visible on a marble surface: one with breadcrumbs, one with flour, and one with beaten eggs. There is a plate with raw chicken pieces beside them.

Take each turkey breast tender and follow these steps:

  • Dredge it in the flour, shaking off any excess.
  • Dip it in the egg substitute, allowing any excess to drip off.
  • Finally, coat it with the panko mixture, pressing gently to ensure the coating adheres well.

Arrange and Prepare for Baking

Breaded fish sticks arranged on a wire rack over a baking tray. The individual pieces vary in size and shape, covered in a light, crumbly coating, ready for baking. The tray rests on a light marble surface.

Place the breaded turkey tenders onto the prepared cooling rack on the baking sheet. Make sure they're not touching each other to allow for even cooking. Once all the tenders are arranged, lightly spray them with cooking spray or olive oil. This will help them achieve a golden-brown color.

Bake the Turkey Tenders

A hand is spraying oil onto a baking tray filled with breaded fish sticks placed on a wire rack. The tray is positioned on a marble surface.

Put the baking sheet with the turkey tenders into the preheated oven. Bake for 20-25 minutes, depending on the size of your tenders. There's no need to turn them over during cooking, as the cooling rack setup allows for even heat distribution.

Broil for Extra Crispiness

After the initial baking time, switch your oven to broil. Place the turkey tenders under the broiler for 2-3 minutes. This step will give the coating an extra crispy texture.

Serve

A plate of breaded, golden-brown chicken tenders garnished with parsley, placed on white parchment paper. Next to the plate is a small bowl filled with a red dipping sauce, set on a marble surface.

Remove the oven-baked turkey tenders from the oven. Let them rest for a few minutes before serving, alongside my green bean casserole or air fryer asparagus.

Top Tips for Crispy Turkey Tenders Recipe 

  • Ensure even coating - When breading the turkey tenders, use one hand for the dry ingredients (flour and panko mixture) and the other for the wet ingredients (egg substitute). This "wet hand, dry hand" technique prevents the breading from clumping on your fingers and ensures a more even coating on the turkey.
  • Don't overcrowd the pan - Make sure to leave some space between each turkey tender on the baking sheet. Overcrowding can lead to steaming instead of crispy baking.
  • Let them rest - After removing the tenders from the oven, let them rest for about 5 minutes before serving. This allows the juices to redistribute throughout the meat, resulting in juicier tenders.

How to Store Leftover Turkey 

A plate of breaded chicken tenders garnished with parsley is served with a small bowl of red dipping sauce. A baking tray with more tenders is in the background, and a black and white checkered cloth is partially visible beside the plate.

If you have any turkey tenders leftover, allow them to cool to room temperature before transferring to an airtight container. For optimal freshness, refrigerate the tenders for up to 3 days.

If you want to freeze them, place the cooled tenders in a single layer on a baking sheet and freeze until solid, then transfer to freezer-safe bags or containers, removing as much air as possible to prevent freezer burn. Frozen tenders can be stored for up to 2 months.

To reheat, place the tenders on a baking sheet in a preheated 375°F (190°C) oven for about 10-15 minutes, or until heated through and crispy. If reheating from frozen, add an extra 5-10 minutes to the cooking time. You can also use an air fryer for 3-5 minutes at 375°F (190°C) for a quick reheat. Avoid microwaving as it can make the coating soggy. Always ensure the internal temperature of the turkey reaches 165°F (74°C) before serving.

A plate of breaded and baked chicken tenders is garnished with parsley. Beside the tenders is a small bowl of red dipping sauce, also garnished with parsley. A checkered cloth and a baking rack with more tenders are in the background.

Recipe

Tried and loved this recipe? Please leave a 5-star review below! Your reviews mean a lot to me, so if you've got any questions, please let me know in a comment.

A plate featuring crispy baked turkey tenders garnished with parsley on a white paper-lined plate. A bowl of red sauce accompanies the dish, next to a glass of iced beverage with a lemon slice. The scene is set against an elegant marble surface.
Print Recipe
No ratings yet

Oven Baked Turkey Tenders Recipe

Try this easy-baked turkey tenders recipe for juicy, flavorful turkey breast tenderloin. Perfect for a quick family dinner, ready in under 40 minutes!
Prep Time15 minutes mins
Cook Time25 minutes mins
Total Time40 minutes mins
Course: Main Course
Cuisine: American
Keyword: baked turkey tenders
Servings: 4 servings
Calories: 831kcal
Author: Ksenia Prints

Equipment

  • Oven
  • Baking sheet
  • cookie drying rack

Ingredients

  • 1 pound pre-cut turkey breast strips
  • ¼ cup all-purpose flour
  • â…“ cup egg substitute
  • ¾ cup panko Japanese breadcrumbs
  • 2 tablespoons grated Parmesan cheese
  • ¼ teaspoon garlic salt
  • ¼ teaspoon black pepper
  • Olive oil cooking spray
  • Non-stick cooking spray

Instructions

  • Preheat oven to 425°F (218°C).
  • Prepare a large cookie sheet by placing a cooling rack on it. Spray the cooling rack with non-stick cooking spray.
  • Place the flour in a shallow dish, the egg substitute in another dish, and combine the panko, Parmesan cheese, garlic salt, and black pepper in a third dish.
  • Dredge the turkey breast strips in flour, then dip in egg substitute, and finally coat with the panko mixture, pressing gently to adhere the coating.
  • Place the breaded turkey strips onto the prepared cooling rack on the cookie sheet.
  • Lightly spray the turkey tenders with olive oil cooking spray.
  • Bake in the preheated oven for 20 minutes. (No need to turn them over during cooking.)
  • After 20 minutes, place the turkey tenders under the broiler for 3 minutes to get an extra crispy coating.
  • Serve hot with dipping sauce.

Nutrition

Calories: 831kcal | Carbohydrates: 59g | Protein: 118g | Fat: 13g | Saturated Fat: 3g | Polyunsaturated Fat: 3g | Monounsaturated Fat: 4g | Trans Fat: 0.1g | Cholesterol: 254mg | Sodium: 2180mg | Potassium: 1415mg | Fiber: 3g | Sugar: 5g | Vitamin A: 360IU | Vitamin C: 0.4mg | Calcium: 300mg | Iron: 8mg

Keeping Family Traditions Alive with My Recipe for Carrot Casserole

Indulge in this easy recipe for carrot casserole recipe featuring tender carrots, sugar, nutmeg, and cinnamon for the Thanksgiving side dish or dessert!

A person slices a baked dessert, reminiscent of a carrot casserole, in a rectangular pan on a marble surface. The orange treat is dusted with sugar. A plated piece with a fork sits on the left, surrounded by cinnamon sticks and a red cloth.

I remember watching my grandmother in her kitchen, a small space always filled with the scent of cinnamon and sweet-cooked carrots. She would pull out her old, worn cookbook and start preparing what she called her carrot kugel.

I watched in awe as she hand-grated garden carrots, carefully stirring them into a mixture of simple yet rich ingredients. Her kitchen felt like the heart of the home—every holiday, every gathering, this creamy carrot casserole was at the center of the table.

It wasn’t just a dessert; it was a part of the family, a recipe we always looked forward to, especially around the Jewish New Year or Thanksgiving. There was something so comforting in the way she prepared it—with a touch of sweetness that was never too much.

It's the perfect dish to tie off Thanksgiving dinner after a hearty bowl of chicken and date casserole or a delicious slow cooker chicken marinara.

Over time, I’ve taken that tried and true dish and made it my own. Despite the small changes, it still carries the essence of my grandmother’s kitchen, and each time I make it, I’m reminded of the generations of love that went into every slice.

And now, I even serve it for Easter sometimes, tell my kids it's carrot pudding, and no one is the wiser.

A slice of pumpkin pudding topped with whipped cream sits elegantly on a decorative plate, accompanied by a fork. Nearby, a black baking dish cradles additional pudding on the marble surface—a scene that inspires thoughts of trying out a recipe for carrot casserole next.

This baked carrot casserole has become a holiday favorite in my home, especially for our Thanksgiving dinner. There’s something timeless about bringing it to the table, especially knowing that I’m keeping my grandmother’s tradition alive and passing it on to my children.

These moments—when food brings people together—remind me why family recipes like this matter so much. They’re more than just meals; they’re memories revived and savored with every bite.

Carrot Casserole Ingredients

Baking ingredients for a savory carrot casserole are artfully arranged on a marble surface, featuring flour, brown sugar, eggs, butter, and fresh carrots. Accompanying flavors include orange zest, cinnamon sticks, cloves, nutmeg, and small bowls of salt, baking powder, and vanilla extract.
  • Carrots: Freshly peeled and grated, providing a sweet and earthy base for the casserole.
  • Eggs: These help bind the ingredients together, giving the casserole a firm yet soft texture.
  • Unsalted butter: Melted for a rich, buttery flavor that enhances the sweetness of the carrots.
  • Brown sugar: Adds a touch of sweetness, balancing the earthiness of the carrots with just the right amount of warmth.
  • Gluten-free flour or potato starch: Helps to thicken the casserole while keeping it light and tender. You can use a mix of almond flour for a nuttier taste.
  • Baking powder: Ensures a light and fluffy texture by helping the casserole rise as it bakes.
  • Vanilla extract: Adds a hint of sweetness and depth to the flavor profile.
  • Cinnamon and Nutmeg: These spices add warmth and complexity to the dish, bringing out the natural sweetness of the sliced carrots.
  • Salt: Enhances all the other flavors without overpowering them.
  • Orange zest: Brightens the dish with a refreshing citrus note.

See the recipe card for exact quantities.

Directions to Make Carrot Casserole Recipe

Prepare the Baking Dish

A hand holds a can and sprays cooking oil onto a dark, rectangular baking pan on a white marble surface, preparing it as the first step in the recipe for carrot casserole.

Preheat your oven to 350°F to make this recipe and grease a 9x13-inch baking dish to prevent the casserole from sticking. This will ensure an even bake and make it easy to serve later.

Mix the Wet Ingredients

A person is preparing a recipe for carrot casserole, skillfully mixing ingredients in a metal bowl with a wooden spoon. The bowl holds shredded carrots, eggs, and brown sugar. The mixture is partially combined, set against the backdrop of a light-colored countertop.

In a large bowl, combine the grated carrots, eggs, melted butter, and brown sugar. Stir until all the ingredients are fully mixed, and the carrots are evenly coated with the wet mixture. The butter adds richness, while the sugar brings a delicate sweetness.

Combine the Dry Ingredients

A hand is pouring spices from a small blue bowl into a larger metal mixing bowl containing flour, creating the perfect blend for a delicious carrot casserole recipe. The mixing bowl rests elegantly on a white marble surface.

In a separate bowl, whisk together the gluten-free flour (or potato starch), baking powder, cinnamon, nutmeg, and salt. Slowly fold this dry mixture into the wet carrot mixture, stirring until combined. Be sure to avoid overmixing—just enough to incorporate everything.

Add Flavor

Hands are mixing ingredients in a metal bowl using a wooden spoon, crafting a delightful recipe for carrot casserole. The mixture contains shredded orange vegetables, possibly carrots or sweet potatoes, and a powdery flour substance. The scene is set against a marble surface backdrop.
A person is mixing ingredients in a large metal bowl with a wooden spoon, following a recipe for carrot casserole. The mixture features shredded orange vegetables, likely carrots, combined with flour. The bowl rests on a white marble surface, awaiting the next step in the flavorful creation.

Once the mixture is smooth, stir in the vanilla extract and the orange zest. These ingredients elevate the flavor of the casserole, adding a refreshing brightness that pairs perfectly with the cooked carrots.

Bake the Casserole

A baking tray filled with shredded sweet potato mixture, reminiscent of a recipe for carrot casserole, sits on a marble countertop. A hand holding a wooden spoon spreads the mixture evenly across the tray.

Pour the carrot batter into the prepared baking dish, smoothing the top with a spatula. Place it in the preheated oven and bake for 45-50 minutes, or until the top is golden brown and the center is set. A toothpick inserted in the center should come out clean.

Serve Casserole

A baking dish holds a delectable dessert, resembling a recipe for carrot casserole, partially cut into squares. One square is carefully lifted onto a decorative plate. Cinnamon sticks and whole nutmegs adorn the white marble surface, with a hint of red cloth peeking through.

Once it’s ready, allow the casserole to cool for about 10 minutes before slicing and serving.

Top Tips for A Delicious Carrot Casserole

Fresh Carrots: Use fresh garden carrots for the best flavor and texture. You can substitute with canned carrots if needed, but fresh always brings out the natural sweetness more effectively.

Texture: Grate the carrots finely for a smoother casserole. Opt for thicker grating or even sliced carrots for a more rustic dish.

Storage for Making Casserole Ahead of Time

A baking tray filled with sliced pumpkin bars, dusted with powdered sugar. One piece is served on a decorative plate next to a fork. A rusty spatula rests in the tray, echoing the rustic charm of your favorite recipe for carrot casserole. Cinnamon sticks and nutmeg are scattered on the marble surface.

Store any leftovers in an airtight container in the refrigerator for up to 4 days. Simply reheat in the microwave or oven before serving.

My recipe for carrot casserole freezes well. After baking, let it cool completely, then wrap tightly in foil and freeze for up to 2 months. Thaw overnight in the fridge and bake at 350°F until heated through.

Accompanying Dishes and Other Casseroles:

A delightful slice of carrot cake with a dollop of whipped cream graces a decorative black and white plate. A fork rests invitingly on the cake while a white and blue cup peeks from the background, almost like the perfect ending to a recipe for an unforgettable carrot casserole.

For a full Thanksgiving spread to go with this dessert, I love making these puff pastry pumpkin pockets or eggplant parmesan stacks for a light appetizer. For drink options, my new favorite is surprising my guests with a pumpkin pie martini mocktail or a chai white Russian mocktail. Both warm the body and complement the Thanksgiving flavors.

For a full meal, I love serving a hearty casserole as my main course. Maybe a cheesy cabbage casserole or eggplant casserole for a veggie-centric dinner or a buttermilk chicken and potato casserole for meat lovers.

Recipe

Tried and loved this recipe? Please leave a 5-star review below! Your reviews mean a lot to me, so if you've got any questions, please let me know in a comment.

A rectangular baking dish filled with sliced pumpkin bread pudding, dusted with powdered sugar, evokes comforting flavors reminiscent of a recipe for carrot casserole. A serving spatula rests on top, with one piece on a patterned white plate nearby. Two cinnamon sticks adorn the marble surface.
Print Recipe
No ratings yet

My Grandmother's Recipe for Carrot Casserole

This gluten-free carrot dessert cassrole dish is my grandmother's carrot kugel recipe, made with cinnamon, egg, nutmeg and gluten-free flour.
Prep Time10 minutes mins
Cook Time50 minutes mins
Cooling Time10 minutes mins
Total Time1 hour hr 10 minutes mins
Course: Dessert, Side Dish
Cuisine: Jewish
Keyword: Carrot Casserole Recipe
Servings: 10
Calories: 370kcal
Author: Ksenia Prints

Equipment

  • 9x13 inch Baking Dish
  • Grater
  • Mixing bowls
  • Spatula

Ingredients

  • 2 ½ lbs carrots peeled and grated
  • 6 large eggs
  • 1 cup 2 sticks unsalted butter melted
  • ¾ cup brown sugar
  • ¾ cup gluten-free flour or potato starch, or a mix of ½ cup gluten-free flour and ⅓ cup almond flour
  • 2 teaspoons baking powder
  • 2 teaspoons vanilla extract
  • 1 teaspoons ground cinnamon
  • ½ teaspoons ground nutmeg
  • ¼ teaspoons salt
  • Zest of 1 orange

Instructions

  • Preheat oven to 350°F. Grease a 9x13-inch baking dish.
  • Combine grated carrots, eggs, melted butter, and brown sugar in a large bowl.
  • In a separate bowl, mix flour, baking powder, cinnamon, nutmeg, and salt.
  • Fold dry ingredients into carrot mixture. Add vanilla and orange zest.
  • Pour batter into prepared dish, smoothing the top.
  • Bake for 45-50 minutes until golden and set in the center.
  • Cool for 10 minutes before serving.
  • Optional: Dust with powdered sugar or serve with crème fraîche.

Nutrition

Calories: 370kcal | Carbohydrates: 39g | Protein: 8g | Fat: 22g | Saturated Fat: 13g | Polyunsaturated Fat: 2g | Monounsaturated Fat: 6g | Trans Fat: 1g | Cholesterol: 147mg | Sodium: 241mg | Potassium: 307mg | Fiber: 6g | Sugar: 17g | Vitamin A: 6469IU | Vitamin C: 12mg | Calcium: 118mg | Iron: 2mg

Copycat Ruth Chris Sweet Potato Casserole with Hazelnuts

Enjoy this sweet potato casserole topped with toasted hazelnuts. It's my Copycat Ruth Christ sweet potato casserole! This easy, flavorful side dish is perfect for Thanksgiving and will be a hit with family and friends!

A square slice of crumbly dessert with a dollop of whipped cream sits on a black plate with a fork. In the background, a baking dish of the same dessert has a serving missing. The scene is set on a white marble surface.

Sweet potatoes have always been a staple in my pantry. Their naturally sweet flavor is a favorite with my kids, and I love that they can be prepared in so many different ways. I can make them even sweeter or turn them into something savory. I crave them every once in a while and even enjoy them just boiled... they're that good! It's one of my favorite casserole recipes, alongside this savory French toast casserole and ground beef zucchini casserole.

I love making this recipe as a side dish for Thanksgiving, but sometimes I make this as my afternoon snack, especially when I'm craving sweet potatoes and I can't get it out of my head. It takes a little over an hour to make but it's very much worth it. It's satisfying when you feel the smoothness and the hazelnut crunch in every bite.

A slice of crumbly dessert topped with a dollop of whipped cream is served on a black plate. A fork is placed on the dessert. A baking dish and a gray cloth are visible in the background.

Your kids will surely love this as well; they wouldn't even notice that they're eating a vegetable dish if they have it paired with chicken (I've tested this many times; take my word for it). If you want to prepare an easy, hearty dish for your family, this sweet potato casserole with hazelnuts is a recipe you'll love!

Instructions to Make Your Own Copycat Ruth Chris Sweet Potato Casserole

Preheat the Oven

Begin by preheating your oven to 375°F (190°C). This step is important as it ensures that your casserole cooks evenly and thoroughly once it is placed in the oven.

Prepare the Sweet Potatoes

Next, take your sweet potatoes and peel them using a vegetable peeler. Once peeled, cut the sweet potatoes into small, even cubes. This will help them cook uniformly. Place the cubed sweet potatoes in a large pot and cover them with water. Bring the water to a boil over medium-high heat. Allow the sweet potatoes to boil for about 15 minutes, or until they are tender enough to be easily pierced with a fork.

Mash the Sweet Potatoes

A person is mixing an orange batter in a white bowl using a whisk. One hand holds the bowl steady, while the other hand grips the whisk. The bowl is on a white marble countertop. A metal bowl with a cracked egg is partially visible in the bottom right corner.

Once the sweet potatoes are tender, carefully drain them using a colander to remove the hot water. Return the drained sweet potatoes to the pot or transfer them to a mixing bowl. Use a potato masher or a fork to mash the sweet potatoes until they are smooth and creamy. This will be the base of your casserole.

Combine the Ingredients

In the bowl with the mashed sweet potatoes, add the sugar, milk, egg, melted butter, vanilla extract, and salt. Using a whisk or a spoon, mix all the ingredients together until they are well combined and the mixture is smooth. Make sure there are no lumps, as a creamy texture will enhance the overall dish.

Prepare the Baking Dish

A person spreads mashed sweet potatoes into a square baking dish with a spatula. A large mixing bowl with remnants of the potatoes is visible in the background on a marble countertop.

Take a 9x13-inch baking dish and lightly grease it with cooking spray or a small amount of butter. This will prevent the casserole from sticking to the dish. Once greased, spread the sweet potato mixture evenly in the bottom of the baking dish. Use a spatula to smooth the top, making sure it is level.

Prepare the Topping

A baking scene with a square metal pan containing mashed sweet potatoes on a marble surface. A wooden spoon rests on the pan. Below, a hand stirs a white bowl filled with chopped nuts and dry ingredients using another wooden spoon.

In a separate bowl, combine the brown sugar, flour, melted butter, and chopped hazelnuts. Stir these ingredients together until they form a crumbly mixture. The hazelnuts will add a delightful crunch and nutty flavor to the topping, while the brown sugar will provide sweetness.

Add the Topping

A person’s hands holding a metal baking dish containing a baked dessert topped with crumbled nuts and oats. A wooden spoon rests in the dish. The dish is placed on a marble surface.

Evenly sprinkle the topping mixture over the sweet potato layer in the baking dish. Make sure to cover the sweet potato mixture completely for an even crispy texture. This will create a delicious contrast to the creamy sweet potatoes underneath.

Bake the Casserole

A square pan filled with a crumb-topped dessert sits on a marble surface. One piece is removed and placed on a black plate nearby. A fork rests on the plate, and a gray cloth and an orange item are partially visible.

Place the baking dish in the preheated oven. Bake for 25-30 minutes, or until the topping is golden brown and crispy. Keep an eye on it during the last few minutes of baking to prevent over-browning.

Serve the Casserole

A metal baking dish containing a partially eaten pumpkin dessert with a crumb topping sits on a marble surface. A square piece is on a black plate with a dollop of whipped cream. A black fork and a gray cloth napkin are nearby.

Once baked, remove the casserole from the oven and let it cool for a few minutes. This will help the flavors settle and make it easier to serve. Use a spatula to cut the casserole into squares or scoop it into individual portions. Serve hot as a delicious side dish that pairs well with a variety of main courses. Enjoy your casserole!

Storage

A dark plate holds a square piece of crumb-topped dessert with a dollop of whipped cream. A fork rests on the plate, with one portion of the dessert partly eaten. The plate is set on a white marble surface.

To store sweet potato casserole with hazelnuts, allow the dish to cool to room temperature before transferring it to an airtight container. For optimal freshness, refrigerate the casserole for up to 3 days. If you want to freeze it, portion the casserole into freezer-safe containers, removing as much air as possible to prevent freezer burn. To reheat, place the casserole in the oven at 350°F (175°C) for about 25-30 minutes, or until heated through. You can also use a microwave, heating in 1-minute intervals until warm. If the casserole is frozen, it’s best to thaw it in the refrigerator overnight before reheating. Enjoy your leftovers!

Top Tips

Choose the right sweet potatoes: Select firm and smooth sweet potatoes for the best flavor and texture. Look for those that are free of blemishes or soft spots. If possible, use orange-fleshed sweet potatoes, as they tend to be sweeter and creamier, making for a richer casserole.

Customize the topping: Feel free to customize the topping to suit your taste. You can mix in other nuts, such as pecans or walnuts, for added flavor and texture. Additionally, consider adding a pinch of cinnamon or nutmeg to the topping for a warm spice that complements the sweetness of the sweet potatoes.

Make ahead of time: This casserole can be prepared ahead of time, making it a convenient option for busy days or holiday gatherings. You can assemble the sweet potato mixture and spread it in the baking dish, then cover and refrigerate it for up to 24 hours before baking. Just add the topping right before you bake it to keep it fresh and crispy.

What to Serve with Sweet Potato Casserole with Hazelnuts

A slice of crumble dessert topped with a dollop of cream is on a black plate. A fork rests on the plate, and a baking dish with more crumble is partially visible in the background on a marble surface.

This sweet potato casserole with hazelnuts goes so well with chicken or turkey, especially my air fryer BBQ chicken drumsticks, crispy easy air fryer chicken wings with Italian seasoning, and even the Cajun style baked turkey breast with vegetables as additional vegetables! 

Recipe

Tried and loved this recipe? Please leave a 5-star review below! Your reviews mean a lot to me, so if you've got any questions, please let me know in a comment.

A baking pan with sliced pumpkin coffee cake topped with crumbly streusel evokes cozy autumn vibes. A piece is served on a black plate with a dollop of cream, reminiscent of sweet potato casserole with hazelnuts. A spoon rests in the pan, and a fork lies beside the plate on a marble surface.
Print Recipe
5 from 1 vote

Sweet Potato Casserole with Hazelnuts

Enjoy this sweet potato casserole topped with toasted hazelnuts. This easy, flavorful side dish is perfect for gatherings and will be a hit with family and friends!
Prep Time15 minutes mins
Cook Time30 minutes mins
Total Time45 minutes mins
Course: Side Dish
Cuisine: American
Keyword: sweet potato casserole
Servings: 9 servings
Calories: 364kcal
Author: Ksenia Prints

Equipment

  • Oven
  • 9 x 9 baking pan

Ingredients

  • 2 large sweet potatoes
  • ¼ cup sugar
  • ¼ cup milk
  • 1 egg
  • ¼ cup butter melted
  • 1 teaspoon vanilla extract
  • ¼ teaspoon salt
  • 1 cup hazelnuts
  • 1 cup brown sugar
  • â…“ cup flour
  • â…“ cup butter melted
  • 1 cup chopped pecans

Instructions

  • Preheat oven to 375°F (190°C).
  • Peel and cube sweet potatoes. Boil until tender, about 15 minutes.
  • Drain and mash sweet potatoes.
  • Mix mashed potatoes with sugar, milk, egg, melted butter, vanilla, and salt.
  • Spread mixture in a 9x13 inch baking dish.
  • In a separate bowl, mix brown sugar, flour, melted butter, and hazelnuts for topping.
  • Sprinkle topping evenly over sweet potato mixture.
  • Bake for 25-30 minutes until topping is crispy.
  • Serve hot.

Video

Nutrition

Calories: 364kcal | Carbohydrates: 48g | Protein: 6g | Fat: 18g | Saturated Fat: 2g | Polyunsaturated Fat: 4g | Monounsaturated Fat: 11g | Trans Fat: 0.002g | Cholesterol: 21mg | Sodium: 125mg | Potassium: 386mg | Fiber: 4g | Sugar: 34g | Vitamin A: 7198IU | Vitamin C: 2mg | Calcium: 89mg | Iron: 2mg

Creamy Vegan Pasta Bake

Try this creamy vegan pasta bake, featuring a rich green goddess alfredo sauce and hearty vegetables. A perfect springtime dinner the family will love!

A bowl of salad with grilled mushrooms, zucchini, and greens, garnished with herbs. Nearby are cashews and whole mushrooms on rustic gray fabric. Purple flowers and a leafy branch add a decorative touch reminiscent of a vegan pasta bake. A spoon rests beside the bowl.

As spring unfolds, bringing with it fresh air and the season’s first harvests, there's nothing quite like a vegan pasta bake to welcome this time of renewal. This plant-based dish captures the best of comfort food while showcasing the light, fresh flavors of spring.

I love making this dish for family meals in the spring. It’s hearty yet healthy, making it a great choice for weeknight dinners. This vegan pasta recipe is designed to be both easy to make and full of flavor, without compromising on nutrition.

The inspiration for this casserole dish came during a difficult time—during the early days of the COVID pandemic when everyone was looking for ways to stay connected. Cooking became my way of bringing hope into our home, and this vegan pasta bake was a favorite. We made it with my parents over Zoom, and shared a family meal that felt like we were in the same room.

And it doesn't get much better than this pasta for feeling connected. It's comforting, flavorful, and filled with nutrient-dense vegetables like asparagus and mushrooms, but you could also make it with spinach, zucchini, and red pepper.

With simple ingredients and minimal prep, it's an easy vegan pasta bake that doesn't skimp on taste. This baked pasta casserole represents new beginnings—celebrating the freshness of spring and the warmth of home cooking.

Ingredients for Creamy Vegan Pasta Bake

A rustic arrangement featuring a white bowl of mushrooms, a small bowl of cashews, and the key ingredients for a delectable vegan pasta bake: a jar of yellow pasta, asparagus spears, and lilac flowers. All set on a wooden surface with textured fabric underneath.

For green Alfredo sauce:

  • Cashews - Creates a creamy base for the sauce. Can substitute with soaked sunflower seeds or blanched almonds for a nut-free option. We will need to soak these for at least an hour to make them work for the sauce, so set aside time for this!
  • Garlic - Adds depth and savory flavor. Can substitute with garlic powder or roasted garlic for a milder taste.
  • Lemon juice - Provides acidity and brightness. Can substitute with apple cider vinegar or white wine vinegar.
  • Vegetable broth or water - Helps thin the sauce to desired consistency. Can use any plant-based milk for a richer sauce.
  • Fresh basil leaves - Adds fresh, herbal flavor. Can substitute with spinach, parsley, or a mix of herbs like oregano and thyme.
  • Nutritional yeast - Provides a cheesy, nutty flavor and adds B-vitamins. Can substitute with miso paste or vegan cheese for similar umami flavor.
  • Onion powder - Adds savory flavor. Can substitute with finely minced fresh onion or shallots.

Vegan pasta primavera:

  • Mushrooms - Adds meaty texture and umami flavor. Can substitute with eggplant or zucchini for a different texture.
  • Asparagus - Provides crunch and fresh flavor. Can substitute with broccoli, green beans, or snap peas.
  • Pasta - The base of the dish. Use any shape you prefer, gluten-free or regular.
  • Pickle juice - Adds tanginess. Can substitute with additional lemon juice or a splash of vinegar.

For pasta bake:

  • Vegan cheese - Adds melty, cheesy texture. Can substitute with homemade cashew cheese or omit if preferred.
  • Nutritional yeast - Enhances cheesy flavor. Can increase amount if omitting vegan cheese.
  • Fresh oregano - Adds aromatic herb flavor. Can substitute with dried oregano or other fresh herbs like thyme or basil.

See recipe card for exact quantities.

Directions to Make Vegan Pasta Recipe

Prepare the Vegetables

A bowl of cashews graces the foreground, set before a larger bowl filled with brown mushrooms. Purple flowers are sprinkled across the wooden surface, creating a picturesque setting that hints at ingredients perfect for a vegan pasta bake.

Begin by sautéing the mushrooms in a pan until they're nicely browned. In the last 3 minutes of cooking, add the pickle juice to the mushrooms. This will enhance their woodsy flavor. Next, bring a large pot of water to a boil and add a little salt. Cook the asparagus in the boiling water for 5 minutes. It should still have some bite to it when done. Remove the asparagus and immediately place it in an ice bath to stop the cooking process.

Cook the Pasta

While the vegetables cook, bring a large pot of salted water to a boil and cook the pasta according to package instructions until al dente. Drain and set aside. Make sure to stir occasionally to prevent the pasta from sticking together.

Prepare the Green Alfredo Sauce

A bright spread of fresh, whole mushrooms complements a vegan pasta bake, rich with greens, and two small bowls of pasta. A hand reaches with a fork towards one bowl. Purple and white flowers gracefully adorn the setting.

Start by draining and rinsing the soaked cashews. Turn on your food processor and drop in the garlic cloves, processing until they're chopped. Then, add the remaining sauce ingredients to the food processor. Process everything until smooth, making sure to stop occasionally to scrape down the sides of the bowl as needed.

Assemble the Vegan Pasta Bake

n an oven-safe dish, combine the cooked pasta, sautéed mushrooms, blanched asparagus, and the green Alfredo sauce you prepared earlier. Mix everything together well to ensure all ingredients are evenly distributed. Stir in some vegan mozzarella and nutritional yeast for extra richness. Transfer the mixture into a baking dish and spread it out evenly.

Bake the Pasta

A table setting features a vegan pasta bake, creamy and garnished with mushrooms, served in a white oval dish. Two smaller black bowls also hold the dish. Surrounding the scene are raw mushrooms, leafy greens, purple flowers, and a draped gray cloth.

Top the pasta mixture with more vegan cheese (such as shredded vegan mozzarella) and cover the baking dish with aluminum foil. Bake in the preheated oven for 20 minutes. Remove the foil and bake for an additional 10 minutes, or until the cheese on top is golden and bubbly.

Storage for Easy Vegan Pasta Bake

To store, cover the pasta bake with aluminum foil or transfer leftovers to an airtight container. This vegan pasta bake keeps well in the fridge for up to 3 days. Reheat in the oven or microwave until warmed through, and enjoy another comforting, plant-based meal.

Top Tips

For the perfect texture, slightly undercook the pasta before baking. It will finish cooking in the oven, preventing it from becoming too soft.

If you like a creamier texture, blend some vegan alfredo sauce or vegan butter into the pasta mixture before baking.

Let the bake rest for a few minutes after cooking time before serving, allowing the flavors to meld together.

Variations

A white bowl filled with a salad of roasted mushrooms, diced potatoes, and green beans, garnished with a sprig of herbs, creates the perfect pair for a vegan pasta bake. Scattered cashews surround it alongside a spoon and rustic fabric on a wooden surface.
  • Gluten-free: Swap out the regular pasta for gluten-free pasta to make this dish suitable for all dietary needs.
  • Different vegetables: Substitute kale or asparagus for the spinach and zucchini to mix up the flavors.
  • Cheesier option: Add more vegan mozzarella cheese or vegan parmesan for extra cheesy goodness.

Accompanying Dishes for Your Vegan Pasta Bake Recipe

This vegan pasta bake is a complete meal on its own, but it pairs beautifully with a simple asparagus dish and a zesty lemon vinaigrette. Serve it alongside some sourdough rosemary bread or cornbread for a cozy, homestyle feel. If you're in the mood for a refreshing drink, try a homemade lemonade or a light, fruity pina colada mocktail to complement the dish’s bright flavors.

There's something comforting about a vegan pasta bake that fills the belly and the heart. It’s simple, flavorful, and perfect for celebrating the freshness of spring. For similar comfort food pasta dishes, try my slow cooker chicken marinara. Also, consider trying my cheesy cabbage casserole, moussaka recipe, and buttermilk chicken and potato dishes. You won't regret it!

So whether you're cooking for a quiet family night or sharing it with friends, I know you'll love this recipe as much as I do.

Recipe

Tried and loved this recipe? Please leave a 5-star review below! Your reviews mean a lot to me, so if you've got any questions, please let me know in a comment.

A hand holding a fork leans over a bowl of pasta with creamy sauce and mushrooms, reminiscent of a comforting vegan pasta bake. Surrounding the bowl are fresh mushrooms, small dishes with more pasta, and lilac flowers adding a touch of elegance.
Print Recipe
No ratings yet

The Perfect Springtime Vegan Pasta Bake

Welcome the freshness of spring with a vegan pasta bake that embodies comfort food and healthy homecooking. This easy-to-make dish combines nutrient-rich vegetables and plant-based cheeses for a hearty meal that celebrates new beginnings. Inspired by the need for connection during challenging times, this pasta bake is perfect for family gatherings or cozy weeknight dinners. Join me in savoring this delightful pasta casserole, packed with flavor and nostalgia, as we embrace the hope that spring brings!
Prep Time30 minutes mins
Cook Time40 minutes mins
Total Time1 hour hr 10 minutes mins
Course: Main Course, main dish, Pasta
Cuisine: Eastern European, gluten-free, Passover, vegan
Keyword: Vegan Pasta Bake
Servings: 8
Author: Ksenia Prints

Ingredients

For green Alfredo sauce:

  • 1 cup raw cashews  soaked in water for at least 30 mins or more
  • 2 garlic cloves peeled
  • ¼ cup fresh lemon juice
  • 1 tablespoon fresh lemon juice
  • ¼ cup vegetable broth or water  or more as needed
  • 1.5 cups fresh basil leaves or other herbs you love  lightly packed
  • ½ cup nutritional yeast nutritional yeast
  • ¾-1 teaspoon kosher salt  or to taste + freshly ground black pepper
  • ½ teaspoon onion powder optional

For vegan pasta primavera:

  • 2 lb mushrooms
  • 1 bunch asparagus 1 bunch asparagus cut
  • 1 package gluten-free or regular pasta
  • 3 tablespoons pickle juice optional

For vegan pasta primavera bake:

  • ½ cup vegan cheese grated
  • 2 tablespoons nutritional yeast
  • handful fresh oregano

Instructions

  • To prepare sauce, drain and rinse soaked cashews. With the food processor turned on, drop in your garlic cloves and process until chopped. Add in the rest of the ingredients and process until smooth, scraping down the bowl as needed.
  • Sautée mushrooms until browned. In the last 3 minutes, add the pickle juice - it’ll accentuate the mushrooms’ woodsy flavour!
  • Bring a large pot of water to a boil. Salt gently. Cook asparagus for 5 minutes, until it retains some of its bite. Remove asparagus from water and place into an ice bath immediately.
  • Add salt, and boil pasta in same pot according to package instructions (5-8 minutes, depending on the type of pasta you’re using). Remove from water and drain.
  • Preheat oven to 350°F. In an oven-safe dish combine pasta, mushrooms, asparagus and sauce. Sprinkle with grated vegan cheese and nutritional yeast.
  • Bake in oven for 25 minutes, or until bubbly and heated through.
« Previous Page
Next Page »
Woman smelling food on stove

Hello! I am Ksenia, a cook and blogger passionate about comfort food that warms the heart.

More about me →

Footer

↑ back to top

About

  • About me
  • Privacy Policy

Newsletter

  • Sign Up! for emails and updates

Contact

  • Contact
  • Services
  • FAQ

As an Amazon Associate I earn from qualifying purchases.

This site is owned and operated by Prints Media. Copyright © 2025 Thermocookery. All rights reserved.

Rate This Recipe

Your vote:


A rating is required
A name is required
An email is required